Reliably collect customer input across multiple turns, then create a Salesforce record. Ensure that the agent collects all required information before creating the record. This example ensures the agent:
Creates a record only after collecting all the required information.
Reliably stores all provided information, even after multiple turns.
Creates only one (not multiple) record per conversation.
Confirms that a record creation actually happened.
The Problem
A common agent pattern is to collect a lot of information from a customer, ask clarifying questions, verify the information is correct, and then create a Salesforce record. During multiple turns and long conversations, some agents can drop captured values, re-ask for information they already have, create half-filled records, or falsely confirm a record creation.
The Solution
One solution is to create two subagents. (One subagent)[#add-the-lead-gather-subagent] gathers customer information and stores the information in variables. The subagent’s after_reasoning block checks whether all variables have values - if so, it runs the action to create the record. If the record ID is returned (indicating the record was created), the after_reasoning block transitions to a second subagent, which reports the record creation to the customer.
Create a Flow to Create the Lead Record from Fields
Create a flow that creates a lead record with the customer-provided fields.
Step 1 - Create the Autolaunched Flow
From the app launcher, enter flows, and then select Flows.
Click New Flow.
Select the Autolaunched category, and then select Autolaunched Flow (No Trigger).
Step 2 - Create the Flow Variables
Expand the toolbox (button on the far left). Using the New Resource button, create six variables defined as follows. Match the API names exactly — they map to the agent action’s inputs and outputs.
Resource Type
API Name
Data Type
Available for input
Available for output
Variable
Company
Text
select
don’t select
Variable
Email
Text
select
don’t select
Variable
FirstName
Text
select
don’t select
Variable
LastName
Text
select
don’t select
Variable
Phone
Text
select
don’t select
Variable
leadRecordId
Text
don’t select
select
Click Save. Name the flow Create Lead by Field and ensure the flow’s API name is Create_Lead_by_Field.
We use this flow name later in the agent script. It needs to match, otherwise you’ll have to edit your script by hand.
Important
Step 3 - Get Existing Lead
Before creating a new lead record, we’ll use the provided email and company name to see if that lead record exists.
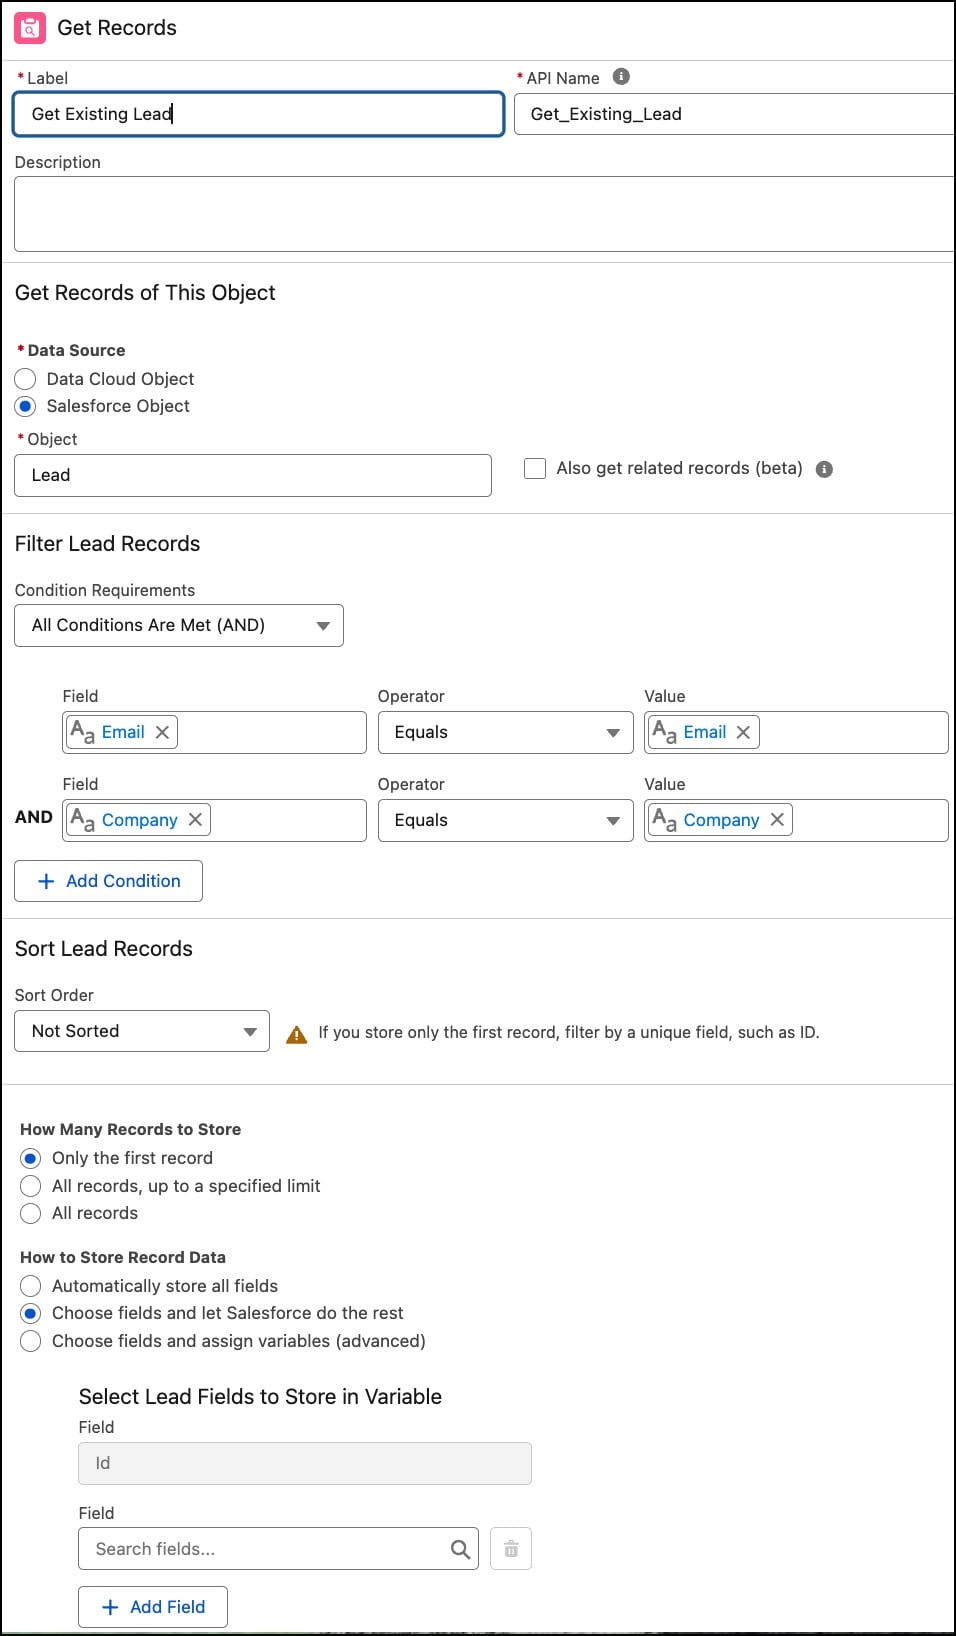
Add a Get Records Element.
For the label, enter Get Existing Lead.
For the object, select Lead.
Under Filter Lead Records, select All Conditions Are Met (AND), then enter these values:
Field
Operator
Value
Email
Equals
Email
Company
Equals
Company
Under Sort Lead Records, for Sort Order, select Not Sorted.
Under How Many Records to Store, select Only the first record.
Under How to Store Record Data, select Choose fields and let Salesforce do the rest.
Under Select Lead Fields to Store in Variable, leave the first Field set to Id. You don’t need to add additional fields — the flow only uses the lead Id to detect an existing record.
Step 4 - Check Whether the Lead Exists
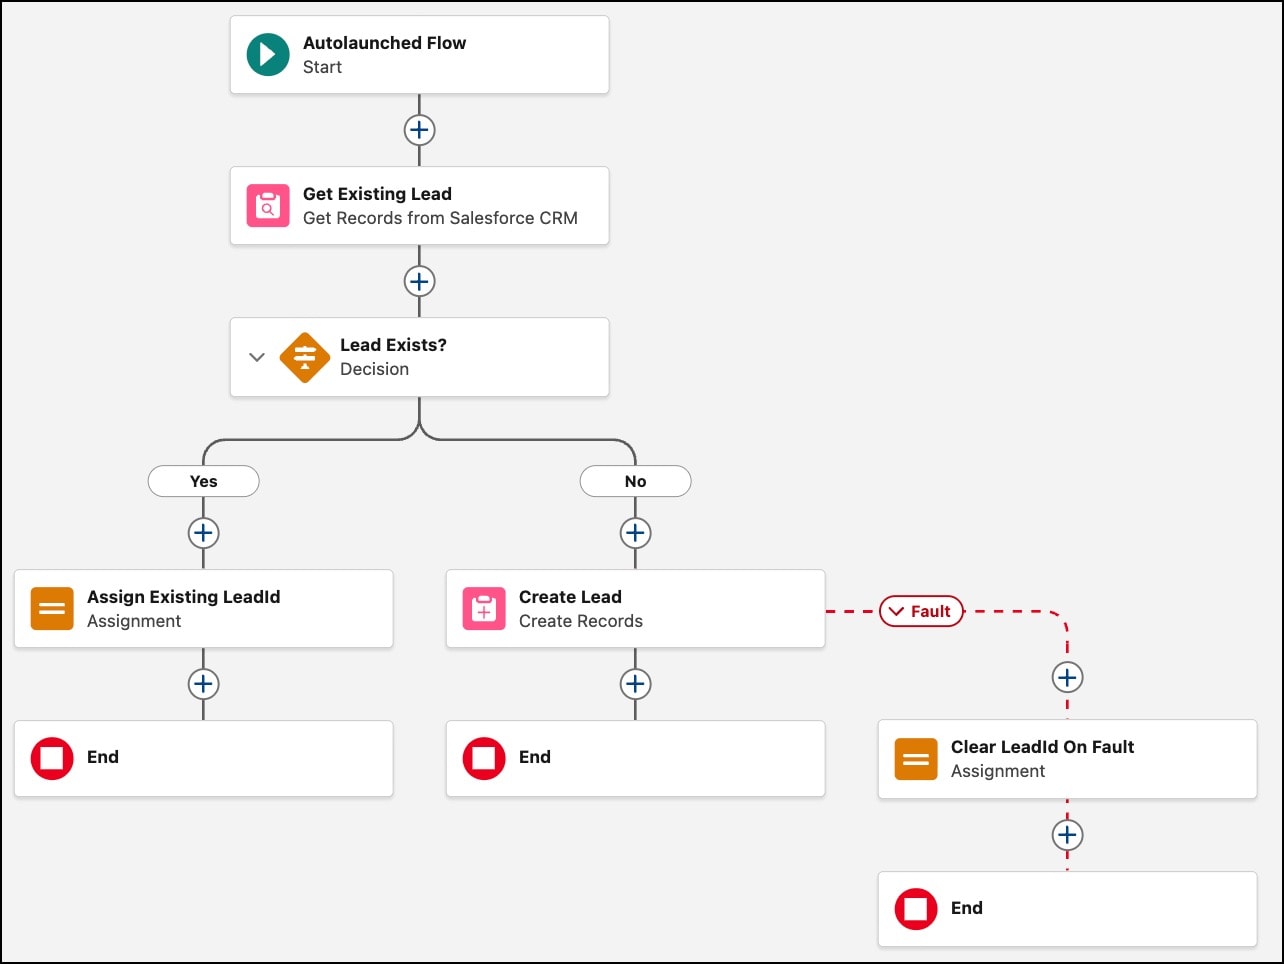
Branch the flow based on whether Get Existing Lead returned a matching lead.
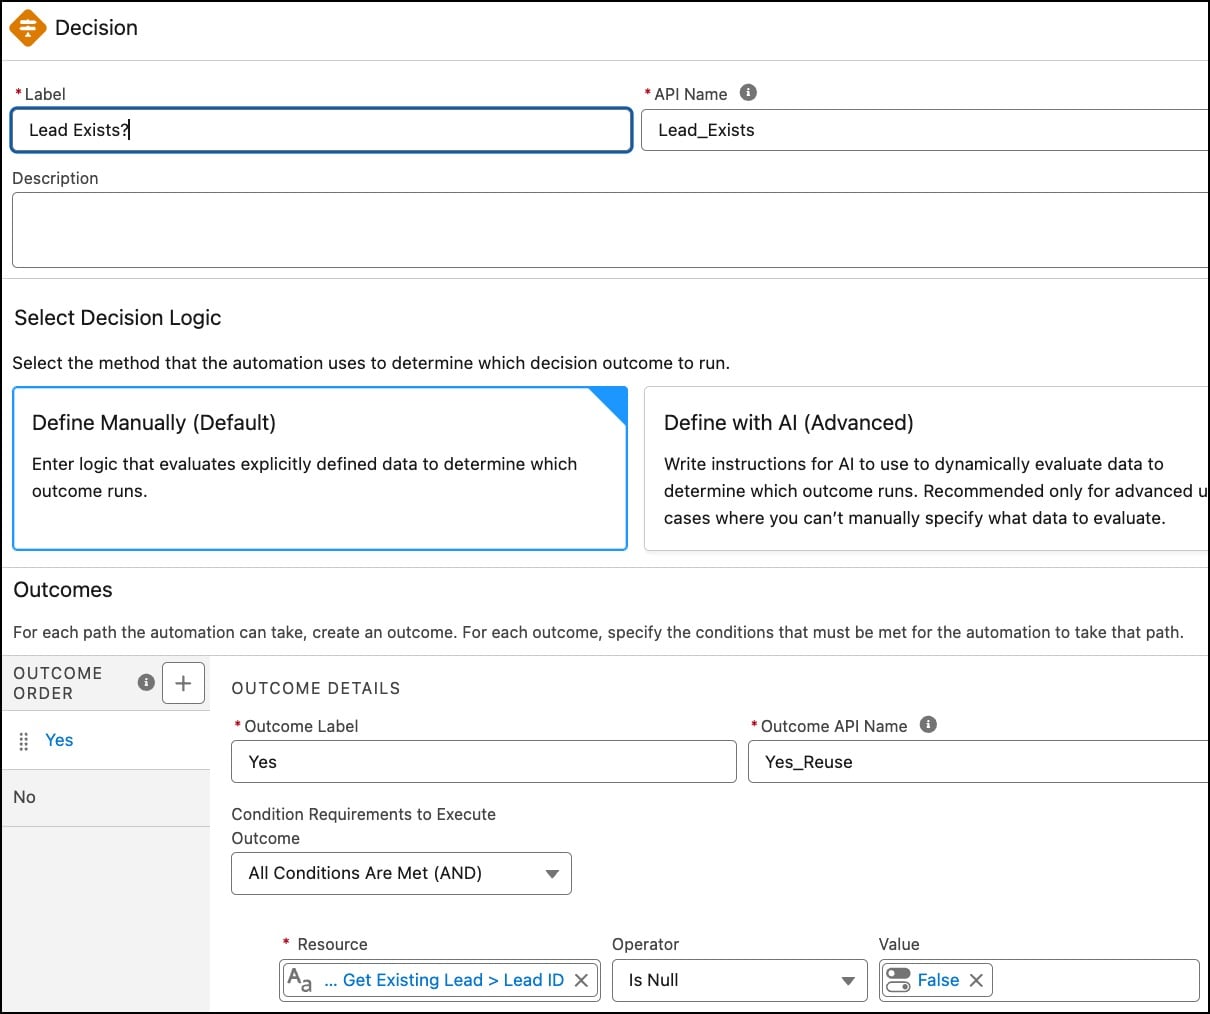
Add a Decision element after Get Existing Lead.
For the label, enter Lead Exists?. The API Name auto-fills as Lead_Exists.
Under Select Decision Logic, select Define Manually (Default).
Under Outcomes, configure the Yes outcome to run when a matching Lead was found.
For Outcome Label, enter Yes.
For Outcome API Name, enter Yes_Reuse.
For Condition Requirements to Execute Outcome, select All Conditions Are Met (AND).
Add this condition:
Resource
Operator
Value
Get Existing Lead > Lead ID
Is Null
False
Select the default tab and rename it to No. The flow follows the No path when no matching lead exists.
Step 5 - Assign Existing Lead Id
On the Yes path, you’ll copy the existing Lead’s Id into leadRecordId so the flow returns the same value whether the lead was found or newly created.
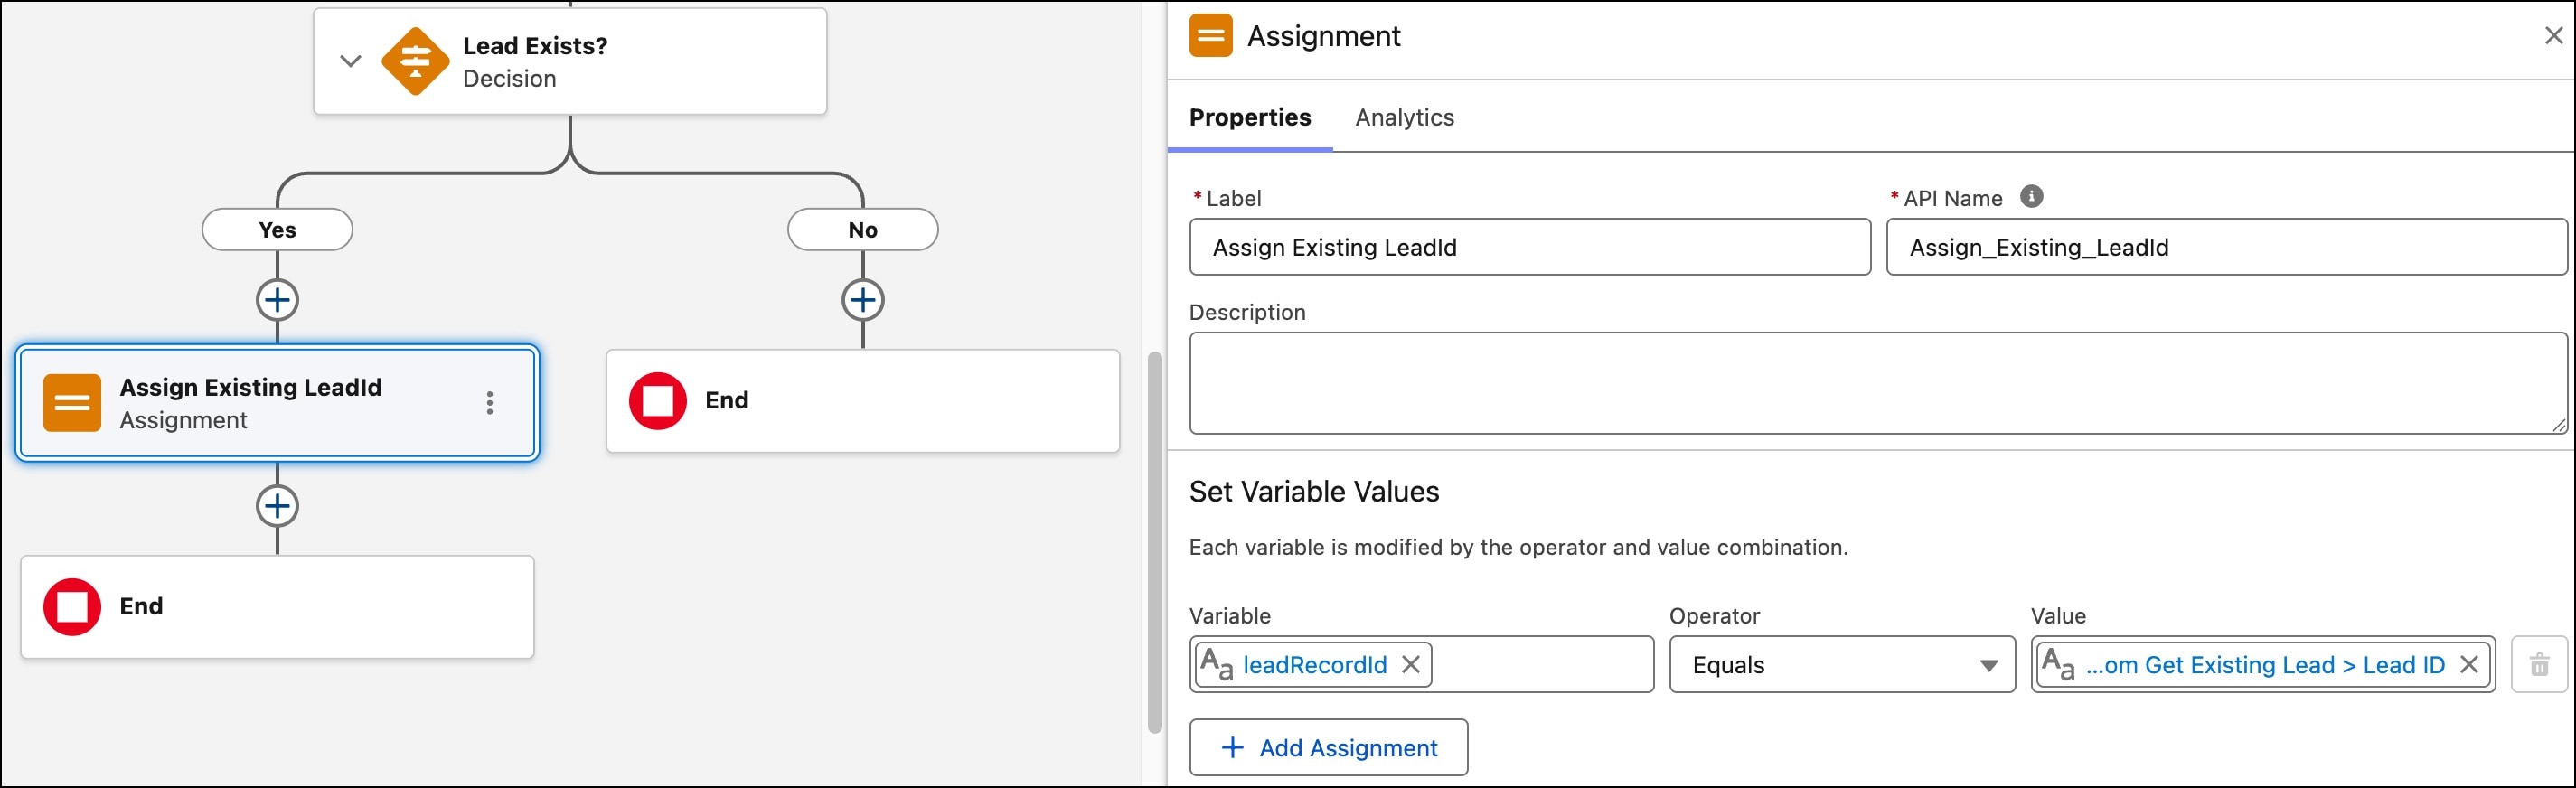
On the Yes outcome from Lead Exists?, add an Assignment element.
For the label, enter Assign Existing LeadId. The API Name auto-fills as Assign_Existing_LeadId.
Under Set Variable Values, add this assignment:
Variable
Operator
Value
leadRecordId
Equals
Get Existing Lead > Lead ID
Connect the Assignment element to its own End element, which terminates the decision’s Yes path.
Step 6 - Add LeadExampleAgent to the LeadSource Picklist
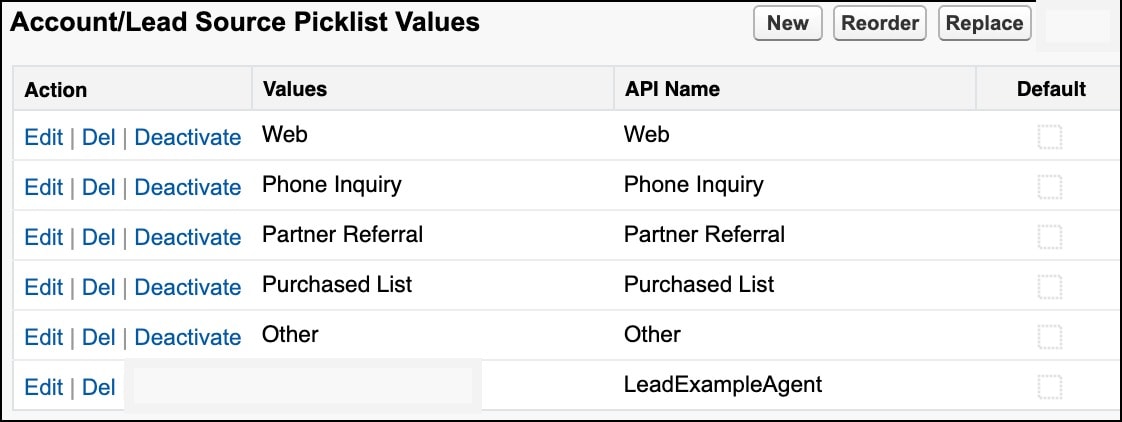
To make sure your agent gets credit for this lead, we’ll add LeadExampleAgent to the possible lead source values.
From Setup, click Object Manager.
Select Lead, then click Fields & Relationships.
Click Lead Source.
Under Account/Lead Source Picklist Values, click New, add LeadExampleAgent.
Click Save.
Step 7 - Create the Lead
Add an element to create the lead, mapping the agent action’s values to the variables you created earlier. Match the API names exactly — they map to the agent action’s inputs.
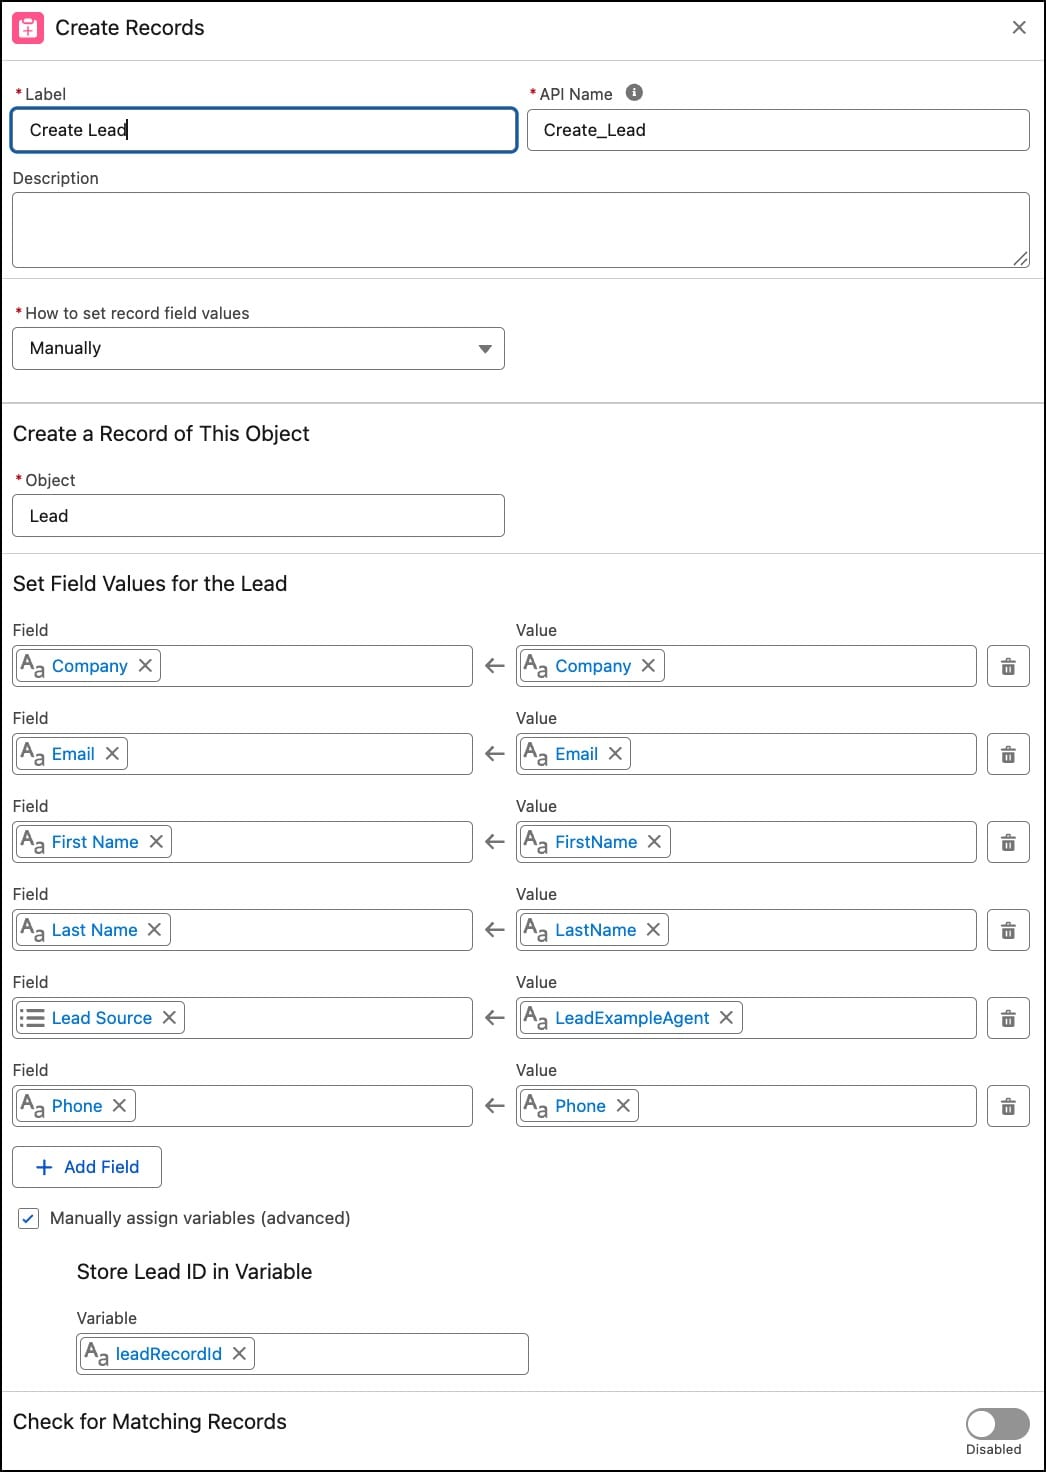
On the No outcome from Lead Exists?, add a Create Records element.
For the label, enter Create Lead. The API Name auto-fills as Create_Lead.
For How to set record field values, select Manually.
Under Create a Record of This Object, for Object, select Lead.
Under Set Field Values for the lead, add a row for each of these fields and map it to the indicated variable.
Field
Value
Company
Company
Email
Email
First Name
FirstName
Last Name
LastName
Lead Source
LeadExampleAgent
Phone
Phone
Select Manually assign variables (advanced).
Under Store Lead ID in Variable, for Variable, select leadRecordId.
Leave Check for Matching Records disabled — the Lead Exists? decision already handles the duplicate check.
Click Save.
Step 8 - Handle a Create Lead Fault
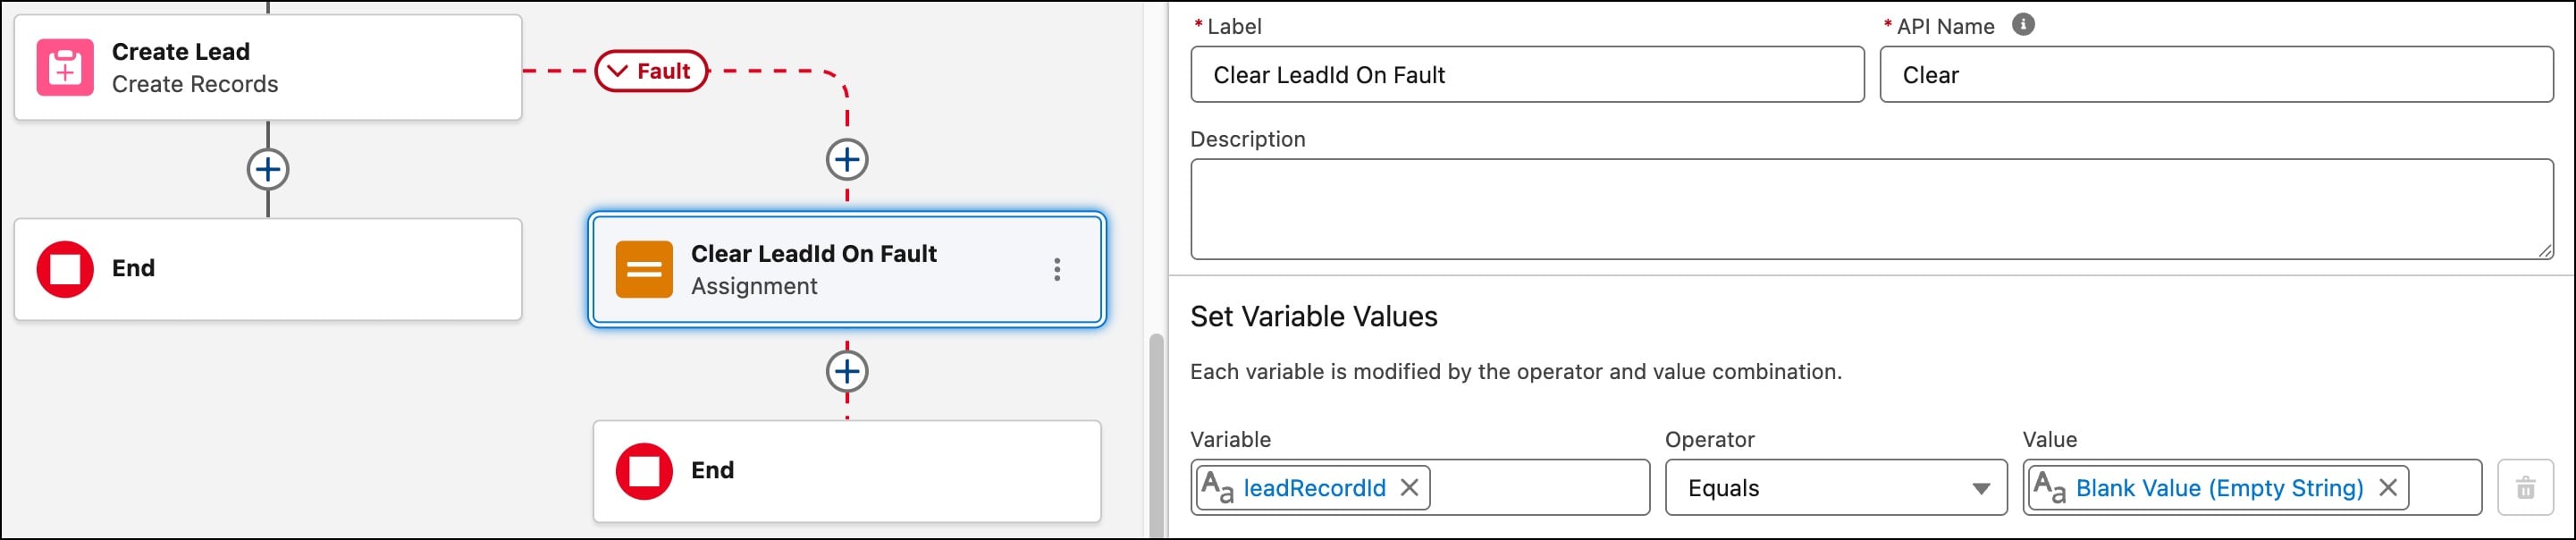
If the Create Lead element fails at runtime (for example, a validation rule rejects the record), the flow returns a lead Id anyway unless you explicitly clear it. Add a fault path that resets leadRecordId so the agent’s after_reasoning gate treats the create as unsuccessful.
Hover over the Create Lead element so the three dots appear.
Click the three dots and select Add Fault Path.
On the fault path, add an Assignment element.
For the label, enter Clear LeadId On Fault. The API Name auto-fills as Clear_LeadId_On_Fault.
Under Set Variable Values, add this assignment:
Variable
Operator
Value
leadRecordId
Equals
Blank Value (Empty String)
Connect the Assignment element to an End element to terminate the fault path.
Step 9 - Test the Flow
Test the flow.
In Flow Builder, click Debug.
Enter test values for Company, Email, FirstName, LastName, Phone.
Click Run and verify a lead is created (or the existing one is returned). Notice that the lead source is LeadExampleAgent.
Step 10 - Activate Your Flow
Click Activate in the upper right.
Create Your Agent
You can create a new agent using the Agentforce Service Agent template, or you can add these subagents and variables to an existing agent.
Step 1 - Create or Reuse an Agent
For this example, you can add the two subagents to an existing agent. Or, you can create a service agent from a template. To create a service agent:
In the App menu, enter and select Agentforce Builder.
Select New Agent, then select Agentforce Service Agent.
Give your agent a name, such as Lead Gather Example.
Accept New User to create a new agent user.
Switch to Script view (click the </>toggle in the upper left)
Step 2 - Create the Variables
The agent uses variables to store customer input during the information-collection turns. The agent also needs a variable to hold the lead ID that the action returns.
Copy and paste these variables into your agent’s existing variables block.
Lead Gather Variables
1# Variables from Lead Gather example2# variables:3 lead_id: mutable string = ""4 description: "Stores the record ID of the Lead created for the prospect."5 visibility: "Internal"6 company: mutable string = ""7 description: "Stores the prospect's company name."8 visibility: "Internal"9 email: mutable string = ""10 description: "Stores the prospect's email address."11 visibility: "Internal"12 first_name: mutable string = ""13 description: "Stores the prospect's first name."14 visibility: "Internal"15 last_name: mutable string = ""16 description: "Stores the prospect's last name."17 visibility: "Internal"18 phone: mutable string = ""19 description: "Stores the prospect's phone number."20 visibility: "Internal"
Save your agent.
The variable defaults matter. Our agent uses "" to mean “not yet captured.”
Note
Add the Lead Gather Subagent
The Lead Gather subagent asks for the required information and captures any relevant information that is provided. The after_reasoning block, which runs after every reasoning loop, checks if all variables are populated. Once all the variables have values (this might take many conversational turns), the agent runs the Create Lead_by_Field action to create the lead. If the action returns a lead record ID, the after_reasoning section transitions to the lead confirmation subagent.
Copy this subagent script and paste the script at the end of your existing agent’s script. If you followed the flow naming conventions, this subagent correctly uses the Create Lead by Field action.
lead_gather Subagent
1subagent lead_gather:2 label: "Lead Gather"3 description: "Collects prospect details and creates a lead."4 reasoning:5 instructions: ->6 | Ask for first name, last name, email, company, and phone number in one message.7 | Use {!@actions.capture_details} whenever the prospect supplies details.8 | Ask only for any remaining missing details.9 | Do not claim that the lead was created or that a meeting was scheduled.10 actions:11 capture_details: @utils.setVariables12 # this action is available ONLY if the lead hasn't been created yet this session13 # That is, the customer can't create a second unique lead in the same session14 available when @variables.lead_id == ""15 with company = ...16 with email = ...17 with first_name = ...18 with last_name = ...19 with phone = ...20 # after_reasoning is run after every reasoning session21 after_reasoning:2223 # if we DON'T have all the variables we need, don't run the action24 if @variables.company != "" and @variables.email != "" and @variables.first_name != "" and @variables.last_name != "" and @variables.phone != "" and @variables.lead_id == "":25 run @actions.Create_Lead_by_Field26 with Company = @variables.company27 with Email = @variables.email28 with FirstName = @variables.first_name29 with LastName = @variables.last_name30 with Phone = @variables.phone31 set @variables.lead_id = @outputs.leadRecordId3233 # if we DID create a lead, transition to the Lead Confirmation subagent34 if @variables.lead_id != "":35 transition to @subagent.lead_confirmation36 actions:37 Create_Lead_by_Field:38 description: "Creates a Lead record from the prospect details captured in the conversation."39 label: "Create Lead by Field"40 require_user_confirmation: False41 include_in_progress_indicator: True42 target: "flow://Create_Lead_by_Field"43 inputs:44 "Company": string45 description: "The prospect's company name."46 label: "Company"47 is_required: True48 is_user_input: False49 "Email": string50 description: "The prospect's email address."51 label: "Email"52 is_required: True53 is_user_input: False54 "FirstName": string55 description: "The prospect's first name."56 label: "First Name"57 is_required: True58 is_user_input: False59 "LastName": string60 description: "The prospect's last name."61 label: "Last Name"62 is_required: True63 is_user_input: False64 "Phone": string65 description: "The prospect's phone number."66 label: "Phone"67 is_required: True68 is_user_input: False69 outputs:70 "leadRecordId": string71 description: "The Salesforce record ID of the newly created Lead."72 label: "Lead Record Id"73 is_displayable: False74 filter_from_agent: True
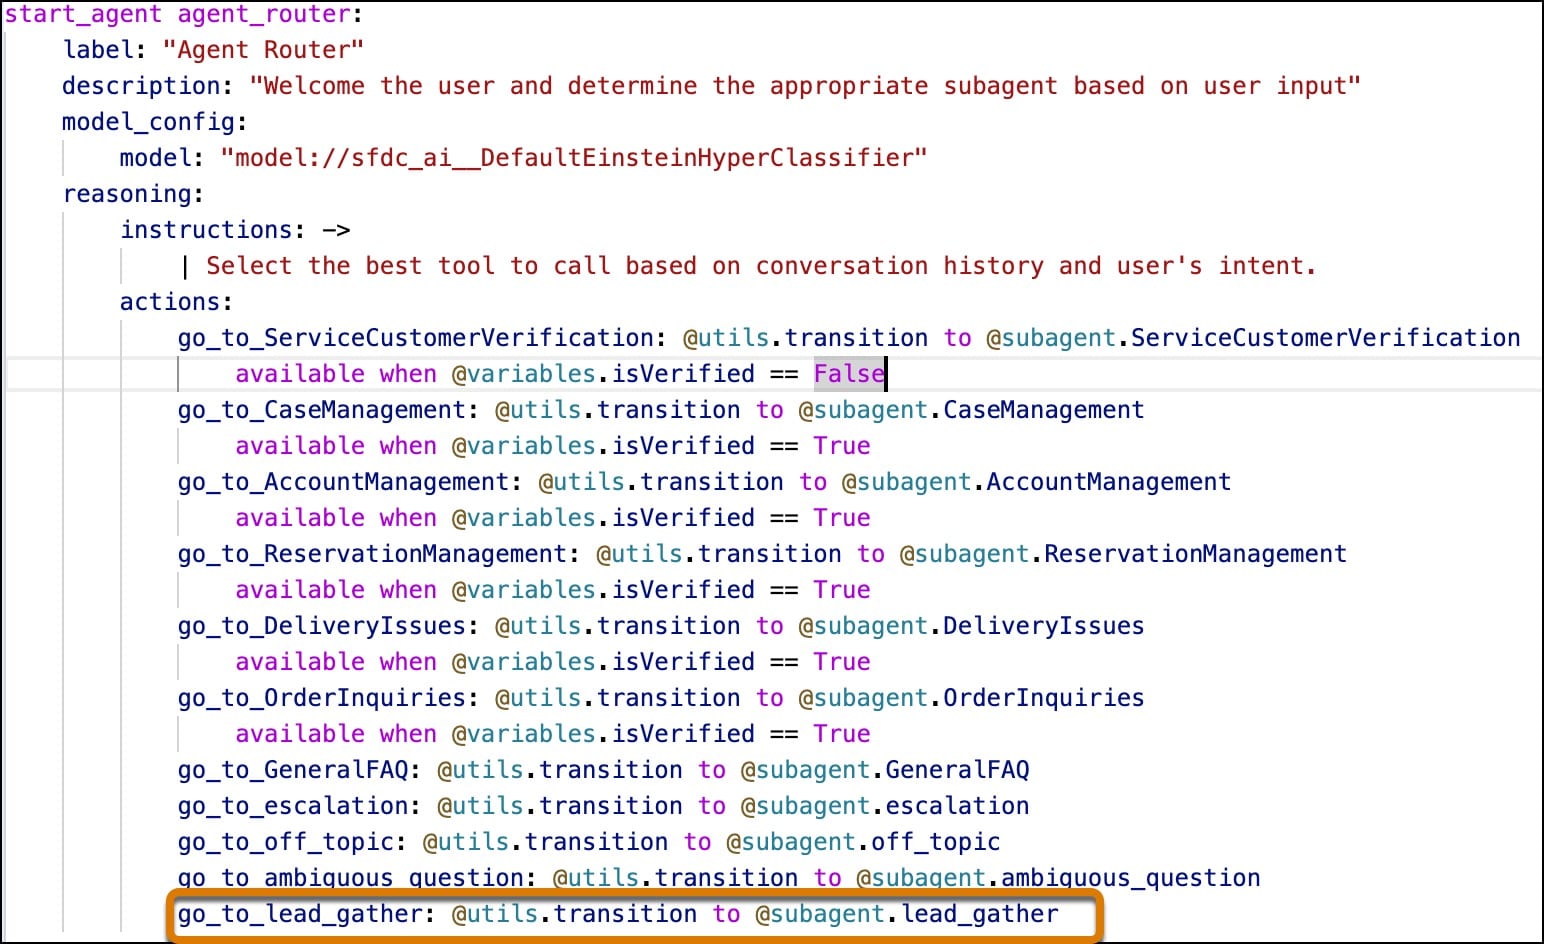
Add these lines to the agent router, lining up the action with the other agent router actions.
lead_gather Subagent
1go_to_lead_gather: @utils.transition to @subagent.lead_gather
Save your agent.
You’ll see an error that the lead_gather subagent doesn’t exist - we’ll fix that problem in the next step.
Note
Add the Lead Confirmation Subagent
This subagent tells the customer that a lead has been created. The agent router doesn’t have access to this subagent. This subagent is only called from the after_reasoning block of the create lead subagent, which is only available if the Create Lead by Field Action returned a lead Id. These safeguards ensure the agent never falsely confirms a lead creation to the customer.
Copy this subagent script and paste the script at the end of your existing agent’s script.
lead_confirmation Subagent
1subagent lead_confirmation:2 label: "Lead Confirmation"3 description: "Confirms that the lead was successfully created."4 reasoning:5 instructions: ->6 | Confirm that the prospect's details were captured successfully.7 | Explain that a team member will follow up to arrange a meeting.
Save your agent.
Grant Agent User Permissions
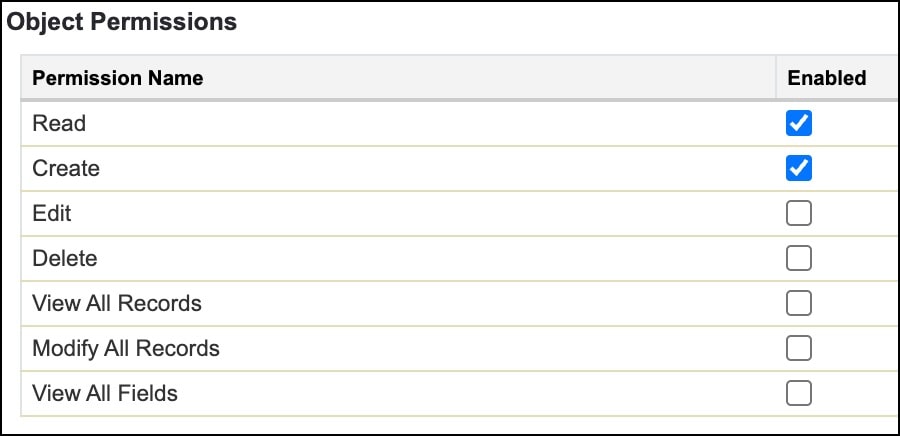
Your agent user needs permission to read and create leads.
From Setup, in the Quick Find box, enter and select Permission Sets.
Click to open your agent user’s permission set.
Click to open Object Settings.
Scroll down, then click to open Leads.
Click Edit.
Under Object Permissions, for Read and Create, select Enabled.
Hi, I'd like to schedule a meeting to learn more about your product. Then when asked: I'm Casey Rivera, casey.rivera@example.com, Northwind Labs, 415-555-0142.
The agent transitions to lead_confirmation, creates the lead, and confirms the lead creation.
No duplicate record created.
Repeat the happy path with the same email and company.
The agent returns the same Lead ID as before. No duplicate lead record is created.
Partial-info gate — only some fields.
Hi, I want to book a meeting. Then when asked for information, provide only one answer per turn.
The agent keeps asking for the missing information. Once all information is provided, the agent creates the lead and confirms with the customer.


 j
j