Agent Script Example: Ground Your Agent With Updated Terminology
Ensure that your grounded agent understands your organization’s evolving jargon, domain-specific terms, or updated product names — without having to update and reindex your information sources.
Grounded agents are grounded in information, either using an Agentforce Data Library or Retrieval Augmented Generation. However, the grounding information might contain only formal names while customers use jargon, acronyms, or new names. Even if the grounding information contains both correct and jargon terms, it might be indexed only on the correct names — so the retriever or data library misses relevant chunks even though correct information exists.
Updating and reindexing an agent’s grounding information (which typically contains thousands of articles) can be time-consuming and involve special roles. Plus, jargon can change quickly!
One solution is to map informal to correct terms before retrieval. Maintain a lightweight old-to-new term map in Salesforce Knowledge (or other object), fetch the mapped information once per session, and hydrate the prompt so the agent can translate user questions when necessary. By telling your agent to map jargon to correct terms before fetching grounding content, your agent can find relevant chunks in the search index and reduce false “irrelevant question” routing. By using Knowledge (or other object), business users rather than IT can make terminology updates.
This solution is a good fit when:
- Your grounding content is mostly correct, but users ask questions with terms that differ from your indexed content.
- Product names, acronyms, or internal jargon change frequently, but the core content in your data library is still accurate.
- Your terminology map isn’t so large that it impacts your agent’s context engineering.
This solution is not a good fit when:
- Your terminology map is so large it starts to affect your agent’s performance.
- Your information sources are easy to update and re-index.
To follow along with this example, you can sign up for a free Salesforce Developer Edition org, then configure the org with Data Cloud and Agentforce.
Instead of signing up for a new org, you can re-use an existing developer org.
For a complete Agentforce implementation guide, see Create Agents in Record Time with Agentforce Implementation Guides.
- Go to the signup page to sign up for a Developer Edition org with Agentforce and Data Cloud.
- Fill out the form and submit it.
- Look for a welcome email from Salesforce in your inbox.
- Verify your account using the verification link in the email.
- When prompted, set a new password and select a security question for your Developer Edition org. Then complete the login process.
- Keep track of your username and password so that you can log in again later from the Salesforce login page.
Data Cloud is required for essential Einstein generative AI and Agentforce functionality, such as the Trust Layer, agent event logs, and consumption billing tracking. In our example, we need Data Cloud for Agentforce Data Library.
Verify your Data Cloud installation. From Setup, in the Quick Find box, enter Data Cloud, and then select Data Cloud Setup Home. Verify that a home org is created on the Data Cloud Setup Home page, with a home org ID, a home org instance, and a tenant endpoint.
If Data Cloud isn’t set up, in Set Up Data Cloud, click Get Started. Setup can take about 10 minutes.
Turn on Einstein to use generative AI features, including Agentforce.
- From Setup, in the Quick Find box, enter
Einstein Setup, and then select Einstein Setup. - Enable Turn on Einstein.
- Refresh the page.
After you turn on Einstein, it can take a few minutes to sync Einstein and Data Cloud.
Turn on Agentforce to start building, customizing, testing, and launching AI agents.
- From Setup, in the Quick Find box, enter Agent, and then select Agentforce Agents.
If you don’t see Agents in Setup, verify that Einstein Generative AI is enabled for your org. - To enable Agentforce, turn on Agentforce.
After you enable Agentforce, refresh the page to see the New Agentforce Builder panel.
Use the standard Agentforce Service Agent template.
Aura & Ash sells skincare products and has a service agent that helps customers select, combine, and use products. Because product names frequently change, and the company wants to stay current with viral product nicknames, Aura & Ash will create a Knowledge article to map old and new product names.
- In the New Agentforce Builder panel, click Let’s Go. To access the Agentforce Builder later, from the App Launcher, find and select Agentforce Studio, and then click Agents.
- Click New Agent, then select Agentforce Service Agent.
- Name your agent
Aura & Ash Service Agentand accept the developer default. - Click Select User, then select
EinsteinServiceAgentuser. - Click Let’s Go.
The agent opens in canvas view. You can see that the Service Agent template provides typical subagents for a service agent. Leave your new agent open in a browser tab.
To ground your agent’s responses in Aura & Ash’s product information, you’ll create a data library and upload a PDF.
- Download the Aura_Ash_Product_Instructions.pdf. This PDF provides brief usage instructions for skincare products, but uses the old product names.
- Leave your agent open in a browser tab. From Setup, in the Quick Find box, enter
Data Library, and then select Agentforce Data Library. - Click New Library.
- For the library name, enter
Aura and Ash Products. The API name is automatically populated. - For the description, enter
Sources for Aura & Ash Customer Service agent’s product usage agent. - Save your changes.
- In the Data Type field, select Files.
- Click Select Files, then upload the
Aura & Ash Product Instructions.pdffile from wherever you saved it on your computer. When your file is finished uploading, click Done.
Salesforce takes some time to create your data library. Wait until the Status is Ready — you might need to refresh your page.

Now that you’ve created your data library, add it to your agent.
- From your agent’s Explorer panel, expand Data and select Data Library.
- Select the Aura & Ash Products library. If you don’t see your library, refresh the page.
- Leave the Show Sources setting disabled. When this setting is enabled, your agent shows the sources for every answer it generates with your data library. For the Aura & Ash use case, we’ll leave that setting disabled because we’re using a single PDF for all answers.
- In the upper right, click Save.
Your agent is now grounded on Aura & Ash product instructions and can answer customer questions, provided customers use legacy product names.
- Click Preview and click Refresh (circular arrow).
- In the test window, enter this text:
How do I use the Hand & Cuticle Oil. - The agent responds with information grounded in your library, such as massaging a few drops into your nails and allowing time for absorption.
- Now, repeat the question with the product’s new name by entering
How do I use Iron Grip Rescue Fuel?. The agent doesn’t have your product’s new name and responds that it can’t help. We’ll download the product’s old and new name map in the next step, so that the agent can find the relevant information.
By testing the agent with new terms before you map them, you’re ensuring that your agent doesn’t already know your new terms. Sometimes, jargon or domain-specific knowledge is still part of the public knowledge set on which the LLM was trained. In that case, the LLM might correctly link a customer’s jargon term to your data library’s knowledge without using your terminology map. It’s important to verify a failure case first, so you can validate your solution later.
Your agent is grounded on Aura & Ash’s product usage information, but your data library uses the old product names. Real-world data libraries can be large and complex to configure. It’s often much easier to provide an agent with a simple terminology map that a business user can update, rather than rewriting and rebuilding a data library.
To create a Knowledge article, set up Salesforce Knowledge, grant yourself and your agent user permissions on the knowledge__kav object, create a template, and grant the agent user access to Knowledge.
This example walks you through a basic Knowledge setup that meets the needs of this example. If your organization already uses Knowledge, you can use an existing article type.
Assign your user the Knowledge user license so you can create Knowledge articles.
- From Setup, in the Quick Find box, enter and select Users.
- Next to your user name, click Edit.
- Select the Knowledge User checkbox.
- Click Save.
- From Setup, in the Quick Find box, enter and select Knowledge Settings.
- Select Yes, I understand the impact of enabling Salesforce Knowledge and click Enable Salesforce Lightning Knowledge, then click Ok.
You need a Knowledge article layout with a text field to hold your map of old and new product names.
This example adds a custom field to the Knowledge layout. If your organization already has layouts defined, consider reusing an existing layout.
-
In Setup, select Object Manager.
-
In Quick Find, enter and select Knowledge (API name
Knowledge__kav). -
Select Fields & Relationships then click New.
-
Select Text Area (Long) and click Next.
-
Enter this information:
Field Value Field Label Alternate Product NamesDescription New or alternate names, acronyms, and slang terms for productsVisible lines 40Field Name Accept Alternate_Product_Names__c -
Leave all other fields the same and click Next.
-
Ensure the new field is visible to the Einstein Agent User and click Next.
-
Select the box next to Knowledge Layout and click Save.
The new field is created and added to the Knowledge page layout.
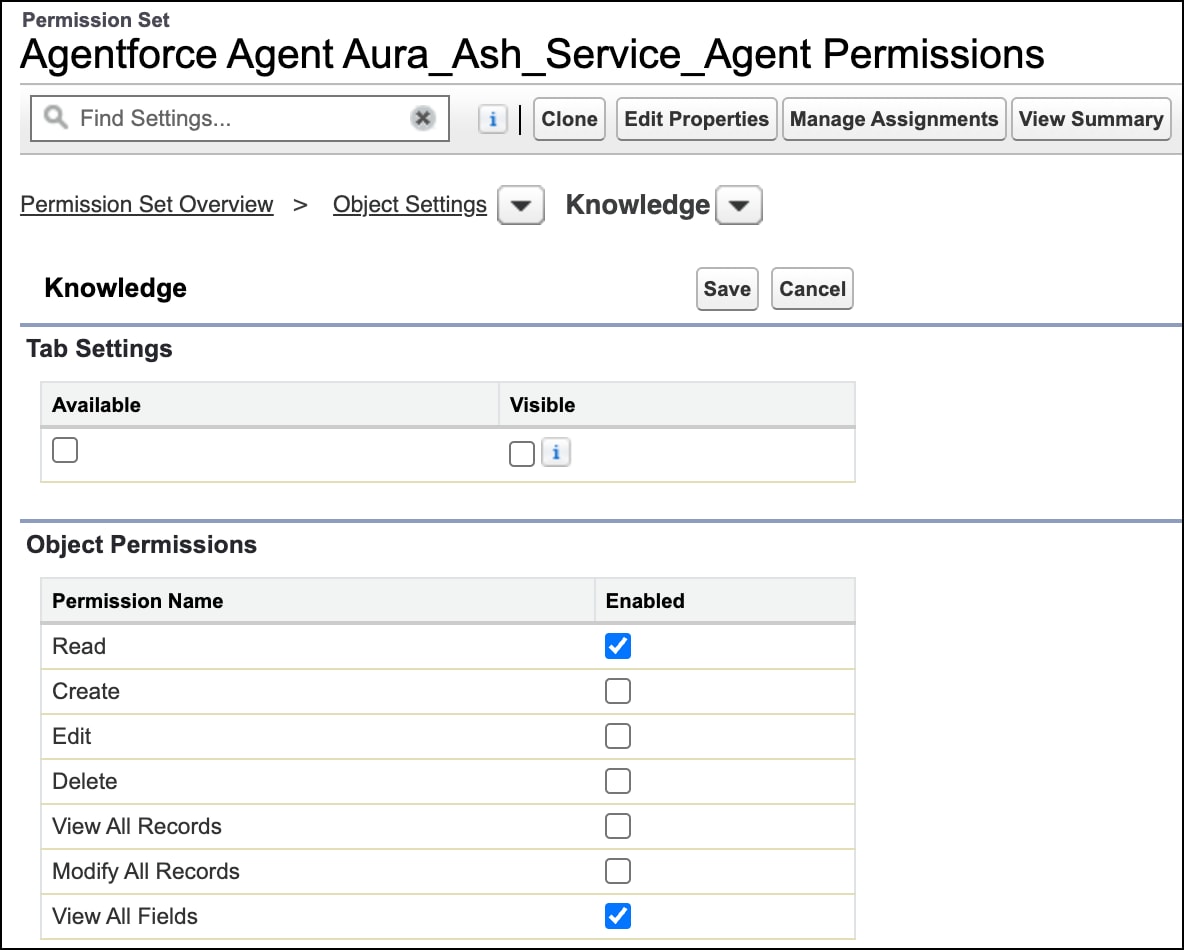
Your agent user needs read permissions on the Knowledge object,Knowledge__kav, but only when operating the Aura & Ash agent.
- From Setup, in the Quick Find box, enter and select Permission Sets.
- Click to open the Agentforce Agent Aura_Ash_Service_Agent Permission set.
- Click to open Object Settings.
- Scroll down, then click to open Knowledge, with the API name
Knowledge__kav. - Click Edit.
- Under Object Permissions, for Read and View all Fields, select Enabled.
- Click Save.
Always give your agent user the fewest permissions it needs to do its job. In this example, our EinsteinServiceAgent user doesn’t need write access. For more information about service agent permissions, see (Help:) Best Practices for Agent User Permissions.
You can’t give the agent user a Knowledge license, but you can grant the Allow View Knowledge app permission.
- From Setup, in the Quick Find box, enter and select Users.
- Click to open your EinsteinServiceAgent name.
- Expand the list of permission set assignments, then click to open the Service User permission set.
- Click to open App Permissions.
- Click Edit.
- Select Allow View Knowledge.
- Click Save.
Your agent user has permissions to view Knowledge articles. For more information about agent user permissions, see (Help):Best Practices for Agent User Permissions.
- Download the document Aura_Ash_New_Names.pdf. This document maps old product names to new product names.
- From the app menu, enter and select Knowledge, then click New to create a new Knowledge document.
- Name your document
Aura & Ash Updated Product Namesand accept the default URL name. - In the field Alternate Product Names, paste the entire contents of the
Aura & Ash New Names.pdf, including the instructions.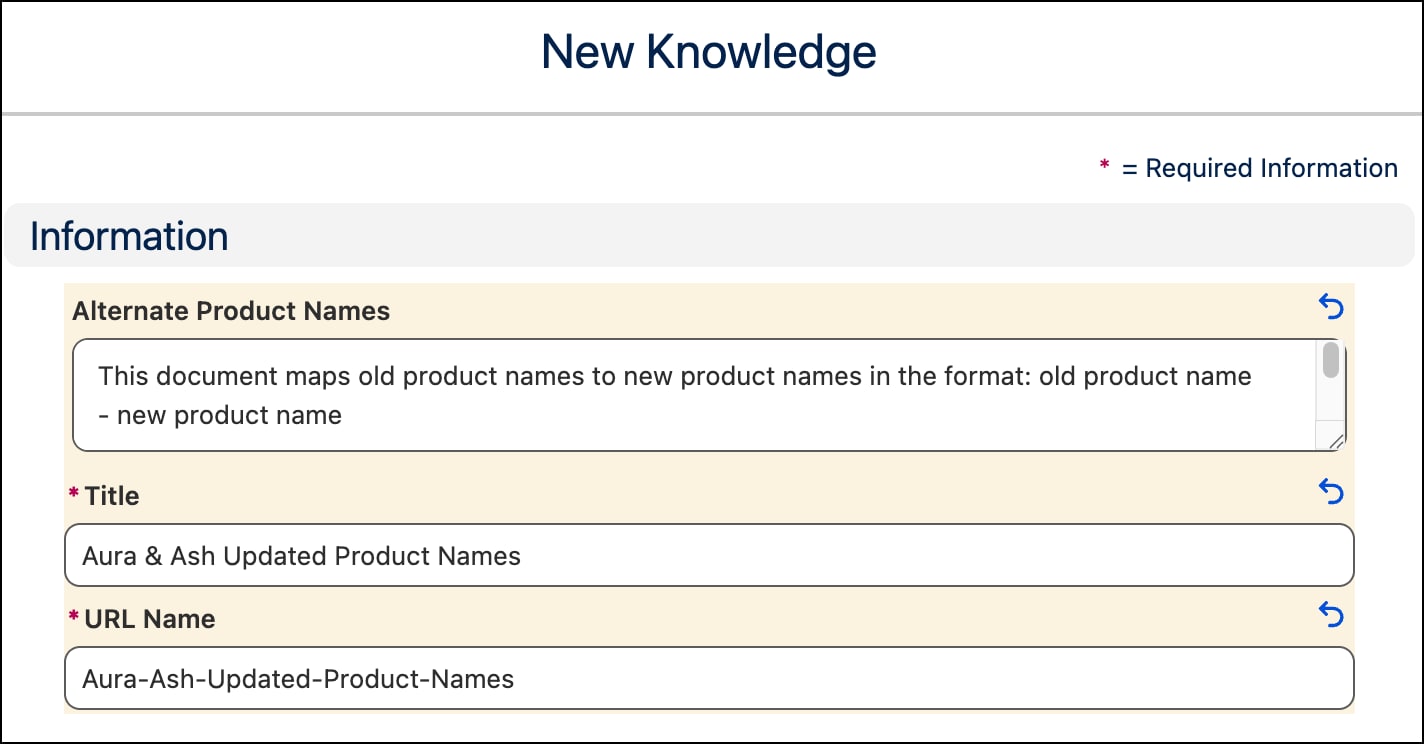
- Click Save.
- Return to the list of Knowledge articles, then select and publish your article.
- Copy your Knowledge article number - you’ll need it to create your agent action.
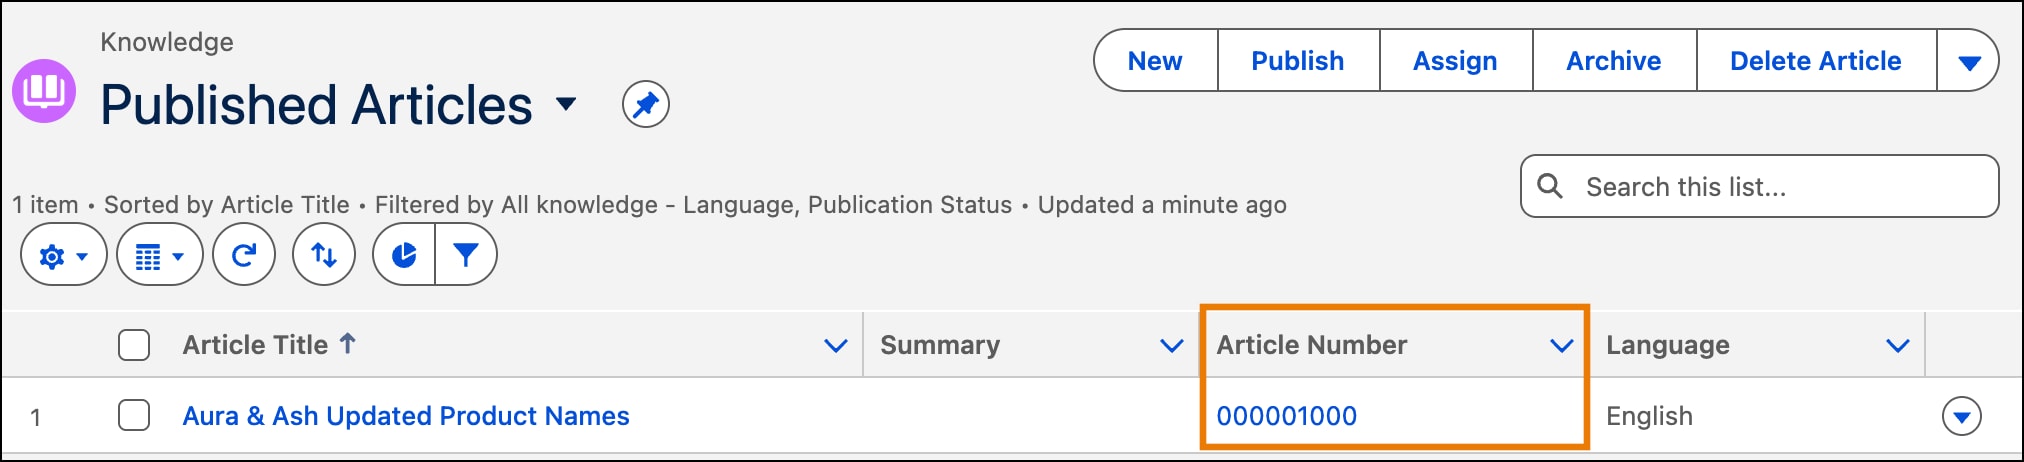 Your Knowledge Article is published and ready to use in a Flow.
Create a flow that looks up your knowledge article by article ID.
- From Setup, in the Quick Find box, enter Flows, and then select Flows.
- Click New Flow.
- Select the Autolaunched Automations category, and then select Autolaunched Flow (No Trigger).
- Add a Get Records Element.
- For the label, enter
Get Knowledge Article by ID. - For the object, select Knowledge (Knowledge__kav).
- For the label, enter
- Select the knowledge record by article number
- For the condition requirements, leave All Conditions Are Met (And) selected.
- For the field, select Article Number.
- For the operator, select Equals.
- For the value, add a new resource with these values:
| Field | Value |
|---|---|
| Resource Type | Variable |
| API Name (case-sensitive) | articleNumber |
| Description | The article number |
| Data Type | Text |
| Availability Outside the Flow | Available for input |
-
Click Done
-
Create a variable to store the new product names.
- Under How to Store Record Data, select Choose fields and assign variables (advanced).
- Under Where to Store Field Values, select In separate variables.
- Under Select Variables to Store Knowledge Fields, for Field, select Alternate_Product_Names__c.
- For Variable, create a new resource.
| Field | Value |
|---|---|
| Resource Type | Variable |
| API Name (case-sensitive) | alternateProductNames |
| Description | List of products with their alternate names. |
| Data Type | Text |
| Default Value | leave blank |
| Availability Outside the Flow | Available for output |
- Click Done.
- Select When no records are returned, set specified variables to null.
- Save the flow. Use the name
Alternate Product Namesand accept the api name.
To test your flow and make sure your agent has all of the required permissions to run it, debug the flow as your agent user.
-
Give yourself permission to debug your flow as another user.
- From Setup, in the Quick Find box, enter
Process Automation, and then select Process Automation Settings. - Select Let admins debug flows as other users then click Save.
- From Setup, in the Quick Find box, enter
-
In Flow Builder, click Debug.
- Select Run automation as another user, and then select your EinsteinServiceAgent User.
- For articleNumber, enter the article number for your Aura & Ash Updated Product Names article. You saved this number in a previous step.
- Click Run and expand Details to see the returned list of product names.
-
To activate the flow, click Activate.
Tip: If you get an error running the flow as the EinsteinServiceAgent user, switch to your user. If the flow is successful running under your user, check the EinsteinServiceAgent’s permissions.
Now that you’ve created a Knowledge article to map old and new product names, then created a flow to fetch the names, you’re ready to ground your agent with the new product names. First, you’ll create a variable to store the mapped names. Then, you’ll create an agent action based on your flow. Finally, you’ll update your agent to run the action and use the mapped names to find answers to your customer’s questions.
You’ll use the Old2NewProductNames variable to store the mapped product names that your flow returns from the Knowledge article.
- In your agent’s Explorer panel, click Variables.
- In the upper right of the Canvas, click New, then select Create Custom Variable.
- Use these values to create your variable.
Field Value Name and API Name Old2NewProductNames Data Type String Description Maps the old product names to the new product names. Default value NotRun - Click Create, then save your agent.
Your Old2NewProductNames variable is created.
- In Agentforce Builder, from the Explorer tab, expand Subagents > General FAQ.
- Click the plus sign (+) next to General FAQ and select Create New Action.
- Set these fields on your action.
Field Value Action Name GetNewProductNames Description Get the new names for products. - Click Create and Open.
- For the reference action type, select Flow.
- For the reference action, select your Alternate Product Names flow.
- Under Inputs, for articleNumber, select Require Input to execute action.
- Under Outputs, for alternateProductNames, select Show in conversation.
- Click Save.
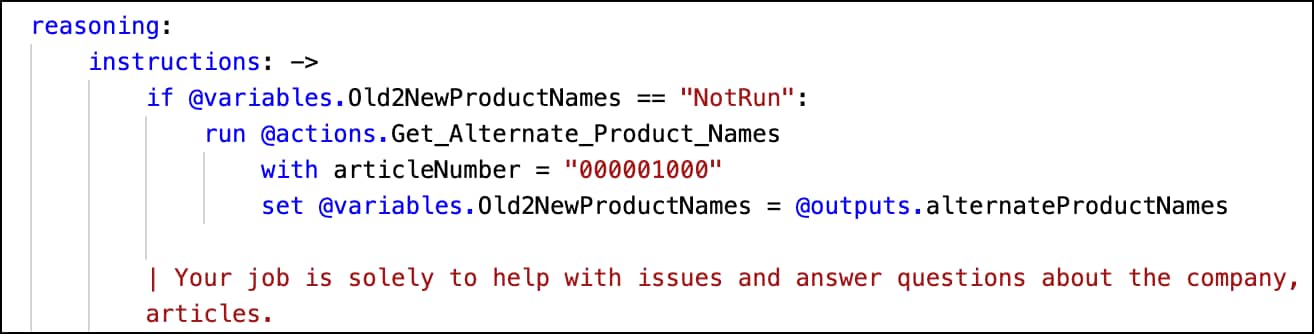
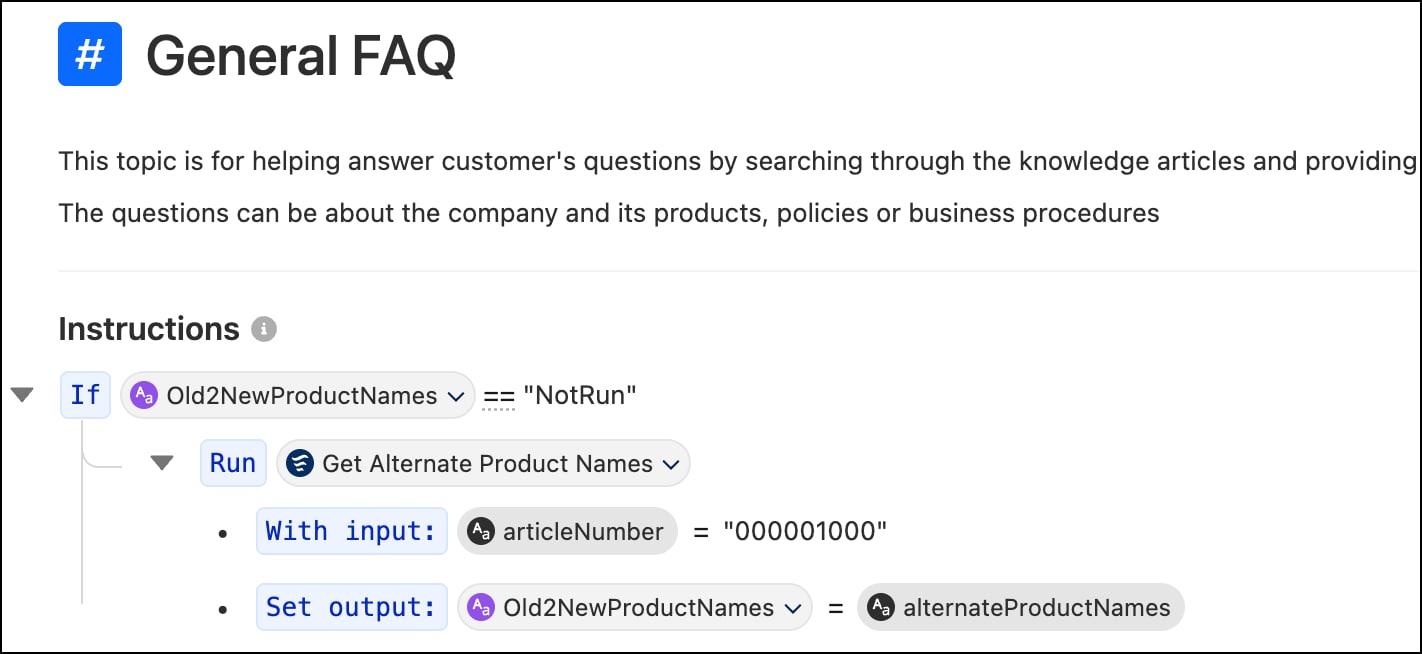
Run your GetNewProductNames action in the reasoning instructions, then store the output list of mapped names in the Old2NewProductNames variable. To improve performance, only run the action once by checking if the Old2NewProductNames variable is NotRun.
- Switch to Script mode.
- In the GeneralFaq subagent, below
instructions: ->and above| Your job is solely to help with issues, paste these instructions.
-
Align the script with the pipe (“
|”) character below. -
If needed, replace 000001000 with your Knowledge article’s article number that you copied in a previous step. Your script should look like this.
- Save the agent, then verify in Canvas view.
-
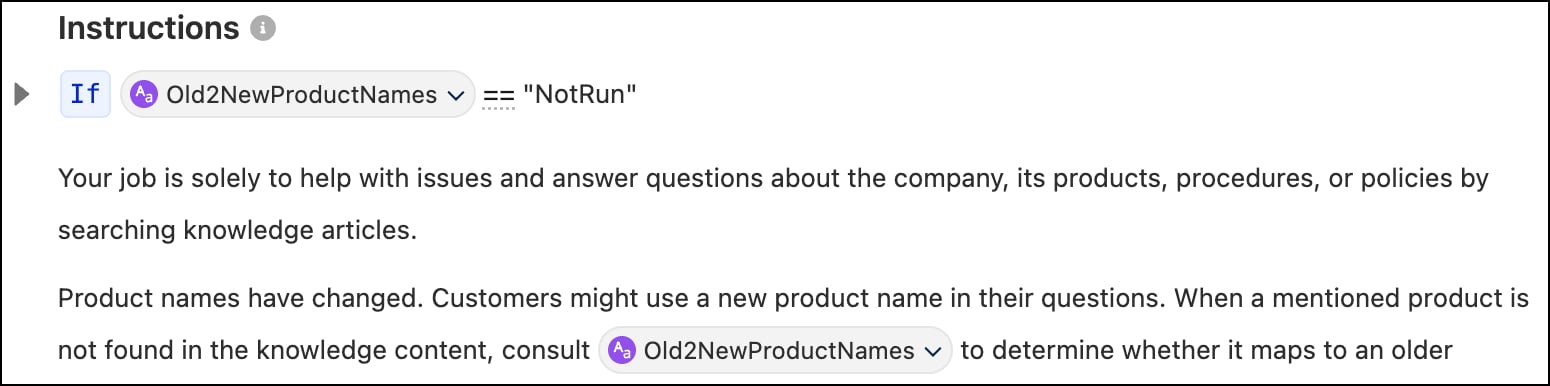
In Canvas, click your cursor after the first sentence, which says something like
Your job is solely to help with issues and answer questions about the company's products, procedures, or policies by searching knowledge articles. -
Press Enter/Return, then paste this text.
Product names have changed. Customers might use a new product name in their questions. When a mentioned product is not found in the knowledge content, consult -
Enter
"@"to bring up the context menu, then scroll down to This Agent’s Variables and select Old2NewProductNames. -
Paste this text
to determine whether it maps to an older product name. If a mapping exists, use the older product name when searching knowledge articles. -
Click Save.
Your Canvas view should look like this.
Your agent is now grounded on Aura & Ash product instructions and new product names. The agent can answer customer questions for both legacy and new product names.
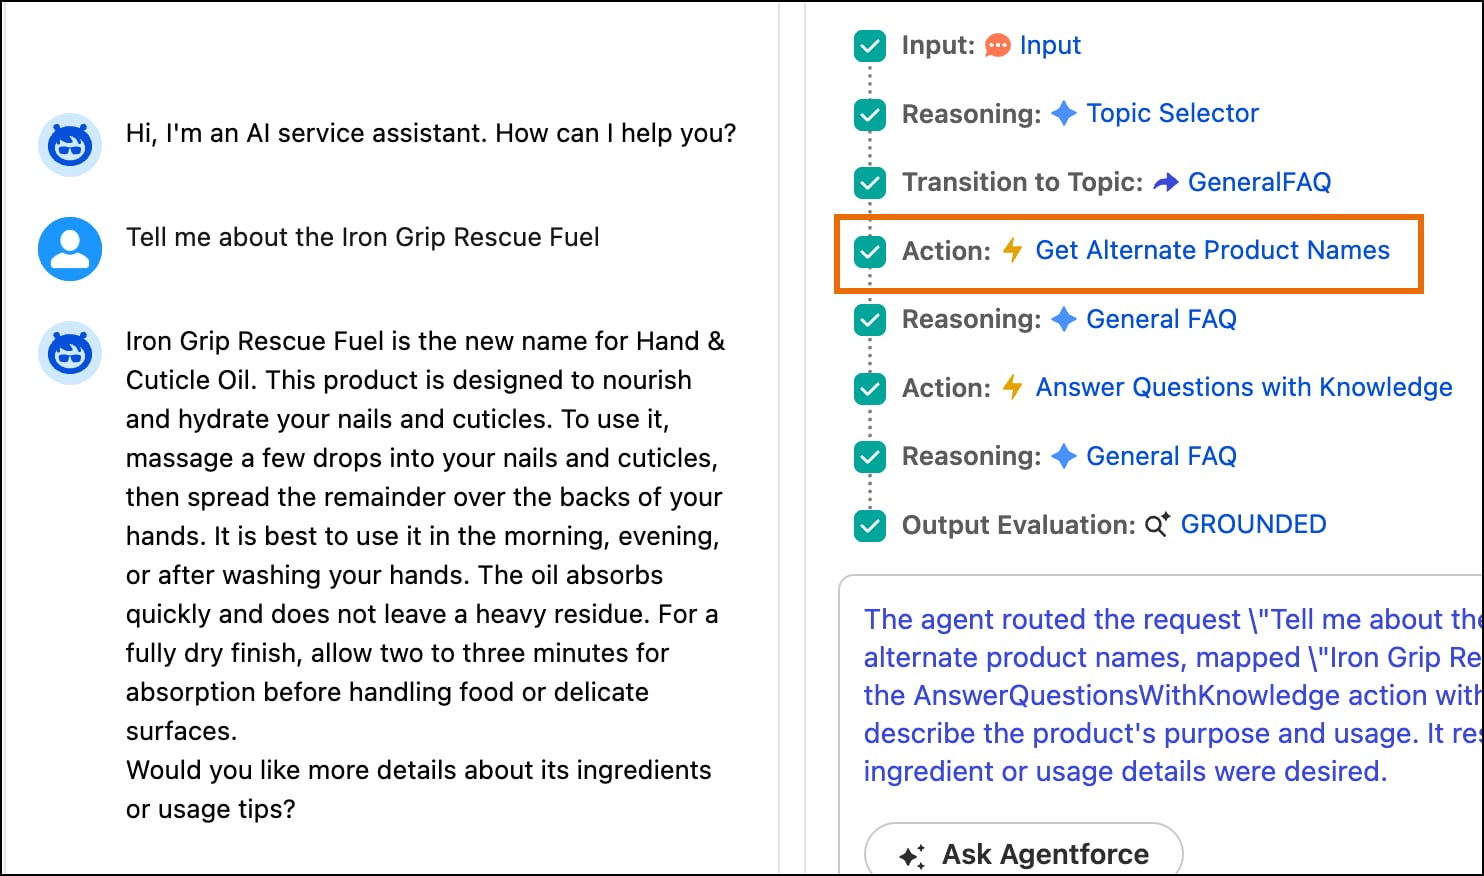
- Click Preview, then next to Set Context, click Refresh (circular arrow).
- Enter the prompt:
Tell me about the Iron Grip Rescue Fuel. - The agent responds with information grounded in your library for the old product name, Hand & Cuticle Oil.
You can see that your Get Alternate Product Names action is run only once.
This example’s Agent Script uses these patterns and best practices.
| Pattern | Usage in Script |
|---|---|
| Fetch Data Before Reasoning | The flow runs before the prompt is sent to the LLM, so the agent always has our updated product names. |
| Using Conditionals | The if @variables.Old2NewProductNames == "NotRun" check ensures the action is run only once, reducing processing and potentially cost. |
| Using Variables Effectively | Old2NewProductNames has a default value, so we can check when it’s not been used. |
| Verify the agent with a known failure case | LLMs can infer a surprising amount of information and have been trained on a vast array of public knowledge. Before injecting the prompt with our product name map, we verified the agent didn’t understand the new product names. That way, we’re confident that the updated name information is coming from our map, not from inference or public knowledge. |