Apex Code Example: Custom Apex Action for Complex Queries
This example walks you through the end-to-end steps to implement an agent that handles complex customer questions using a custom Apex action.
Scenario in This Example
This example covers end-to-end implementation of a customer service agent that can handle complex queries about product inventory. Using Apex, we will create a custom action that converts a customer question with multiple parts into an actionable SOQL query.
By setting up each component individually, you’ll gain a thorough understanding of their configuration and how they fit into the Agentforce solution stack. You’re welcome to follow along with the instructions in a Salesforce Developer org. Note that your results may vary.
In this example, we’ll use Salesforce CLI to import existing product and price data from .csv files into Salesforce standard objects Product2 and PriceBook. Then, we’ll create a custom Apex class to dynamically query our products inventory based on inputs passed by our agent. Finally, we’ll build an agent, subagent, and action to call the custom Apex class when needed.
If you’d prefer to use a different Salesforce org, verify that it offers comparable functionality: Einstein is enabled, Agentforce is enabled, and it’s OK for you to add cases. Note that your user permissions and other org settings can affect your ability to complete all the steps in this example.
Note
If you’re following along with the instructions and your org runs into unexpected issues, try refreshing your browser window. You can also try going back and repeating previous instructions.
Note
Log into the Salesforce Developer Edition org.
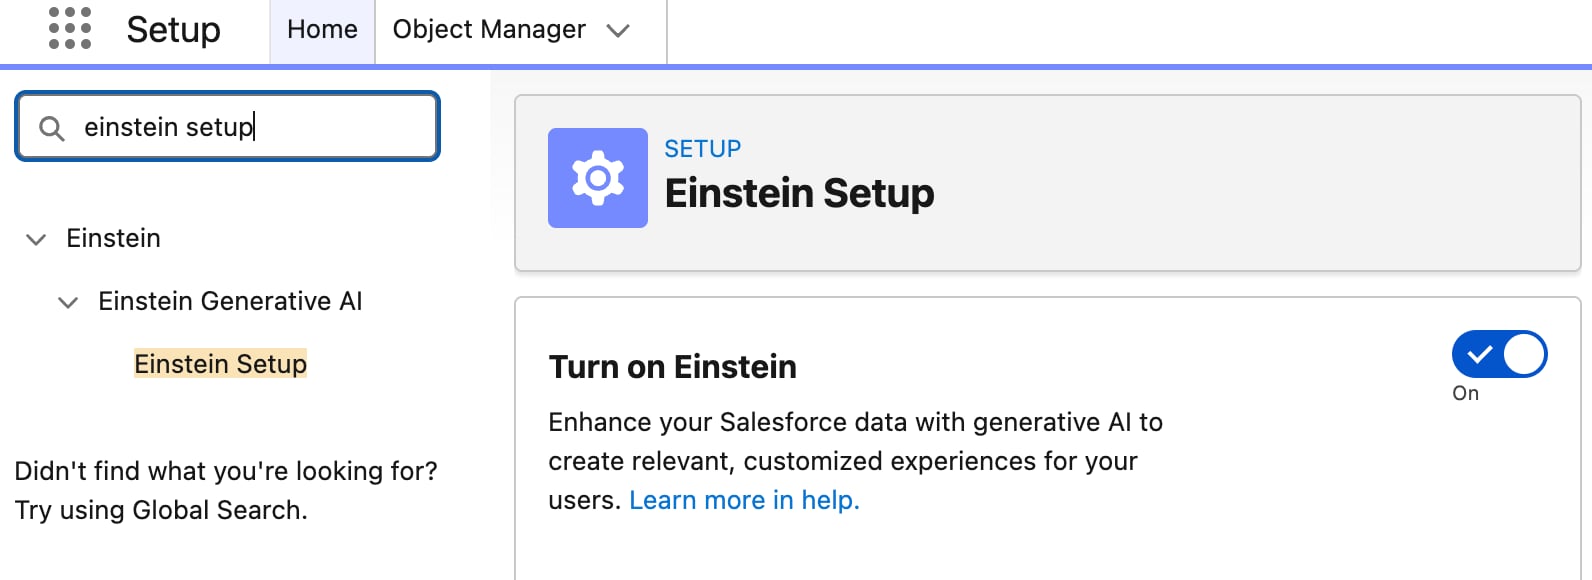
From Setup, in the Quick Find box, enter einstein setup, and then select Einstein Setup and Turn on Einstein.
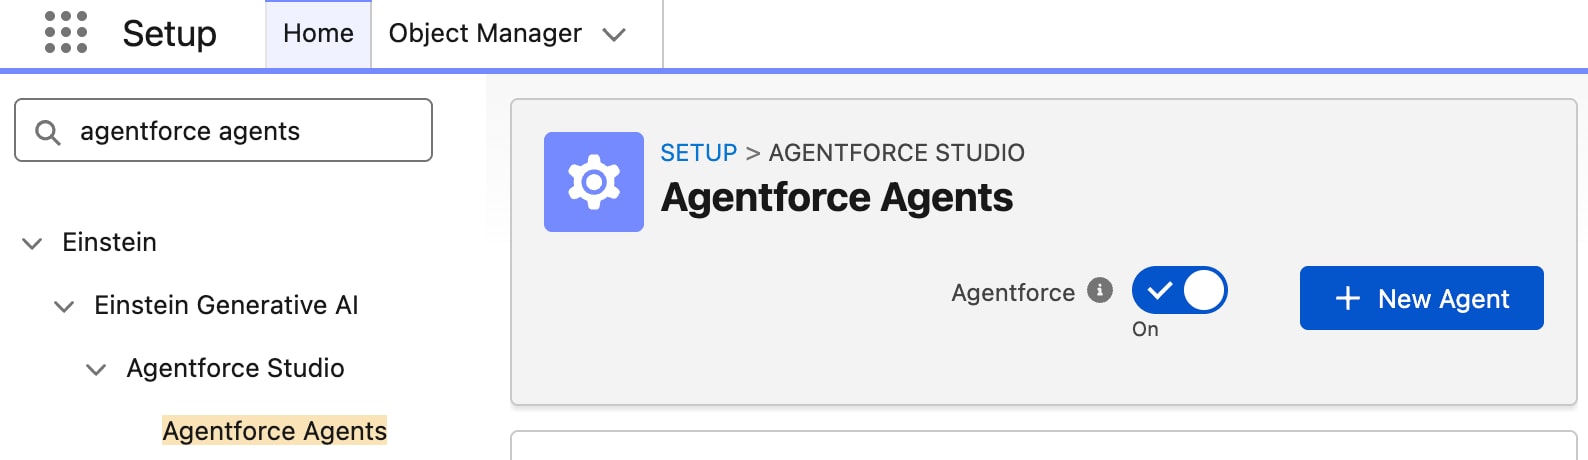
Search for Agentforce Agents and open it.
Turn on Agentforce.
Step 2: Import Your Data
Our custom Apex class queries structured data inside our org. That means we need to get our data cleaned, organized, and inside the appropriate Salesforce objects. Here is the sample data we are using for this example: Link. This .csv file contains 100 furniture items with a Name, Description, SKU, Price, Color, and Weight.
Create Custom Fields
We’re going to store most of our data in the Product2 object. Let’s start by creating custom fields for Color and Weight, since they aren’t included by default.
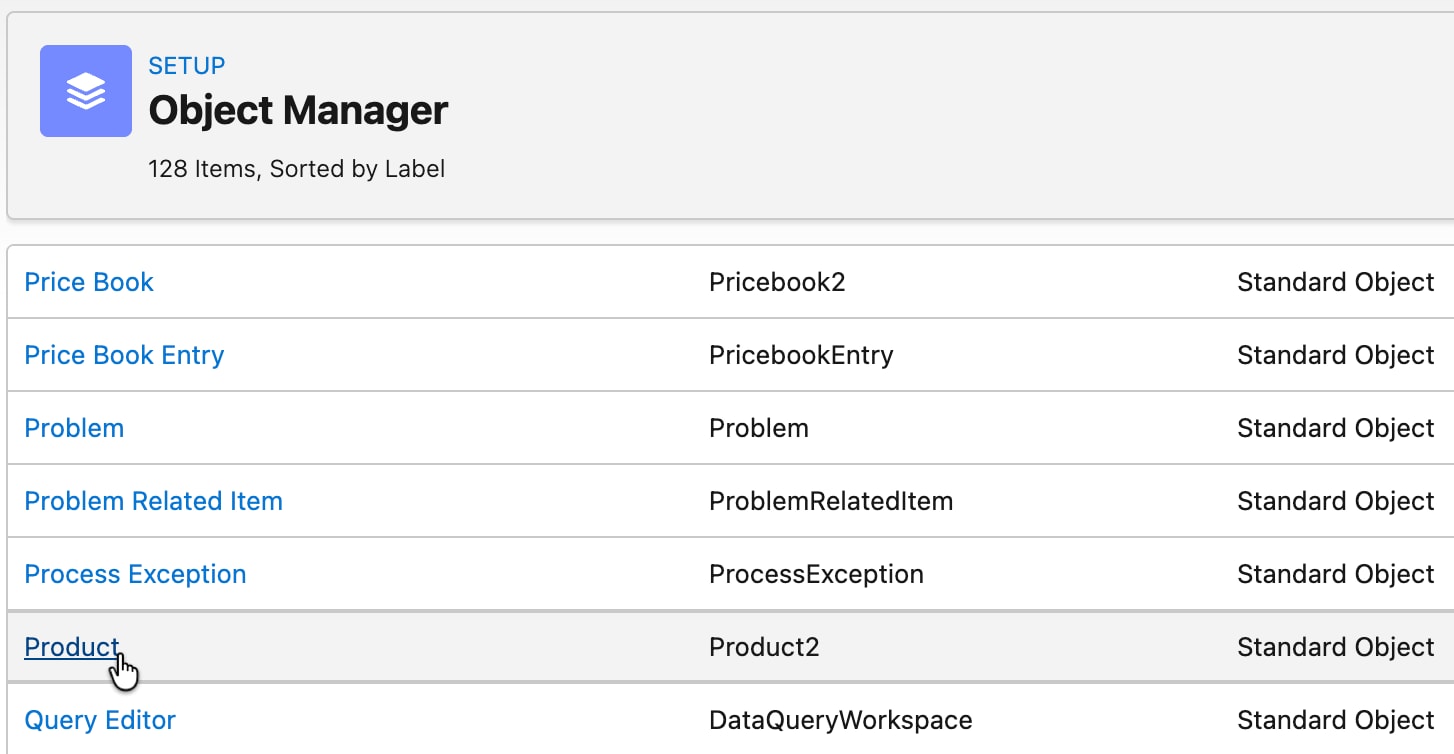
From Setup, click Object Manager, then scroll down to Product (API name Product2).
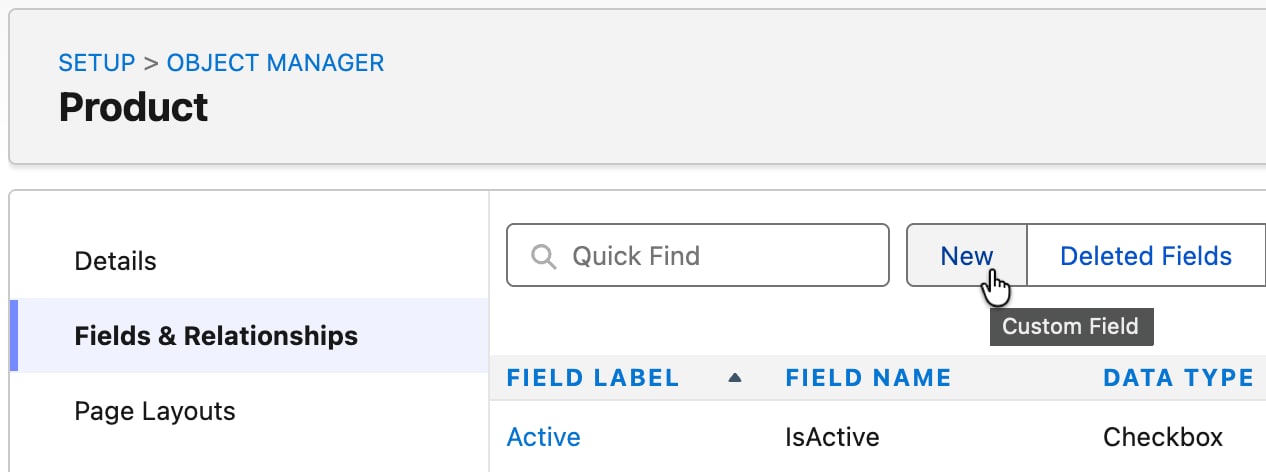
Click Fields & Relationships, then click New.
Create the Color custom field with the following settings, then save the field.
On the field-level security screen, check Visible for your profile
Create the Weight (kg) custom field with the following settings, then save the field.
Field Type: Number
Label: Weight (kg)
Length: 16
Decimal Places: 2
On the field-level security screen, check Visible for your profile
Import Product2 Data with Salesforce CLI
Because we’re importing inventory data to the Product2 object, we’re restricted to using Salesforce CLI or Salesforce Data Loader. You can also create the data entries manually, but that method is too time consuming for large data sets. For this example, we’ll use Salesforce CLI.
For the rest of this section, you need to download and install Salesforce CLI: Link. All commands should be run in Command Prompt (Windows) or Terminal (Mac).
Authenticate to your org. Once authenticated, you can begin making changes to the org from the command line. Run the following command and log in when prompted. Replace your-org-alias with a short, repeatable name like “inventory-org”. We’ll use this alias in place of your-org-alias for the rest of our commands.
1sf org login web --alias your-org-alias
Download this import-ready version of our product data: Link. Import the inventory data to Product2 using the command below. Replace /full/path/to/product2_import.csv with the direct path to import-ready .csv file.
Retrieve the Standard Pricebook ID. Copy and save the ID value that starts with “01s…”.
1sf data query --query "SELECT Id, Name FROM Pricebook2 WHERE IsStandard=true" --target-org your-org-alias
Export the Product2 IDs. Replace /full/path/to/product2_ids.csv with the location you want to save the file.
1sf data query --query "SELECT Id, ProductCode FROM Product2 ORDER BY ProductCode ASC" --target-org your-org-alias --result-format csv>/full/path/to/product2_ids.csv
Build the PricebookEntry .csv.
Open your original spreadsheet in one tab Link, and the product2_ids.csv you just exported in a second tab.
Add two new columns to your original spreadsheet named: “Pricebook2Id” and “Product2Id”.
Under Pricebook2Id, paste the ID value you copied in step one in every row.
Sort the rows on your spreadsheet alphabetically by ProductCode, then copy the entire Id Column from product2_ids.csv and paste it in the Product2Id column.
Create a brand new spreadsheet with only these four columns: Pricebook2Id, Product2Id, UnitPrice, IsActive.
Copy over the respective columns from your original spreadsheet. Under IsActive, enter “true” for every row.
Save the new spreadsheet as a .csv file. Your final spreadsheet should look something like this: Link.
Import the PricebookEntry .csv. Replace /full/path/to/pricebook_entry_import.csv with the file path to your own final spreadsheet.
From the App Launcher, enter products, then select the Products app.
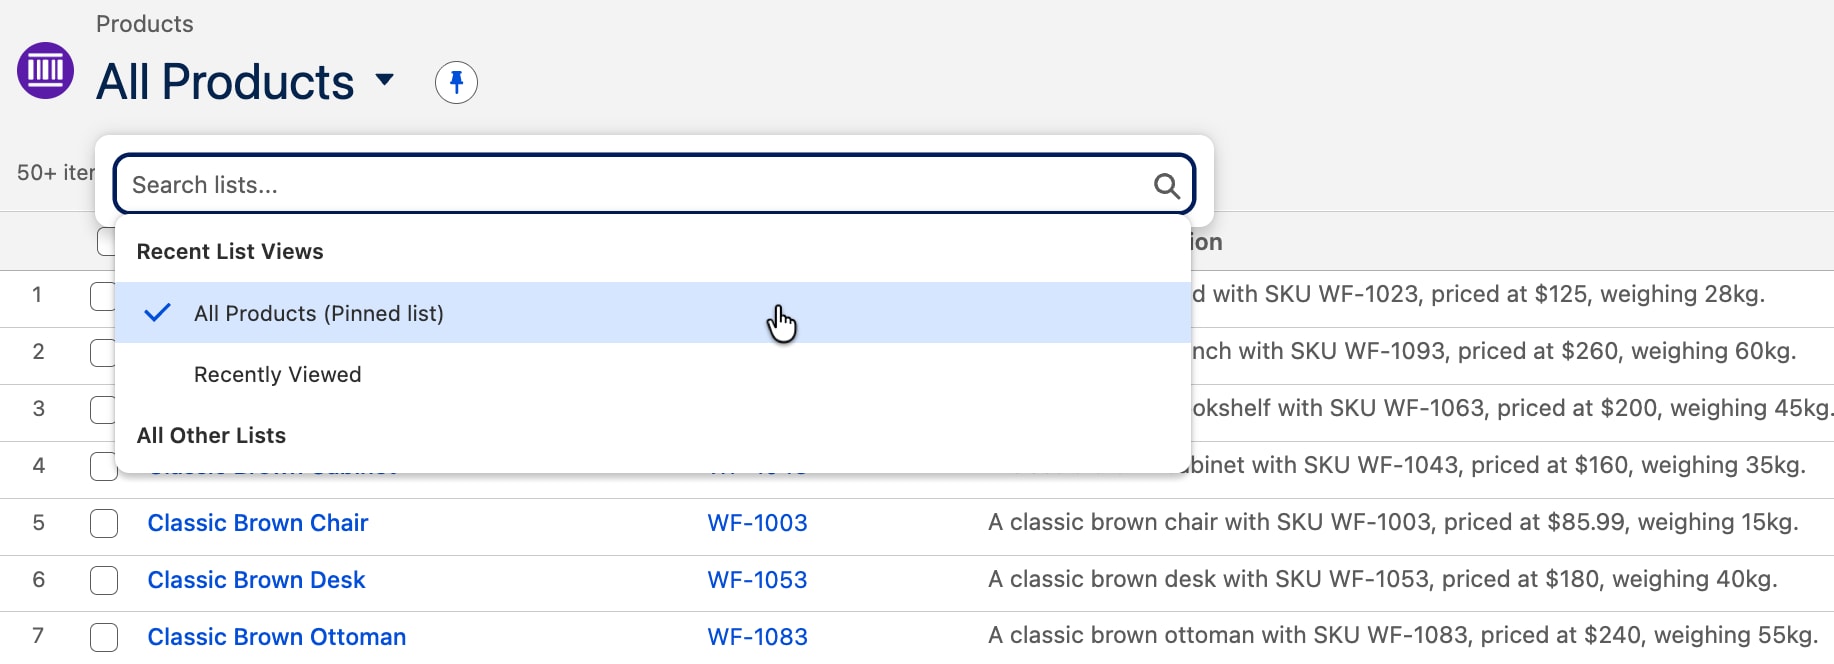
Change the List View to All Products. You should see 100 furniture entries.
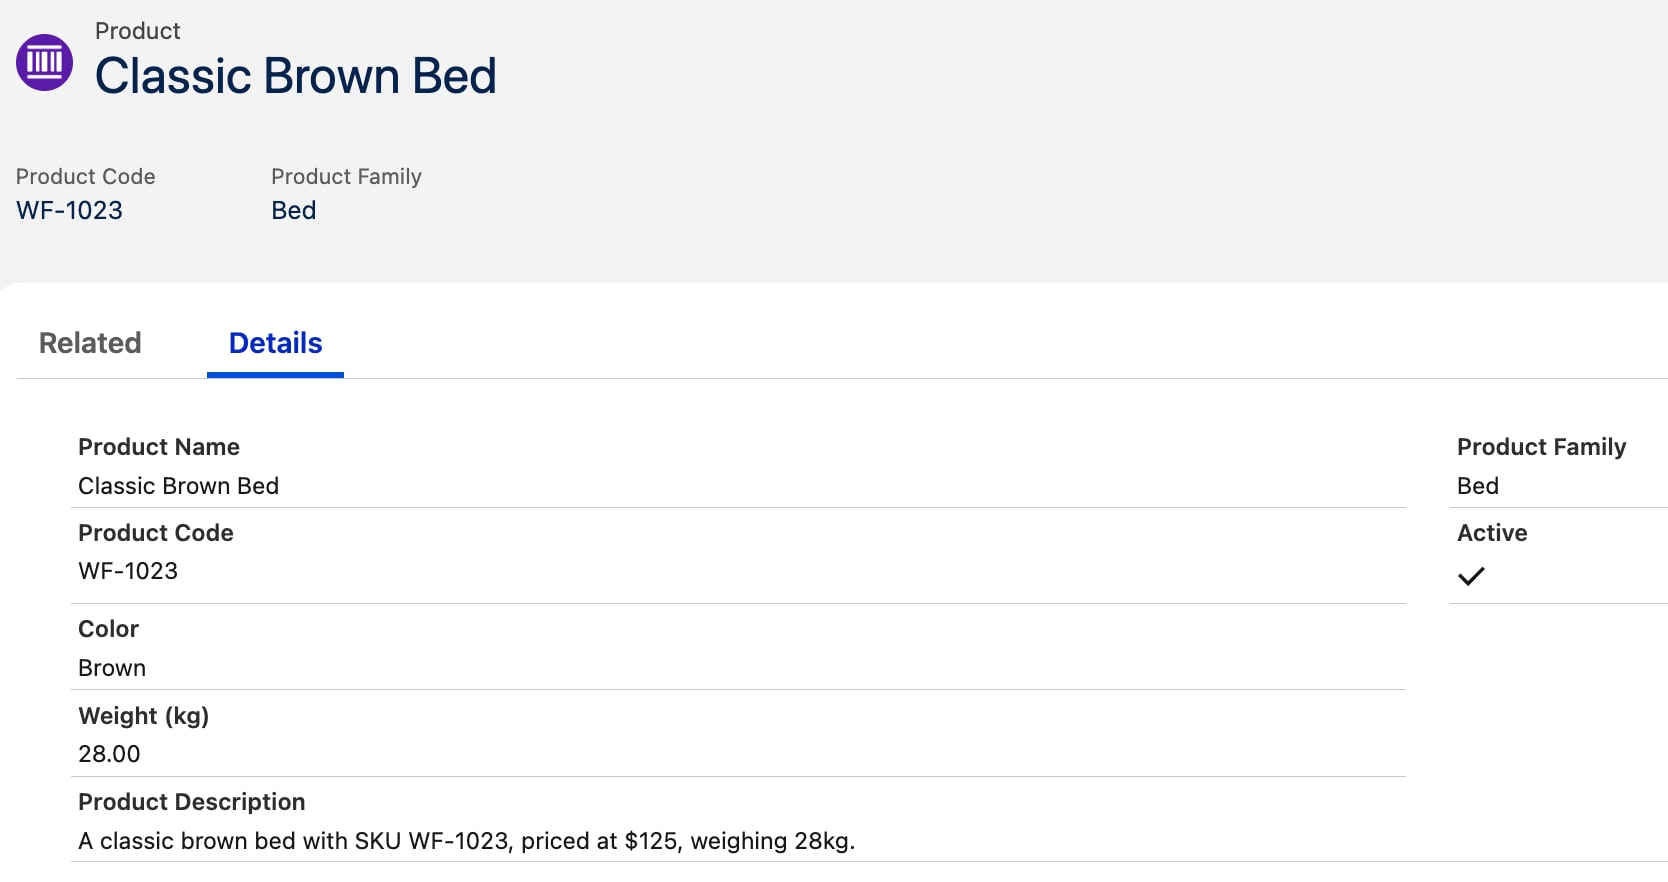
Click on one of the entries. Under Details, you should see Color and Weight (kg) fields.
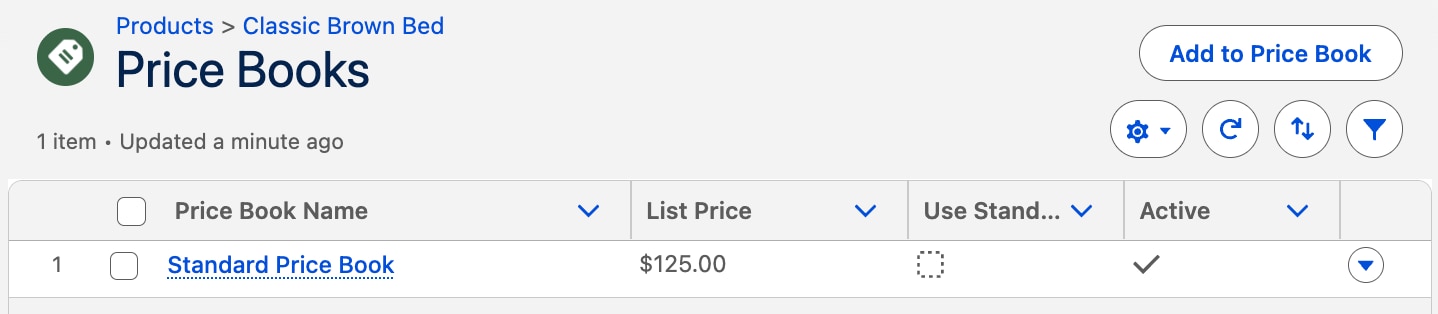
Click Related. Click Price Books. You should see a list price for the object.
If you see everything, then congratulations! Your data was imported successfully.
Step 3: Create the Apex Class
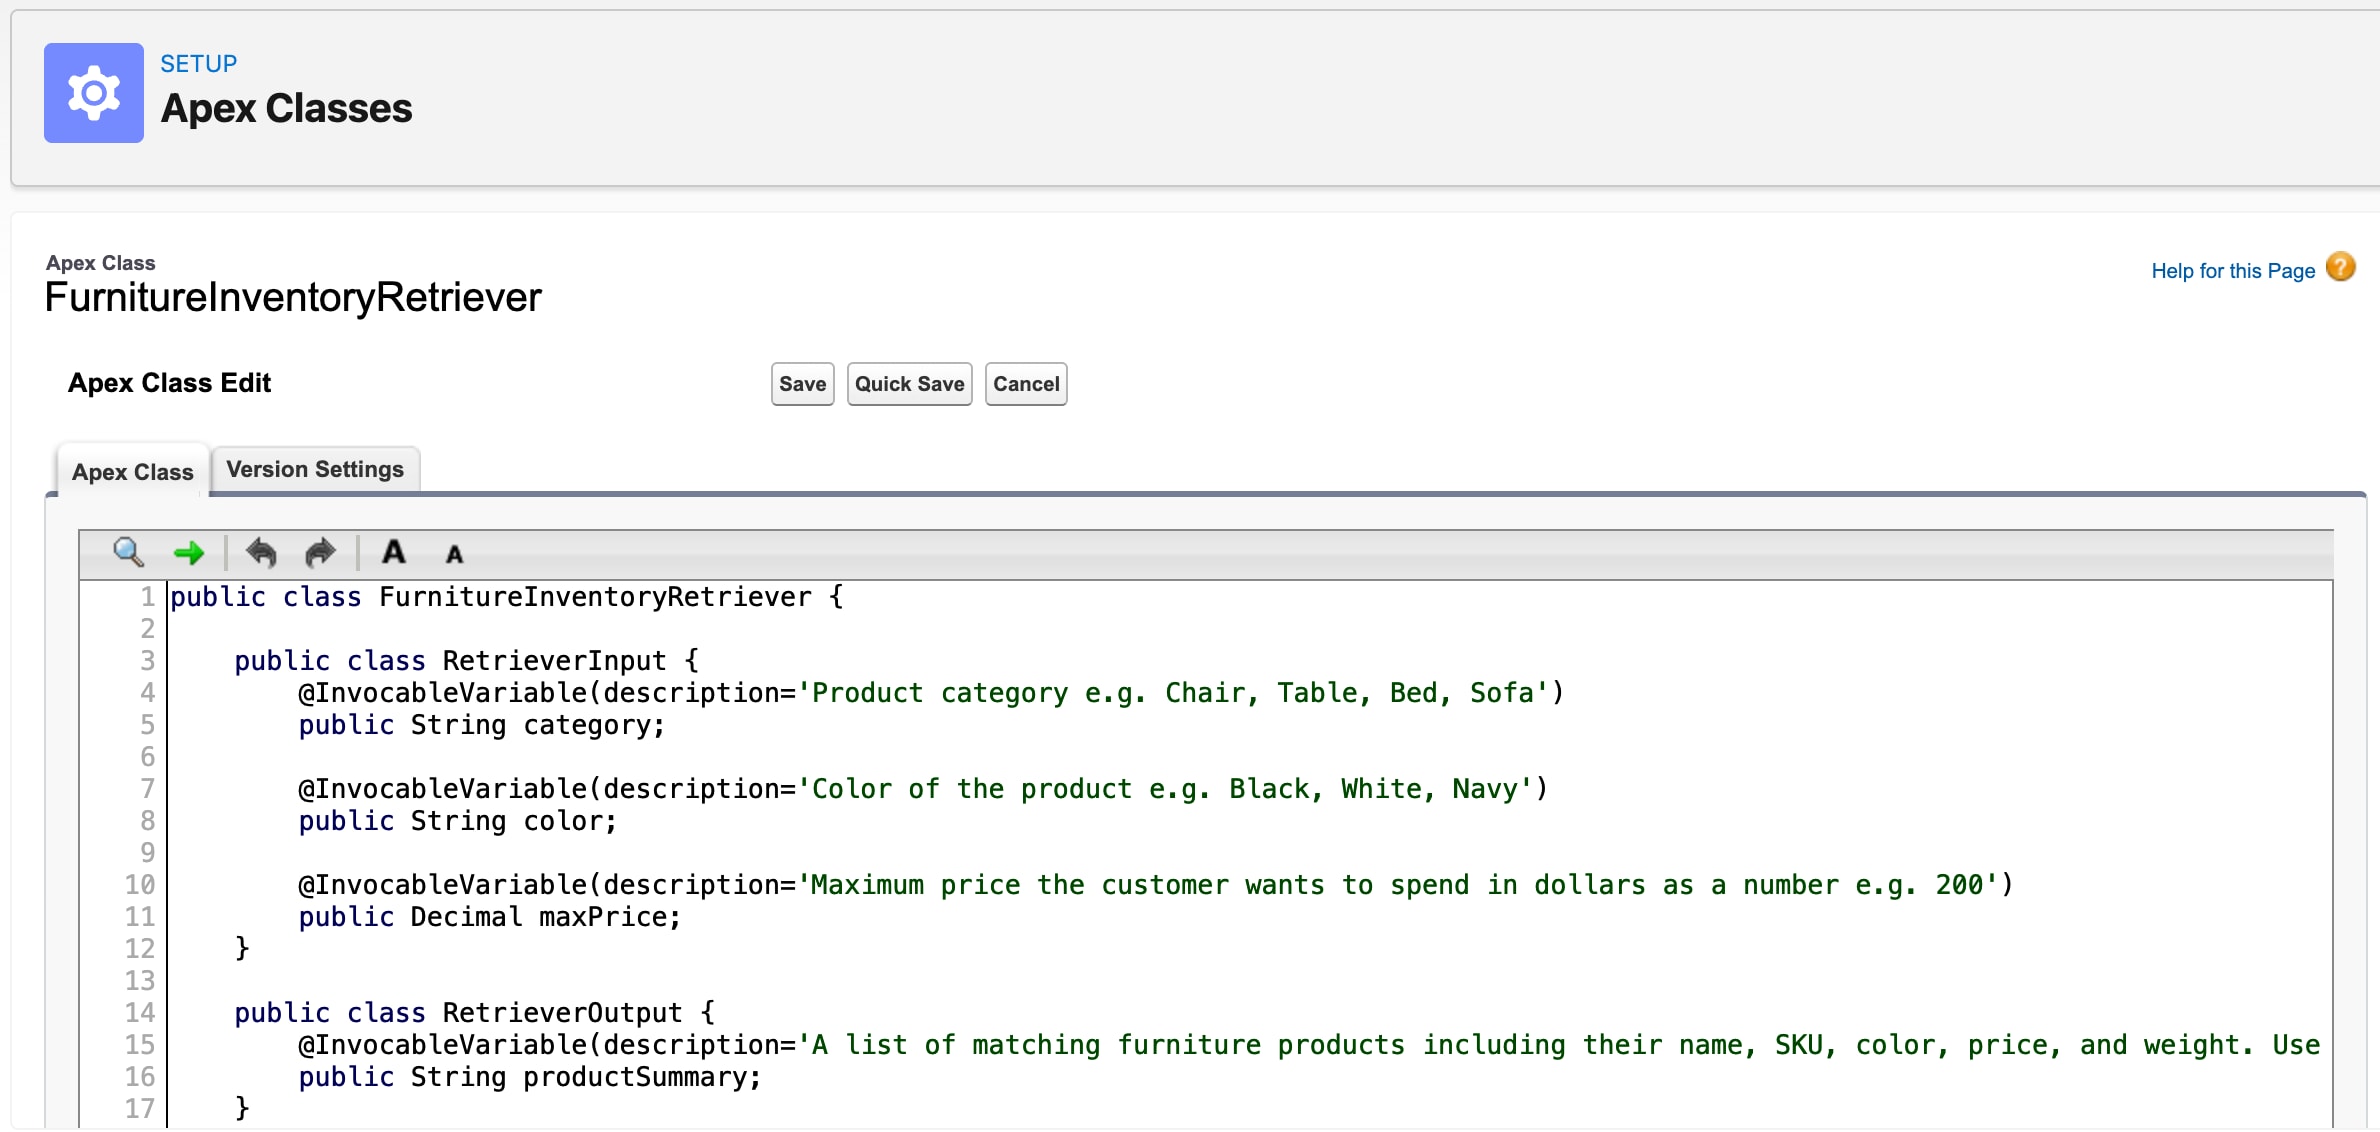
Now we need to create the custom Apex class our agent will be using to process customer questions. We’ll add it to an agent action later.
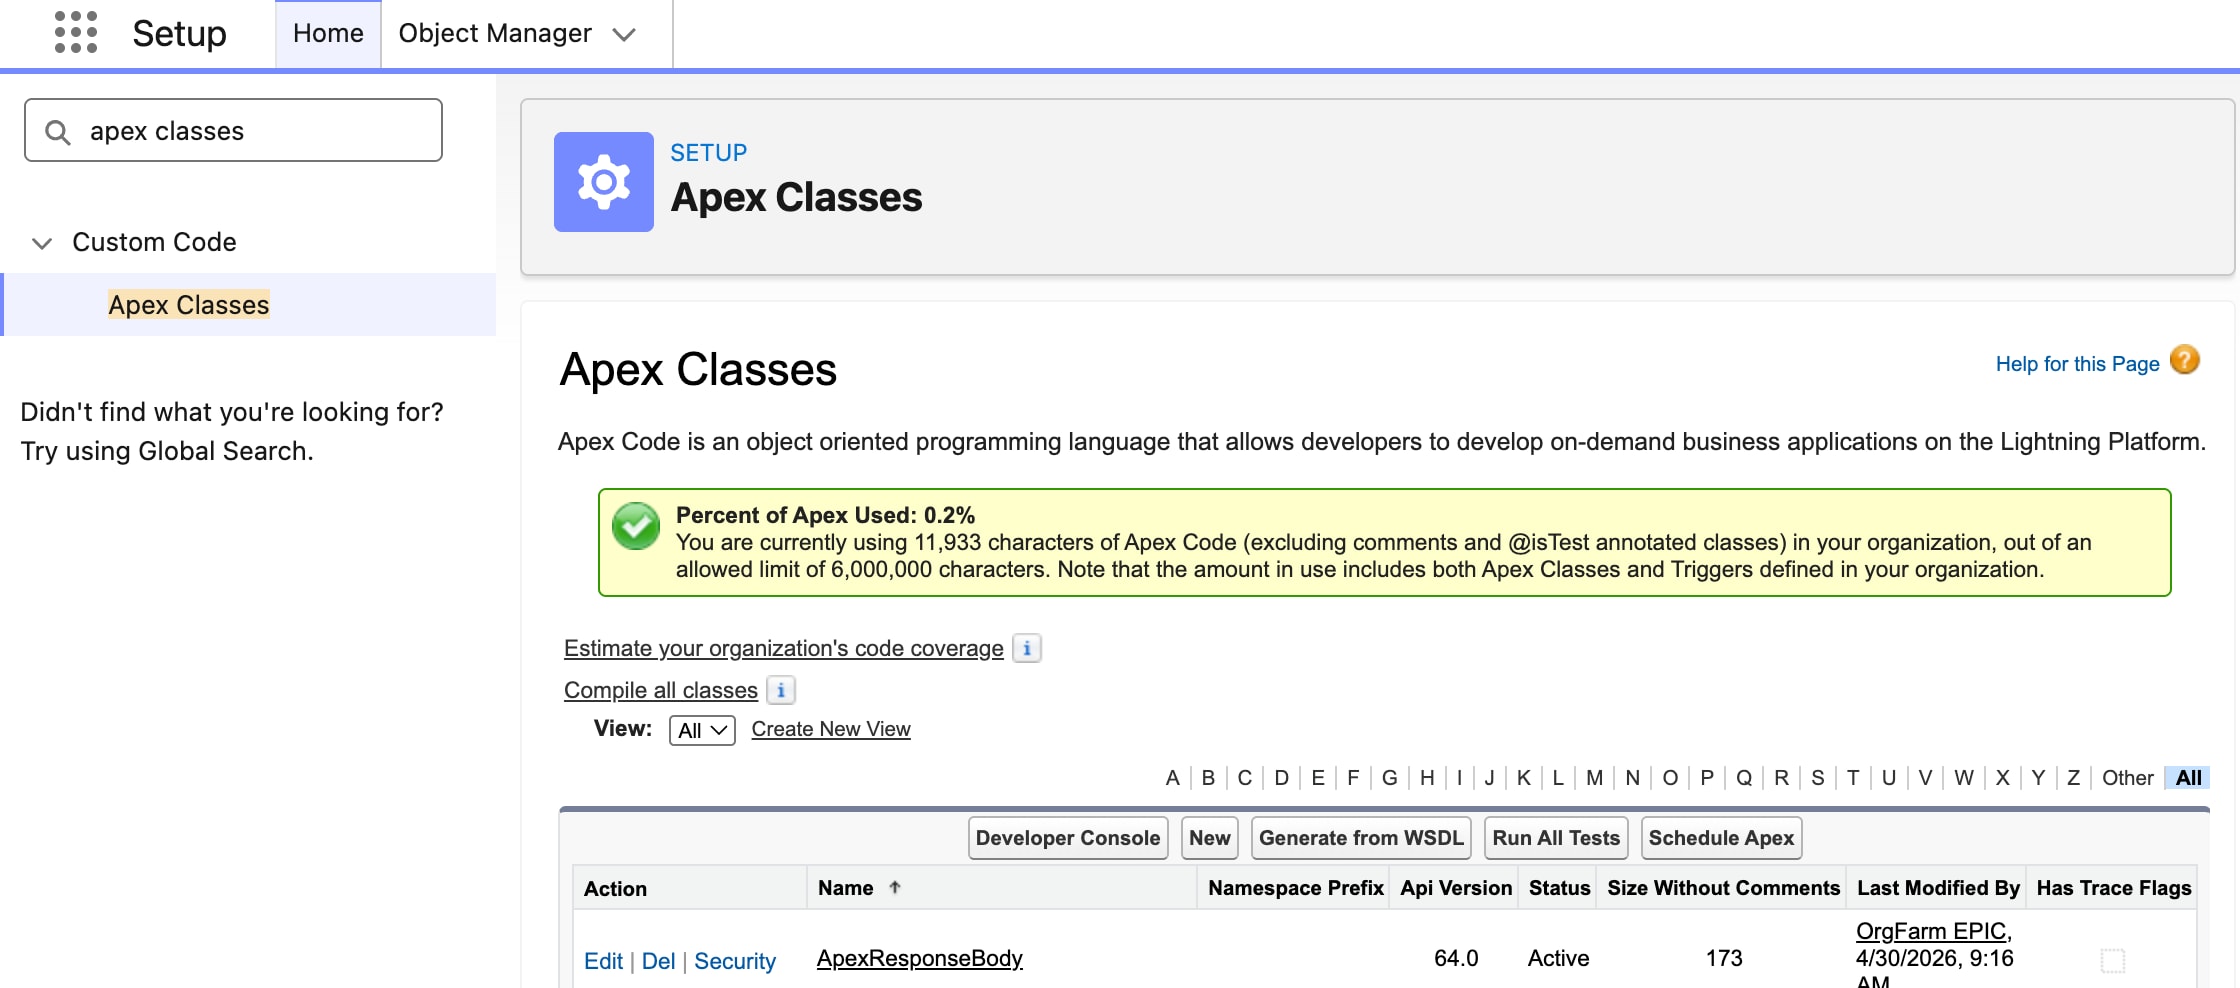
From Setup, in the Quick Find box, enter apex classes, and then select Apex Classes.
Click New.
Add the Apex code. See full code below.
Click Save.
Example Code
This code has extensive code comments explaining each section, denoted by the ”//” syntax, like this: // This is a code comment.
Custom Apex Action
1// This class is an Apex Action for Agentforce.2// It allows an AI agent to search the furniture inventory3// by category, color, and max price using natural language.4public class InventoryRetriever{56 // RetrieverInput defines the parameters the agent can pass into this action.7 // Each @InvocableVariable is a field the agent will populate based on8 // what the user asks. The description tells the agent what each field means.9 public class RetrieverInput{10 @InvocableVariable(description='Product category e.g. Chair, Table, Bed, Sofa')11 public String category;1213 @InvocableVariable(description='Color of the product e.g. Black, White, Navy')14 public String color;1516 @InvocableVariable(description='Maximum price the customer wants to spend in dollars as a number e.g. 200')17 public Decimal maxPrice;18}1920 // RetrieverOutput defines what this action sends back to the agent.21 // The agent reads productSummary and uses it to compose a response to the user.22 public class RetrieverOutput{23 @InvocableVariable(description='A list of matching furniture products including their name, SKU, color, price, and weight. Use this to answer the customer\'s question about available products. If no products are found, inform the customer and suggest broadening their search.')24 public String productSummary;25}2627 // @InvocableMethod marks this as the entry point the agent calls.28 // The label and description appear in the Agent Action configuration in Setup.29 @InvocableMethod(30 label='Search Furniture Inventory'31 description='Searches the furniture inventory by category, color, and max price'32)33 public static List<RetrieverOutput>searchInventory(List<RetrieverInput>inputs){34 // Agentforce always passes inputs as a List, even for a single call.35 // We take the first (and only) item from the list.36 RetrieverInput input = inputs[0];3738 // Copy input values into local variables. This is required for dynamic39 // SOQL bind variables — Apex cannot bind directly to object properties40 // in a dynamically built query string.41 String categoryFilter = input.category;42 String colorFilter = input.color;4344 // Start with a base query that returns all active products.45 // We'll append WHERE clauses dynamically based on what the agent passed in.46 String query = 'SELECT Id, Name, ProductCode, Color__c, Weight_kg__c ' +47 'FROM Product2 WHERE IsActive = true';4849 // Only filter by category if the agent provided one.50 // Family is the standard Salesforce field that stores product category (e.g. Chair, Table).51 if(String.isNotBlank(categoryFilter)){52 query += ' AND Family = :categoryFilter';53}5455 // Only filter by color if the agent provided one.56 if(String.isNotBlank(colorFilter)){57 query += ' AND Color__c = :colorFilter';58}5960 // Execute the dynamically built query and store the matching products.61 List<Product2>products = Database.query(query);6263 // Price is not stored on Product2 — it lives on PricebookEntry, which is64 // a separate object. We need to query it separately and build a map65 // so we can look up each product's price by its ID.6667 // First, collect all the Product IDs from our query results.68 Set<Id>productIds = new Set<Id>();69 for(Product2 p : products){70 productIds.add(p.Id);71}7273 // Query the Standard Pricebook for prices matching our product IDs.74 // We use a Map so we can efficiently look up price by Product ID later.75 Map<Id, Decimal>priceMap = new Map<Id, Decimal>();76 for(PricebookEntry pbe : [77 SELECT Product2Id, UnitPrice78 FROM PricebookEntry79 WHERE Product2Id IN :productIds80 AND Pricebook2.IsStandard = true81 AND IsActive = true82]){83 priceMap.put(pbe.Product2Id, pbe.UnitPrice);84}8586 // Build a list of formatted product summary strings to return to the agent.87 List<String>summaries = new List<String>();88 for(Product2 p : products){89 // Look up this product's price from the map we built above.90 Decimal price = priceMap.get(p.Id);9192 // If the agent specified a max price, skip any products that exceed it.93 // We only apply this filter if both maxPrice and price are present.94 if(input.maxPrice != null && price != null && price>input.maxPrice){95 continue;96}9798 // Format each matching product as a readable summary string.99 summaries.add(p.Name + ' | SKU: ' + p.ProductCode +100 ' | Color: ' + p.Color__c +101 ' | Price: $' + price +102 ' | Weight: ' + p.Weight_kg__c + 'kg');103}104105 // Build the output object to return to the agent.106 RetrieverOutput output = new RetrieverOutput();107108 // If no products matched, return a helpful message.109 // Otherwise, join all summaries into a single string separated by newlines.110 output.productSummary = summaries.isEmpty() ?111 'No products found matching your criteria.' :112 String.join(summaries, '\n');113114 // Agentforce expects the output as a List, even though we only return one item.115 return new List<RetrieverOutput>{output};116}117}
Step 4: Configure Your Agent’s Subagent and Actions
Now it’s time to build our agent, a custom subagent, and a custom action. The agent will connect to our customer support channel, find the new subagent when asked a question about product inventory, and invoke the action containing our custom Apex class to get an answer.
Create an Agentforce Service Agent
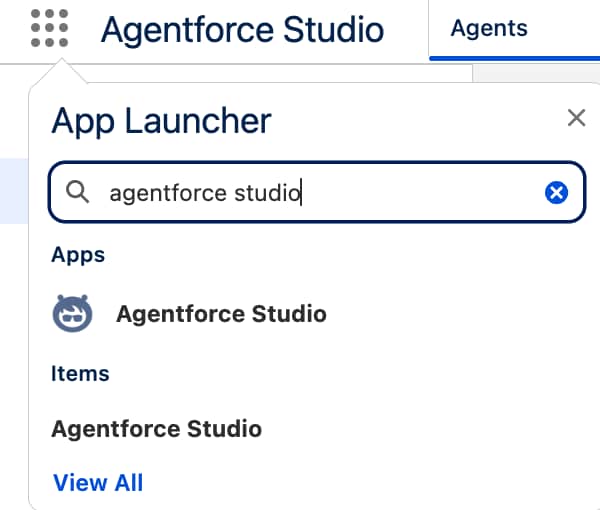
From the App Launcher, enter Agent, and then select the Agentforce Studio app.
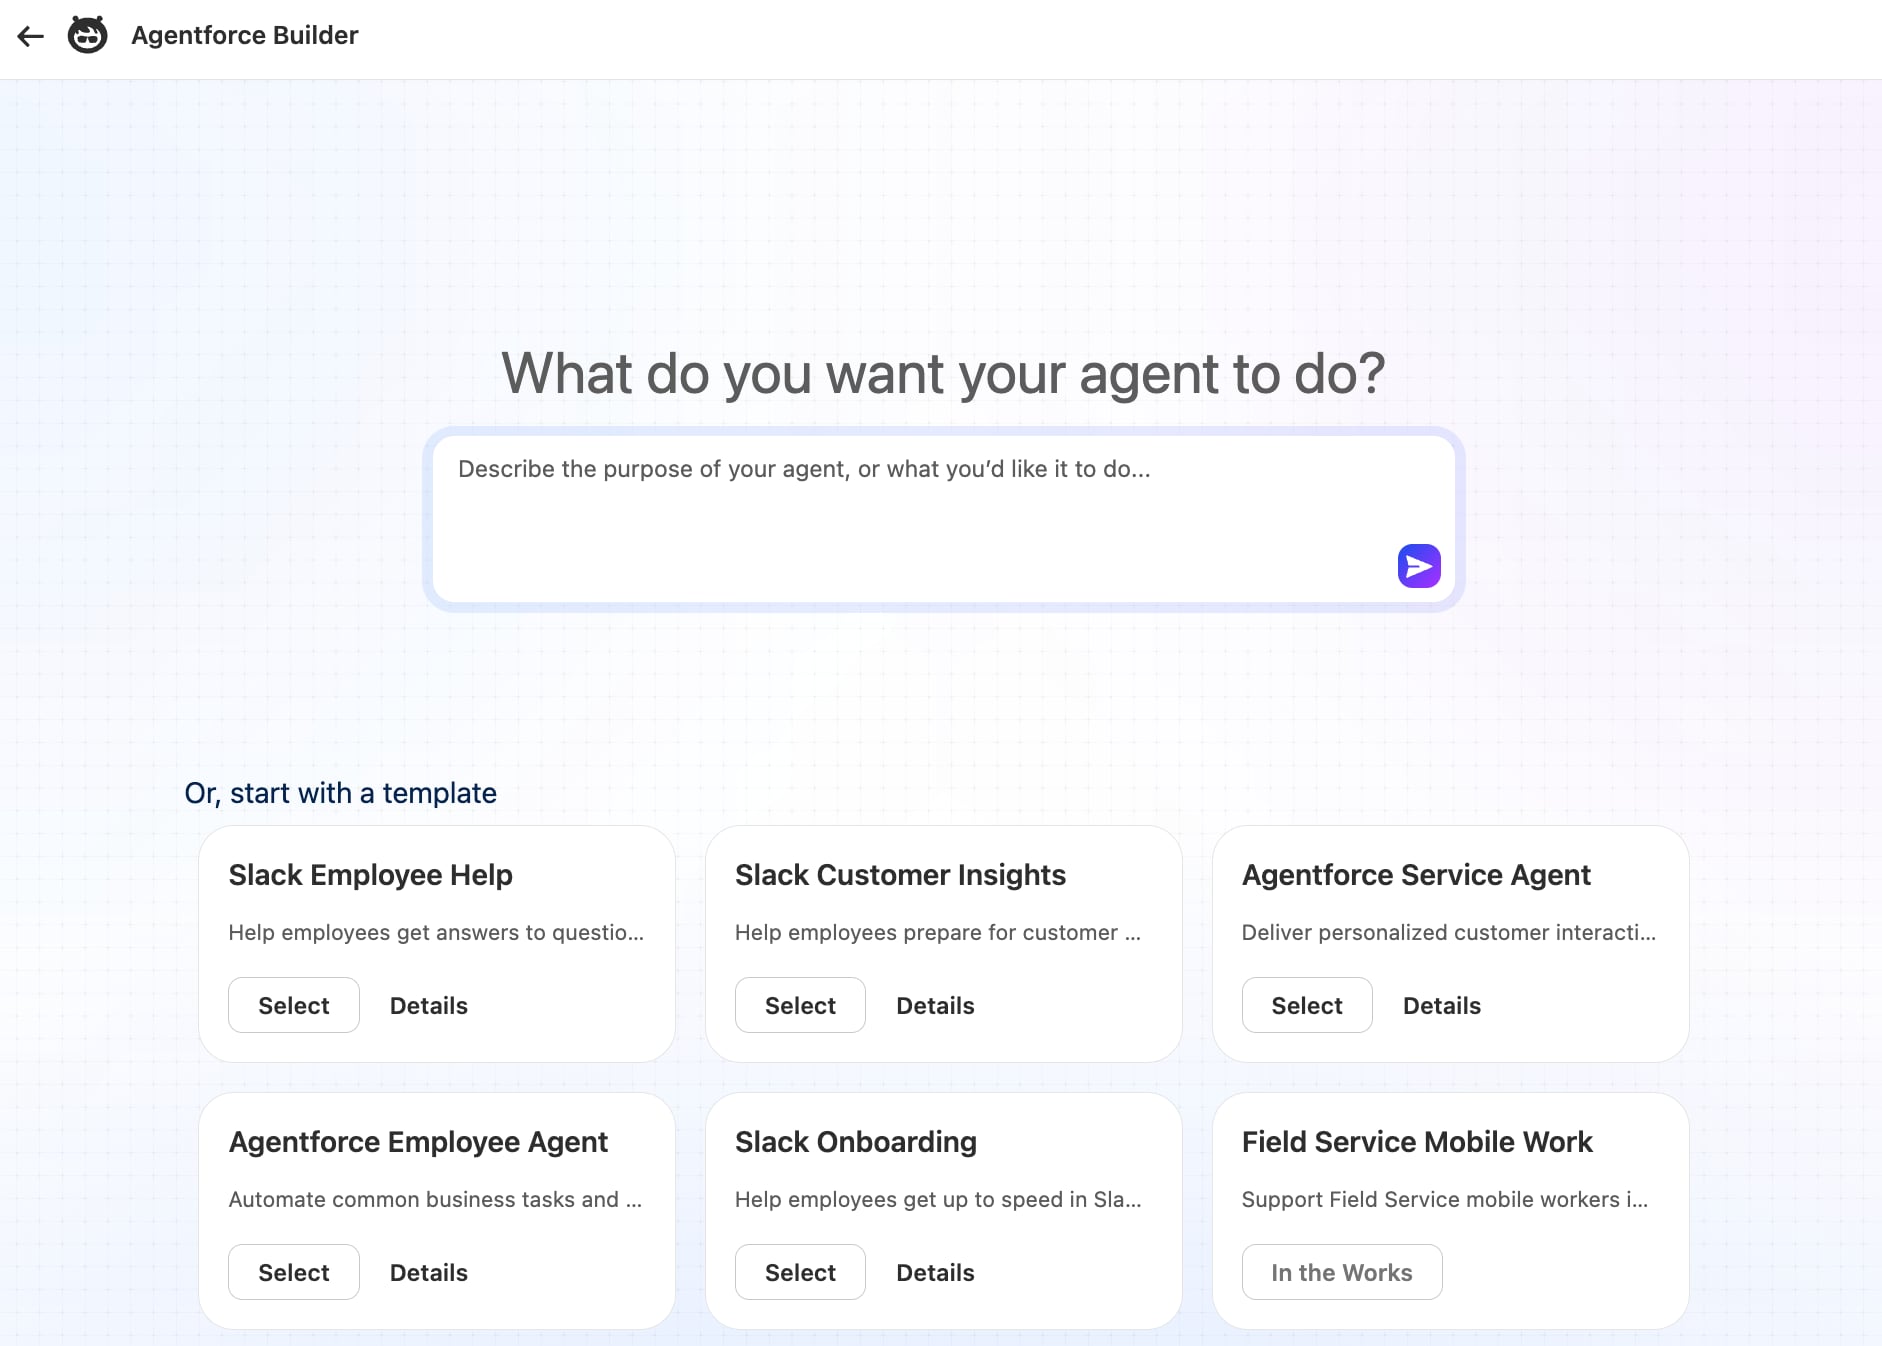
Click New Agent.
Select the Agentforce Service Agent template.
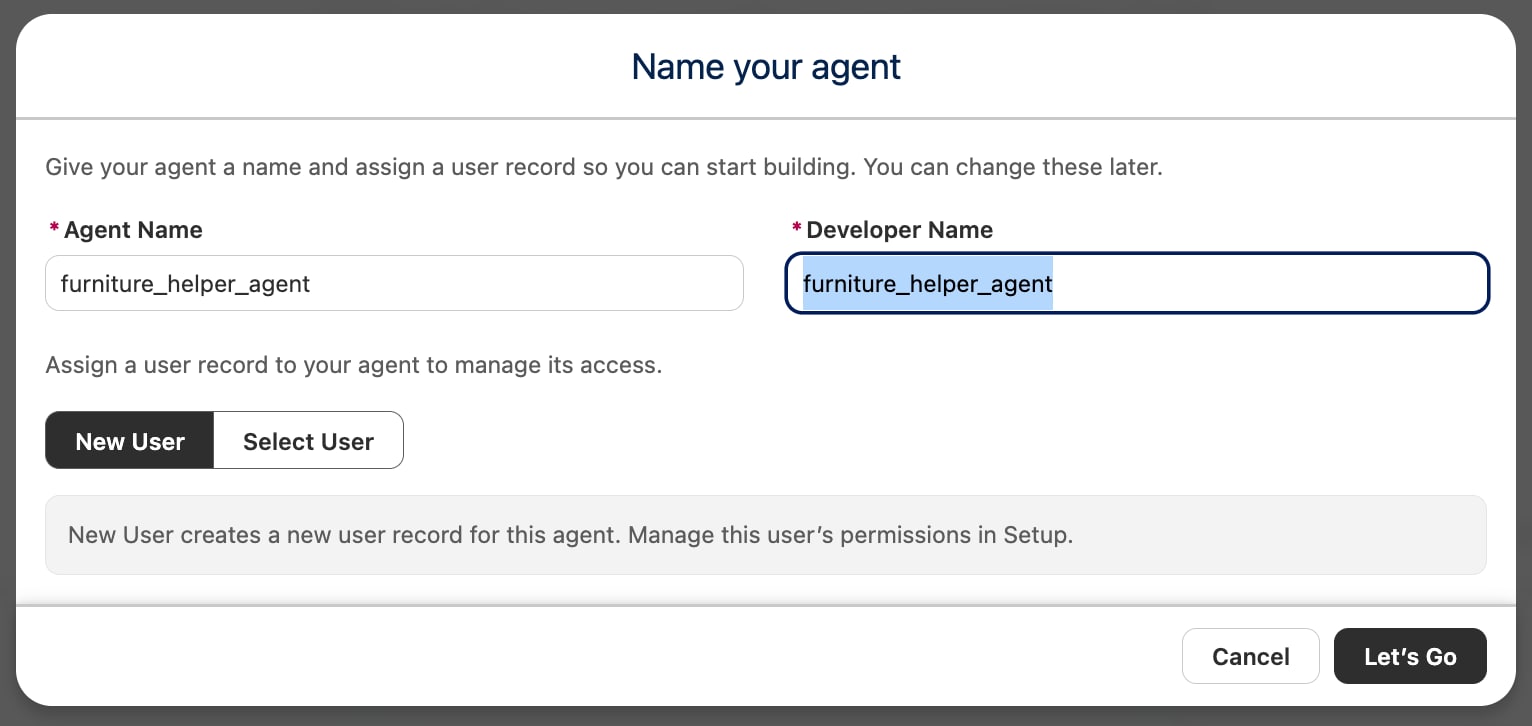
Give your agent a name, like “Furniture Helper Agent”.
Select New User for the agent user record.
Click Let’s Go.
Create a New Subagent
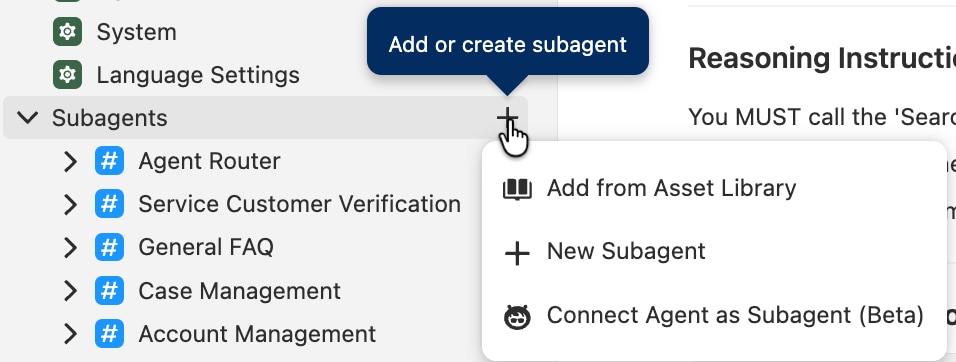
In the Explorer, click the + icon next to subagents, then click New Subagent.
Give it a Subagent Name, like “Search Inventory”.
Give it a Description, like “Handle all questions about products, furniture, inventory, pricing, colors, and availability.”
Give it Reasoning Instructions, like:
“You MUST call the ‘Search Furniture Inventory’ action for every product-related question. Pass the relevant category, color, and maxPrice values from the user’s message. Do not respond until you have received results from the action. If the action returns no results, tell the user no matching products were found.”
The subagent must explicitly instruct the agent to call an action, otherwise the agent may ignore it.
Note
Create a New Action
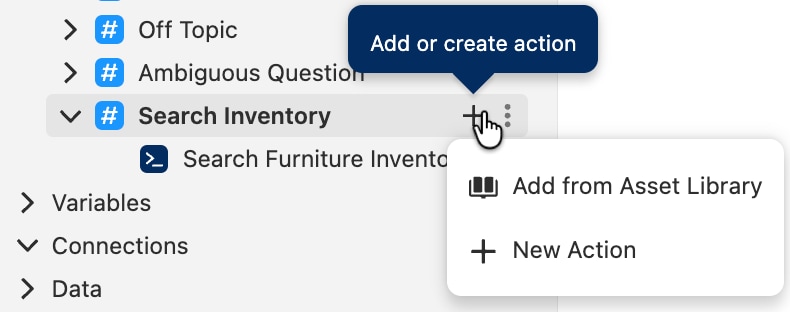
In the Explorer, click the + icon next to your new subagent, then click New Action.
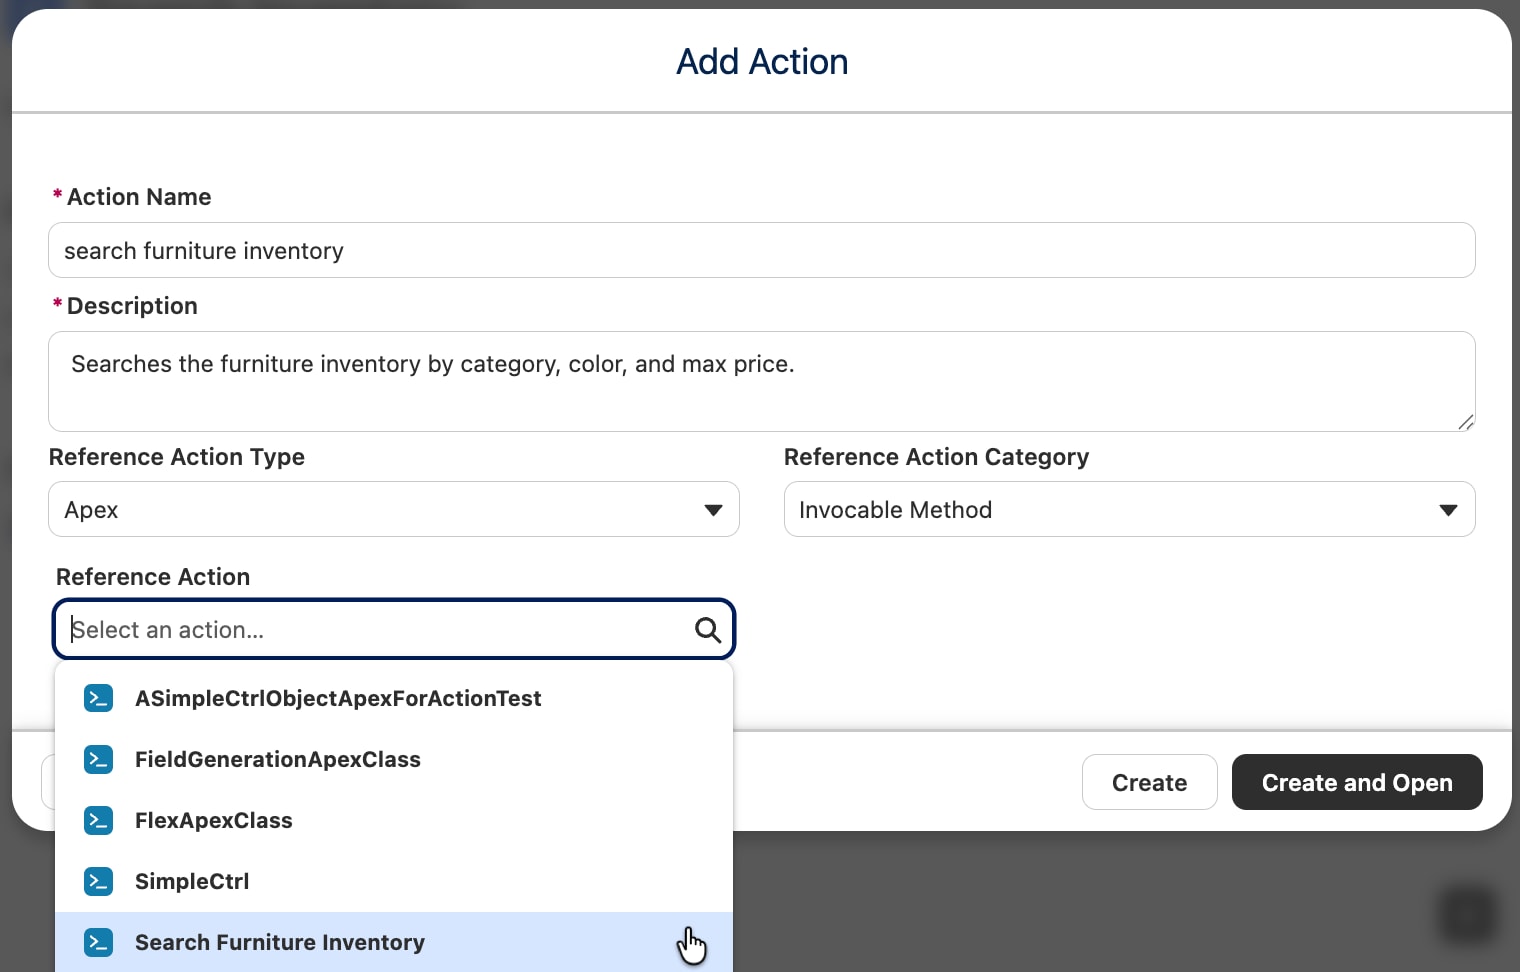
Give it an Action Name, like “Search Furniture Inventory”.
Give it a Description, like “Searches the furniture inventory by category, color, and max price.”
The description is very important because the agent uses it to decide if it should run the action or not.
Note
For Reference Action Type, select Apex.
Reference Action Category should be Invocable Method.
For Reference Action, select the Apex action we created (Search Furniture Inventory) and click Create and Open.
Click Save to save your work.
Step 5: Give Your Agent User the Correct Permissions
In order for our agent to access both our inventory data and the custom Apex class, we need to give its agent user permissions in our org. Without those permissions, the agent isn’t allowed to see into our data or run any special code. See Best Practices for Agent User Permissions for more information.
Grant Object and Field Permissions
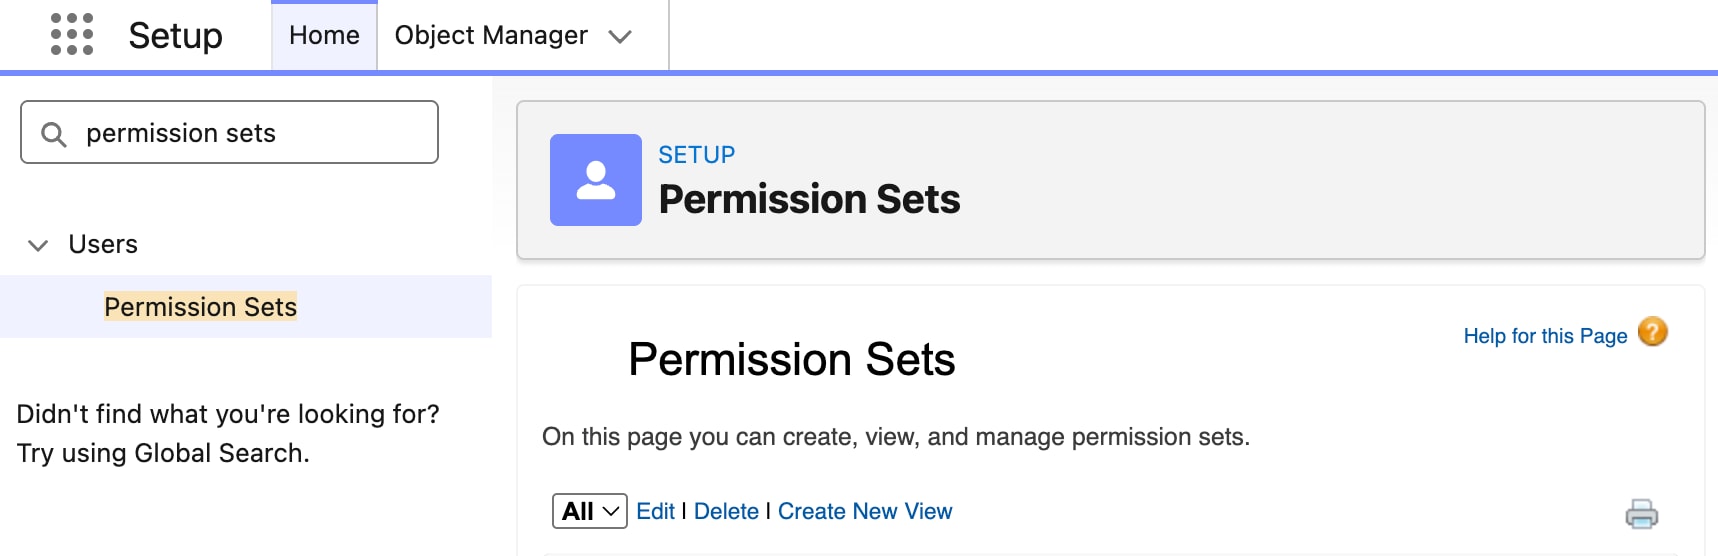
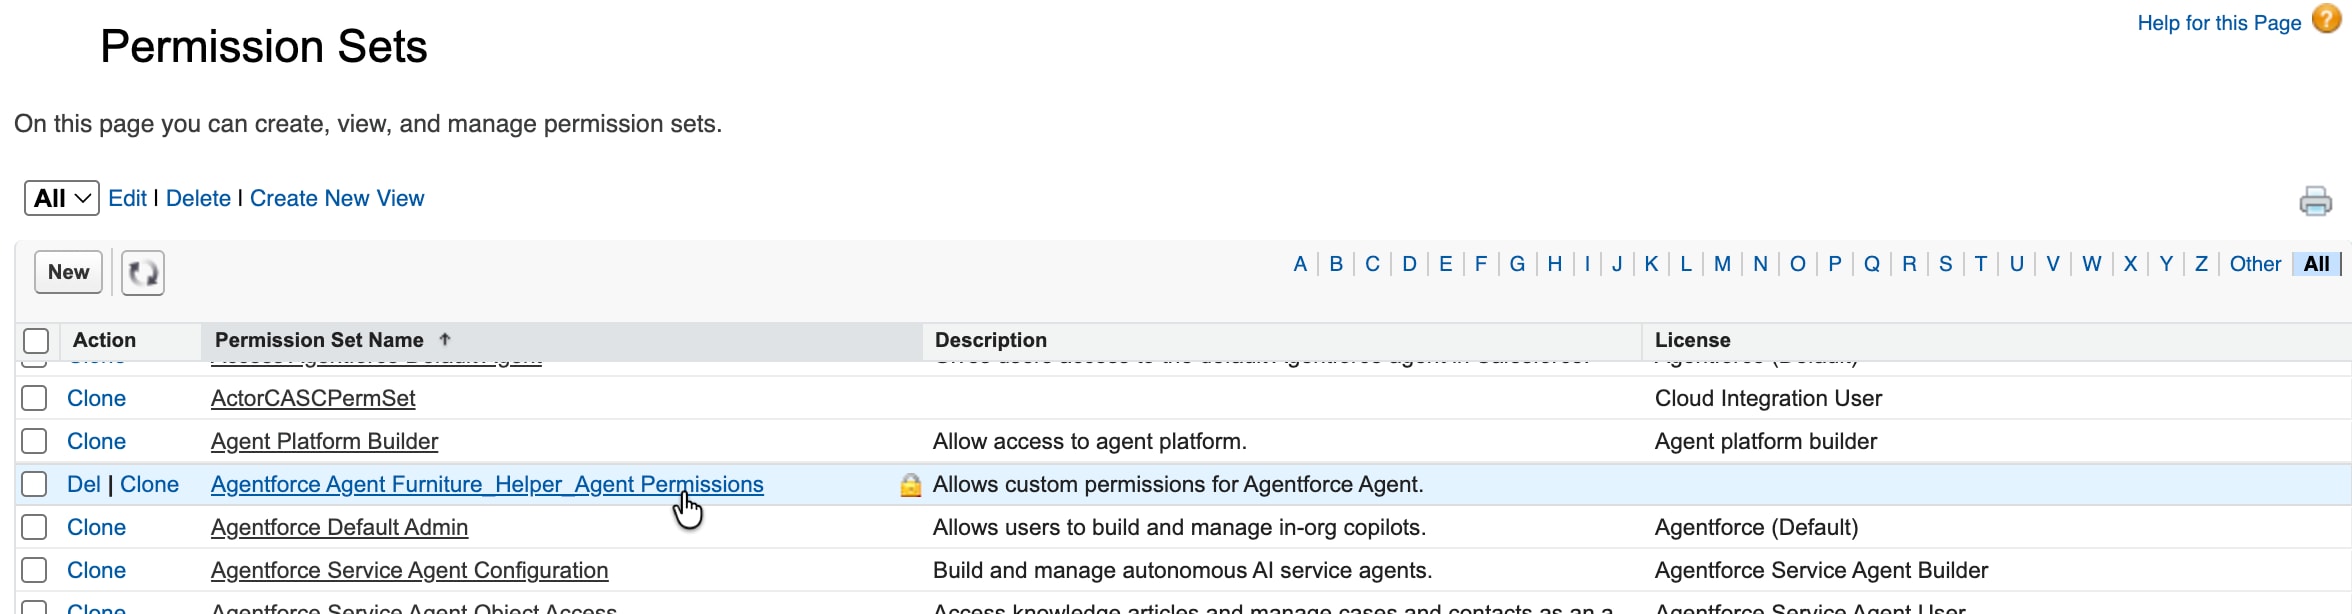
From Setup, in the Quick Find box, enter permission sets, and then select Permission Sets.
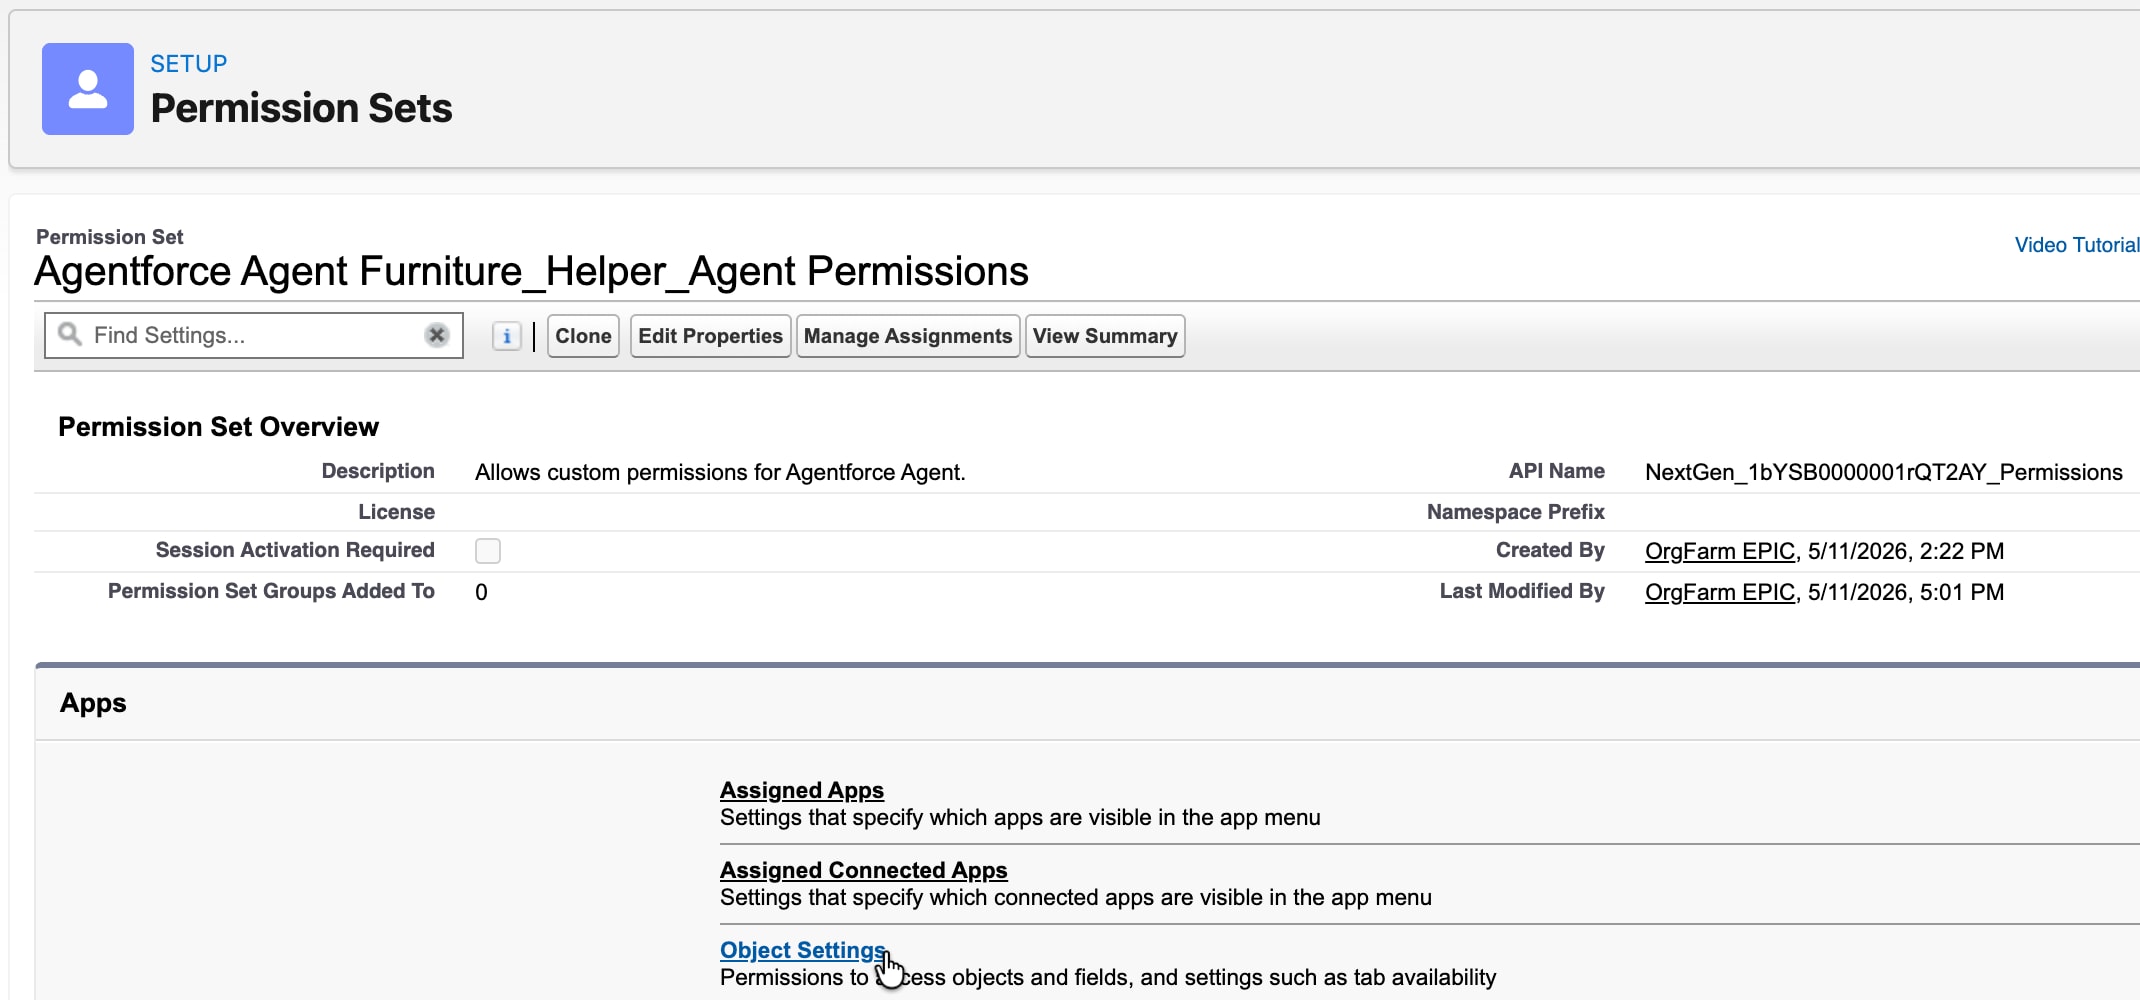
From the list, look for Agentforce Agent [your agent name] Permissions and open it. For this example, the permission set is named Agentforce Agent Furniture_Helper_Agent Permissions.
Select Object Settings.
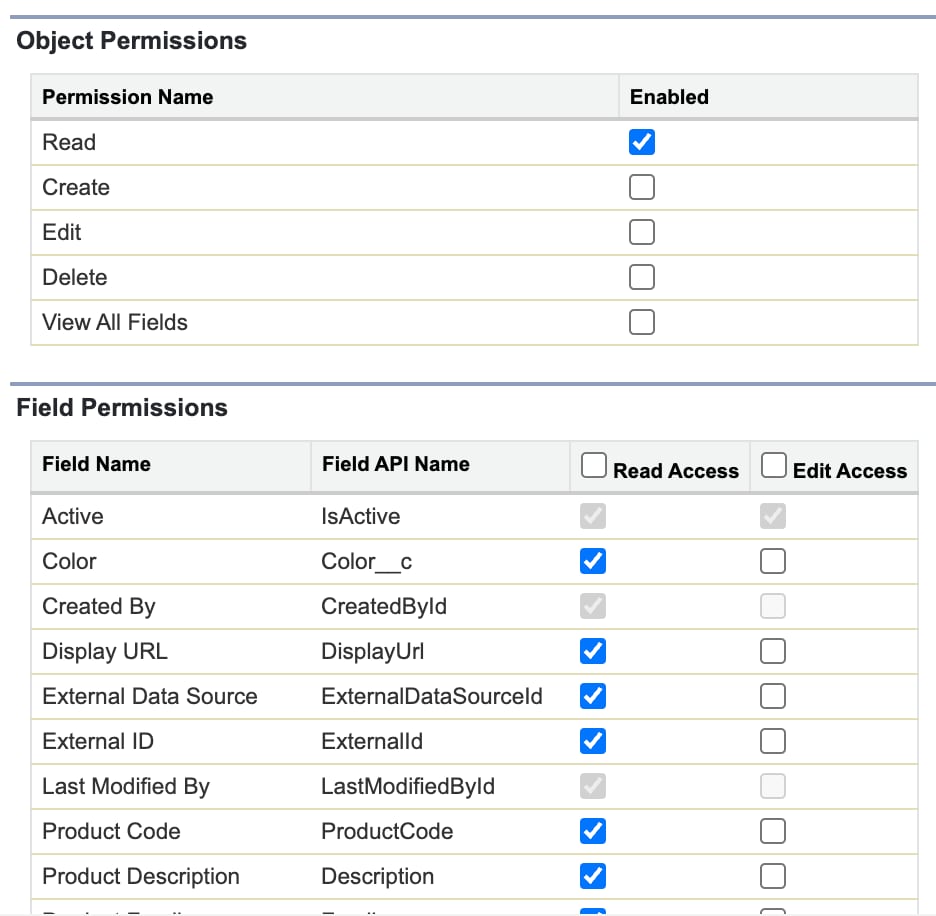
Scroll down the list until you find one of the objects your agent needs and open it. For this example, we need objects with the API names Product2, PricebookEntry, and Pricebook2.
Click Edit, then check Read under Object Permissions, and Read Access for all Field Permissions.
Repeat for all necessary objects.
Click Save.
Grant Custom Apex Class Permissions
Return to your custom Apex class.
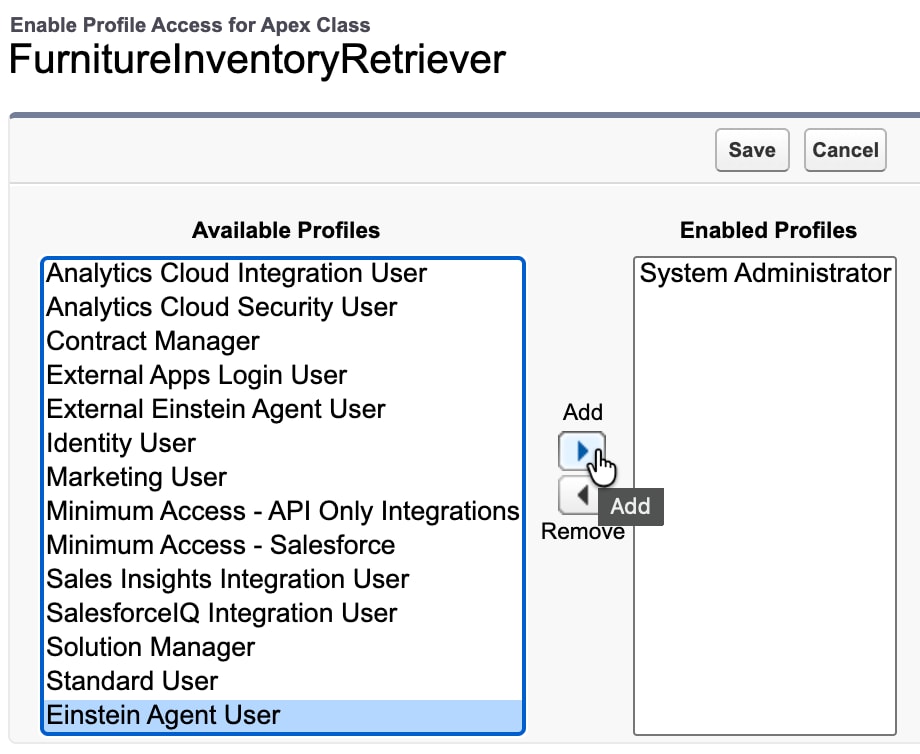
Click Security.
Highlight your Einstein Agent User profile in Available Profiles and click Add so it moves to the Enabled Profiles list.
Click Save.
Step 6: Test Your Agent
Always test your agent thoroughly before activating it and making it available to your customers. Agenforce Builder has a suite of advanced testing features to ensure your agent behaves consistently, responsibly, and helpfully. See Preview and Test in Agentforce Builder for more information.
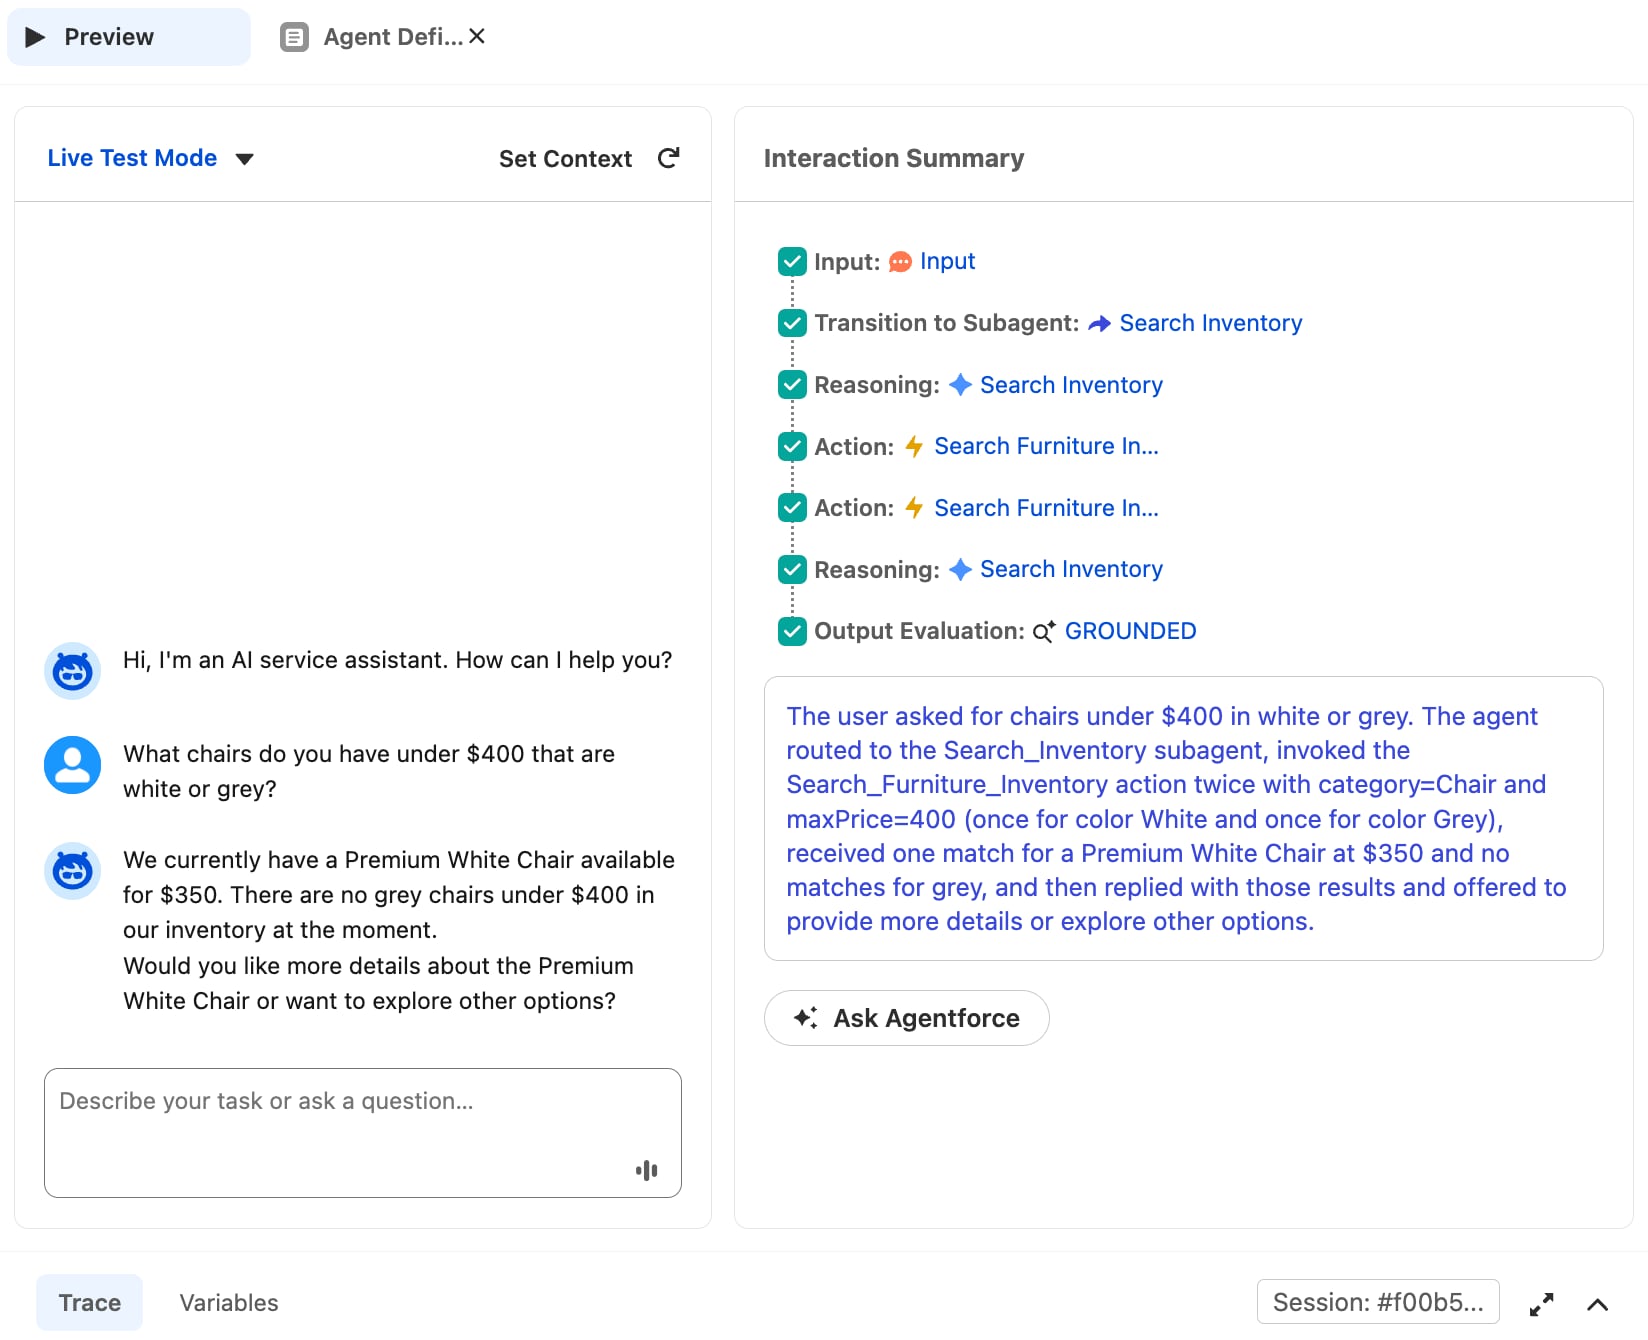
Return to your agent in Agentforce Builder.
Click Preview at the top of the canvas.
Change Simulate to Live Test Mode.
Ask your agent questions about the furniture inventory and evaluate the results.
For example, try asking “What chairs do you have under $400 that are white or grey?”
You can see the agent’s reasoning process in the Interaction Summary column.
If the results are satisfactory, you’re ready to activate your agent.
Step 7: Save, Commit, and Activate Your Agent
Once our agent is ready, we need to save our work and finalize the agent version. When we click Commit Version, we’re locking in the current state of the agent as version complete. Future changes will require us to create a new version, leaving the previous version intact in case we ever need to go back to it. After that, we’re ready to activate our agent and make it available to our customers.
In your agent in Agentforce Builder, click Save.
Click Commit Version, then click Commit Version again. You’ll need to create a new version to make further changes to your agent.
Click Activate, then click Activate again.
Your agent should now be live on its connected channels.




 j
j