This example builds a customer support agent that verifies a customer’s identity and helps them get information about their orders. You can build the same agent in three different ways (Headless, Script, or Canvas). Choose the path that fits how you work.
Subagent Summary
The agent contains three subagents:
The agent_router subagent, which provides general instructions to the LLM and exposes two tools that the LLM can select to call. The two tools are utilities that transition to the required subagents, based on user input.
The Identity subagent, which verifies the user’s identity. This subagent allows the LLM to request the user’s email (if it doesn’t exist), then sends a verification code to the provided email. Then, the LLM can validate the verification code that the customer provides. This subagent contains deterministic tools and actions, while allowing the LLM freedom to use natural language to interact with the user.
The Order_Management subagent, which allows the user to look up order details.
Prerequisites
Before you build the agent on any path, make sure that your org is ready:
You have an active user for the agent. Every agent runs as a specific user. These examples use agentforce@salesforce.com as a placeholder for the default_agent_user — replace it with an active Einstein Agent User in your own org. To find one, in Setup go to Users, or query SELECT Username FROM User WHERE UserType = 'EinsteinAgent' AND IsActive = true.
The flows the agent calls exist in your org. See Flows This Agent Calls. If they don’t exist yet, stub them so you can preview the agent end-to-end.
For the Headless and Script paths, the Salesforce CLI must be installed and authorized to your org. See Set Up Your DX Environment.
Flows This Agent Calls
No matter which path you select, this agent calls four flows to do its work. The agent expects them to exist in your org. These names are the example’s defaults. If you point an action at a different flow, keep its input and output variable names the same so the action’s contract still matches.
Flow
Called to…
Inputs
Outputs
Get_Verification_Code
Send a verification code by email
email, member_number
verification_code, member_name
validate_Verification_Code
Confirm the code that the customer entered
verification_code
verification (boolean)
Get_Current_Order
Look up the customer’s current order
member_email
order_summary, order_id
Get_Past_Order
Look up a past order by ID
query
order_summary, order_id
All four flows are specific to this example. (In a real Service Cloud org, the order lookups are often handled by standard SvcCopilotTmpl__ flows instead. That namespace is reserved for a managed package, so this example uses its own plainly named flows that any org can create.)
If a flow doesn’t exist in your org, the agent won’t publish — a flow action can’t point at a flow:// target that isn’t there. To try the agent end-to-end without wiring up real backends, replace each flow with a stub: an autolaunched flow that ignores its inputs and returns canned values.
A stub flow needs only three things:
Input variables that match the action’s inputs (marked Available for input), so the agent can pass values in.
Output variables that match the action’s outputs (marked Available for output), so the agent can read results back.
An Assignment element that sets each output variable to a fixed value.
For example, a validate_Verification_Code stub takes a verification_code input, ignores it, and assigns true to a verification output — so any code the customer enters passes. A Get_Verification_Code stub returns a fixed verification_code (such as 123456) and a member_name. Give each stub the exact flow name and variable names from the table above, deploy it (sf project deploy start), then build the agent.
Choose Your Path
You can build this agent three ways. Select a tab to follow that path from start to finish.
If you’re a…
You’ll build with…
Open the tab…
Vibe coder (instruct an AI agent)
Natural-language prompts to an AI coding agent, no platform UI required
Headless
Developer (code)
Agent Script in Script view, Agentforce DX, or the CLI
Script
Admin (clicks, not code)
Agentforce Builder Canvas view
Canvas
Build the agent by describing what you want in natural language and letting an AI coding agent generate the metadata for you — no platform UI required. To get reliable results, use a coding agent that has Salesforce development context loaded, so it follows platform best practices and produces valid Agent Script.
Agentforce Vibes is Salesforce’s AI-assisted development tool, built for headless development on the platform.
The Salesforce Skills Library provides skills you can add to any coding agent that supports them, so the agent follows Salesforce best practices.
With this context in place, paste the prompt from each step below into your coding agent. The more specific your prompt — naming the agent’s behavior, the rules it must follow, and any flows or actions it needs to call — the closer the result matches.
Headless Step 1: Scaffold the Agent
This prompt sets up the agent’s foundation — its name, instructions, welcome message, running user, and locale.
1Build an Agentforce customer support agent in Agent Script, with the developer name pronto_customer_support_assistant. Its job is to help customers get information about their orders while following professional support policies. Set the welcome message to "Hi there, I'm your Pronto Customer Support Assistant," use agentforce@salesforce.com as the default agent user, and set the locale to en_US.
Headless Step 2: Define the Variables
When you build headlessly, you don’t hand-write variable declarations or specify Agent Script types — but do name the variables explicitly, so they match the references in the prompts for later steps.
1Define the agent's variables using these exact names. For identity: member_name, member_email, member_number, verification_code (the code the agent sends), user_verification_code (the code the customer enters), and a verified boolean that defaults to False and gates access to order lookups. For orders: order_id and an order_summary string that starts empty. You don't need to specify types — just name each variable and describe what it holds.
Headless Step 3: Build the Router
This prompt creates the router subagent — the agent’s entry point that welcomes the customer and routes them to the right subagent based on whether they’re verified.
1Add a start_agent router subagent that welcomes the customer and decides which subagent should handle their request. Give it two transition tools, gated by the verified variable: a transition to the Identity subagent available only when verified is False, and a transition to the Order Management subagent available only when verified is True. Tell it to never escalate to a human unless the customer explicitly asks.
Headless Step 4: Build the Identity Subagent
This prompt creates the Identity subagent, which verifies the customer by email before any order data is exposed, calling flows to send and validate a verification code.
1Add an Identity subagent that verifies the customer before they can look up orders. When member_email is known, send a verification code by calling the Get_Verification_Code flow and store its outputs in verification_code and member_name. Ask the customer for the code they received, save it in user_verification_code, and validate it by calling the validate_Verification_Code flow, setting the verified variable from the result. If they didn't get the code, confirm their email and resend it. Once verified is True, allow a transition to the Order Management subagent.
Headless Step 5: Build the Order Management Subagent
This prompt creates the Order Management subagent, which automatically looks up the customer’s current order on entry and can also retrieve a past order by ID.
1Add an Order Management subagent. When the customer enters this subagent and the order_summary variable is empty, automatically run a lookup of their current order by email (backed by the Get_Current_Order flow) and store the result in order_summary. Address the customer by name and show their order summary. If they ask about a past order, request the Order ID and look it up with the Get_Past_Order flow.
Headless Step 6: Preview and Test
Deploy the agent to your org with the Salesforce CLI or your coding agent’s MCP connection, then open it in Agentforce Builder and select Preview. Start a conversation, such as I need help with my order, and confirm the agent asks you to verify your identity first.
Build the agent by writing Agent Script directly in Script view, in Agentforce DX, or with the CLI. The snippets below assemble into the complete script in The Complete Script at the end of this tab.
Script Step 1: Scaffold the Agent
Set up the agent’s foundation. This Agent Script snippet defines the system block (the agent’s instructions and welcome and error messages), the config block (developer name and description), the access block (the default agent user), and the language block (locale settings).
Step 1 - Scaffold
1system:2 instructions: "You are a helpful, professional assistant that provides customers with information about their orders."3 messages:4 welcome: "Hi there, I'm your Pronto Customer Support Assistant."5 error: "Sorry, something went wrong on my end. Could you say that again in a different way?"67config:8 developer_name: "pronto_customer_support_assistant"9 description: "Assists customers with their orders while following defined support policies."1011access:12 default_agent_user: "agentforce@salesforce.com"1314language:15 default_locale: "en_US"16 additional_locales: ""17 all_additional_locales: False
Replace agentforce@salesforce.com with an active Einstein Agent User in your org. The agent won’t publish with a default_agent_user that doesn’t exist. See Prerequisites.
Note
Script Step 2: Define the Variables
Declare the variables that the agent uses to remember information across the conversation. This Agent Script snippet declares them in a variables block, grouped into identity variables (such as member_email and the verified boolean) and order variables (such as order_summary). Each variable is mutable, so the agent can update it during the conversation, and some have default values.
Step 2 - Variables
1variables:2 # Identity3 member_name: mutable string4 description: "This is the name of the member."5 member_email: mutable string = ""6 description: "This is the email address of the member."7 member_number: mutable string8 description: "This is the member number for identification."9 verification_code: mutable string10 description: "This is the verification code to validate against the user's."11 user_verification_code: mutable string12 description: "This is the verification code entered by the user."13 verified: mutable boolean = False14 description: "Shows whether or not the user's identity has been verified."1516 # Orders17 order_id: mutable string18 description: "This is the Order ID of the order they placed."19 order_summary: mutable string = ""20 description: "This is the summary of the order."
Script Step 3: Build the Router
Add the agent_router subagent as the agent’s entry point. This Agent Script snippet defines the start_agent subagent with a reasoning block. The reasoning instructions tell the LLM how to greet and route the customer, and the actions section exposes two @utils.transition tools, each gated by an available when condition on the verified variable, so customers must verify before they can look up orders.
Step 3 - Router
1# The entry point for the agent, on every customer utterance.2start_agent agent_router:3 description: "Welcome the user and determine the appropriate subagent based on user input"4 reasoning:5 instructions: ->6 | You are an agent router for a Customer Service Bot assistant.7 Welcome the guest and analyze their input to determine the most appropriate subagent to handle their request.8 NEVER escalate to a human unless explicitly requested. A bad experience shouldn't automatically escalate.9 # This section lists the tools that the LLM10 # can choose to use. In this example, the LLM has two tools:11 # transitioning to the Identity subagent or transitioning to the12 # Order_Management subagent13 actions:14 # Transitions deterministically route execution to the specified subagent.15 # Once the LLM chooses to use this tool, the execution is guaranteed16 # to transition.17 go_to_identity: @utils.transition to @subagent.Identity18 description: "verifies user identity"19 available when @variables.verified == False20 go_to_order: @utils.transition to @subagent.Order_Management21 description: "Handles order lookup, refunds, order updates, and summarizes status, order date, current location, delivery address, items, and driver name."22 available when @variables.verified == True
Script Step 4: Build the Identity Subagent
Add the Identity subagent, which verifies the customer before any order data is exposed. This Agent Script snippet defines the subagent: the reasoning block runs send_verification_code deterministically when an email exists, then guides the LLM to validate the code, while the reasoning.actions section exposes the two verification actions and a transition tool. The subagent’s own actions section defines send_verification_code and validate_verification_code, each targeting a flow.
Step 4 - Identity Subagent
1subagent Identity:2 description: "Handles verification of the user's identity before providing access to all other topics."3 reasoning:4 instructions: ->5 if @variables.member_email != "":6 run @actions.send_verification_code7 with email=@variables.member_email8 with member_number = @variables.member_number9 set @variables.verification_code=@outputs.verification_code10 set @variables.member_name=@outputs.member_name1112 | Greet the user and inform them that to help them get started you've sent them a verification code via email.13 # This prompt contains two actions that the LLM can choose to run -14 # a tool to send the verification code, and a tool to validate the15 # verification code. Once the LLM chooses to run these actions,16 # the actions are run deterministically17 Ask the user for the verification code they received and verify it using {!@actions.validate_verification_code}.18 If the user says they did not receive the code, ask them to confirm their email and resend the verification code using {!@actions.send_verification_code}1920 # The reasoning.actions section declares the tools that the LLM can choose21 # to run. This section has three tools - two actions and22 # one transition.23 actions:24 send_verification_code: @actions.send_verification_code25 with email=@variables.member_email26 with member_number=@variables.member_number27 set @variables.verification_code=@outputs.verification_code2829 validate_verification_code: @actions.validate_verification_code30 available when @variables.verification_code != None31 with verification_code=@variables.user_verification_code32 set @variables.verified=@outputs.verification3334 go_to_order_management: @utils.transition to @subagent.Order_Management35 available when @variables.verified == True363738 # This section defines the actions available to this subagent. Actions are39 # only valid within the subagent in which they are defined.40 actions:41 send_verification_code:42 description: "Send a verification code to the member and verify confirmation."43 inputs:44 email: string45 member_number: string46 outputs:47 verification_code: string48 member_name: string49 target: "flow://Get_Verification_Code"505152 validate_verification_code:53 description: "validate the verification code"54 inputs:55 verification_code: string56 outputs:57 verification: boolean58 description: "always validate and return True"59 target: "flow://validate_Verification_Code"
Script Step 5: Build the Order Management Subagent
Add the Order_Management subagent, which looks up order details. This Agent Script snippet defines the subagent: the reasoning block runs lookup_current_order when order_summary is empty and stores the result in variables, and the reasoning.actions section exposes both lookup actions. The subagent’s actions section defines lookup_order and lookup_current_order, each targeting a flow.
Step 5 - Order Management Subagent
1subagent Order_Management:2 description: "Handles order lookup, order updates, and summaries including status, date, location, items, and driver."34 reasoning:5 instructions: ->6 if @variables.order_summary == "":7 run @actions.lookup_current_order8 with member_email=@variables.member_email9 set @variables.order_summary=@outputs.order_summary1011 | Refer to the user by name {!@variables.member_name}.12 Show their current order summary: {!@variables.order_summary} when conversation starts or if requested.13 If they want past order info, ask for Order ID and use {!@actions.lookup_order}.1415 actions:16 # The ... indicates that the LLM can use reasoning to select the17 # information from the customer's conversation, then input18 # the information into the correct input variables19 lookup_order: @actions.lookup_order20 with query = ...21 # Store the action's output into variables22 set @variables.order_summary=@outputs.order_summary23 set @variables.order_id=@outputs.order_id242526 lookup_current_order: @actions.lookup_current_order27 with member_email=@variables.member_email28 set @variables.order_summary=@outputs.order_summary29 set @variables.order_id=@outputs.order_id3031 actions:32 lookup_order:33 description: "Retrieve order details."34 inputs:35 query: string36 outputs:37 order_summary: string38 order_id: string39 target: "flow://Get_Past_Order"4041 lookup_current_order:42 description: "Retrieve current order details."43 inputs:44 member_email: string45 outputs:46 order_summary: string47 order_id: string48 target: "flow://Get_Current_Order"
Script Step 6: Preview and Test
In Script view, select Preview and start a conversation, such as I need help with my order. Confirm that the agent asks you to verify your identity first, and that order details return correctly after verification.
Each agent needs a unique developer_name. If you make multiple agents from one example script, change the developer name each time.
If you encounter an unexpected error in Agentforce Builder with the last line of your script, add a blank line or a comment to the end.
Tip
The Complete Script
The snippets from Steps 1–5 combine into this complete script. Copy and paste it to create the agent in one shot.
Example - Customer Support Agent
1system:2 instructions: "You are a helpful, professional assistant that provides customers with information about their orders."3 messages:4 welcome: "Hi there, I'm your Pronto Customer Support Assistant."5 error: "Sorry, something went wrong on my end. Could you say that again in a different way?"67config:8 developer_name: "pronto_customer_support_assistant"9 description: "Assists customers with their orders while following defined support policies."1011access:12 default_agent_user: "agentforce@salesforce.com"1314variables:15 # Identity16 member_name: mutable string17 description: "This is the name of the member."18 member_email: mutable string = ""19 description: "This is the email address of the member."20 member_number: mutable string21 description: "This is the member number for identification."22 verification_code: mutable string23 description: "This is the verification code to validate against the user's."24 user_verification_code: mutable string25 description: "This is the verification code entered by the user."26 verified: mutable boolean = False27 description: "Shows whether or not the user's identity has been verified."2829 # Orders30 order_id: mutable string31 description: "This is the Order ID of the order they placed."32 order_summary: mutable string = ""33 description: "This is the summary of the order."343536language:37 default_locale: "en_US"38 additional_locales: ""39 all_additional_locales: False4041# The entry point for the agent, on every customer utterance.42start_agent agent_router:43 description: "Welcome the user and determine the appropriate subagent based on user input"44 reasoning:45 instructions: ->46 | You are an agent router for a Customer Service Bot assistant.47 Welcome the guest and analyze their input to determine the most appropriate subagent to handle their request.48 NEVER escalate to a human unless explicitly requested. A bad experience shouldn't automatically escalate.49 # This section lists the tools that the LLM50 # can choose to use. In this example, the LLM has two tools:51 # transitioning to the Identity subagent or transitioning to the52 # Order_Management subagent53 actions:54 # Transitions deterministically route execution to the specified subagent.55 # Once the LLM chooses to use this tool, the execution is guaranteed56 # to transition.57 go_to_identity: @utils.transition to @subagent.Identity58 description: "verifies user identity"59 available when @variables.verified == False60 go_to_order: @utils.transition to @subagent.Order_Management61 description: "Handles order lookup, refunds, order updates, and summarizes status, order date, current location, delivery address, items, and driver name."62 available when @variables.verified == True6364subagent Identity:65 description: "Handles verification of the user's identity before providing access to all other topics."66 reasoning:67 instructions: ->68 if @variables.member_email != "":69 run @actions.send_verification_code70 with email=@variables.member_email71 with member_number = @variables.member_number72 set @variables.verification_code=@outputs.verification_code73 set @variables.member_name=@outputs.member_name7475 | Greet the user and inform them that to help them get started you've sent them a verification code via email.76 # This prompt contains two actions that the LLM can choose to run -77 # a tool to send the verification code, and a tool to validate the78 # verification code. Once the LLM chooses to run these actions,79 # the actions are run deterministically80 Ask the user for the verification code they received and verify it using {!@actions.validate_verification_code}.81 If the user says they did not receive the code, ask them to confirm their email and resend the verification code using {!@actions.send_verification_code}8283 # The reasoning.actions section declares the tools that the LLM can choose84 # to run. This section has three tools - two actions and85 # one transition.86 actions:87 send_verification_code: @actions.send_verification_code88 with email=@variables.member_email89 with member_number=@variables.member_number90 set @variables.verification_code=@outputs.verification_code9192 validate_verification_code: @actions.validate_verification_code93 available when @variables.verification_code != None94 with verification_code=@variables.user_verification_code95 set @variables.verified=@outputs.verification9697 go_to_order_management: @utils.transition to @subagent.Order_Management98 available when @variables.verified == True99100101 # This section defines the actions available to this subagent. Actions are102 # only valid within the subagent in which they are defined.103 actions:104 send_verification_code:105 description: "Send a verification code to the member and verify confirmation."106 inputs:107 email: string108 member_number: string109 outputs:110 verification_code: string111 member_name: string112 target: "flow://Get_Verification_Code"113114115 validate_verification_code:116 description: "validate the verification code"117 inputs:118 verification_code: string119 outputs:120 verification: boolean121 description: "always validate and return True"122 target: "flow://validate_Verification_Code"123124125subagent Order_Management:126 description: "Handles order lookup, order updates, and summaries including status, date, location, items, and driver."127128 reasoning:129 instructions: ->130 if @variables.order_summary == "":131 run @actions.lookup_current_order132 with member_email=@variables.member_email133 set @variables.order_summary=@outputs.order_summary134135 | Refer to the user by name {!@variables.member_name}.136 Show their current order summary: {!@variables.order_summary} when conversation starts or if requested.137 If they want past order info, ask for Order ID and use {!@actions.lookup_order}.138139 actions:140 # The ... indicates that the LLM can use reasoning to select the141 # information from the customer's conversation, then input142 # the information into the correct input variables143 lookup_order: @actions.lookup_order144 with query = ...145 # Store the action's output into variables146 set @variables.order_summary=@outputs.order_summary147 set @variables.order_id=@outputs.order_id148149150 lookup_current_order: @actions.lookup_current_order151 with member_email=@variables.member_email152 set @variables.order_summary=@outputs.order_summary153 set @variables.order_id=@outputs.order_id154155 actions:156 lookup_order:157 description: "Retrieve order details."158 inputs:159 query: string160 outputs:161 order_summary: string162 order_id: string163 target: "flow://Get_Past_Order"164165 lookup_current_order:166 description: "Retrieve current order details."167 inputs:168 member_email: string169 outputs:170 order_summary: string171 order_id: string172 target: "flow://Get_Current_Order"173# End of customer support script
Build the agent with clicks in Agentforce Builder’s Canvas view, which summarizes Agent Script into easily understandable blocks. For full details on the features used here, see Building Agents in Canvas View.
Canvas Step 1: Scaffold the Agent
Create an agent in Agentforce Builder. In the setup flow, set the agent’s name, running user, description, and tone — the foundation that the agent’s instructions and welcome message build on. When you finish, Agentforce Builder opens your new agent in Canvas view.
Canvas Step 2: Define the Variables
Open the Variables panel and create the variables that the agent uses to remember information across the conversation. For each one, set a name, a data type, and an optional default value:
Identity: member_name, member_email, member_number, verification_code, user_verification_code, and a verified boolean (default False).
Orders: order_id and an order_summary string (default empty).
The verified boolean and order_summary string are the variables that later gate which subagents and actions the agent can use. See Manage Variables.
Canvas Step 3: Build the Router
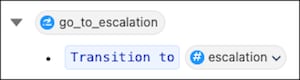
The router is your start subagent — the agent’s entry point on every customer message. In actions available for reasoning, add two transition utilities: one to the Identity subagent, one to Order Management. Use a filter (Make this action available when:) so the transition to Identity is available only when verified equals False, and the transition to Order Management only when verified equals True. This ensures customers verify their identity before they can look up orders.
Canvas Step 4: Build the Identity Subagent
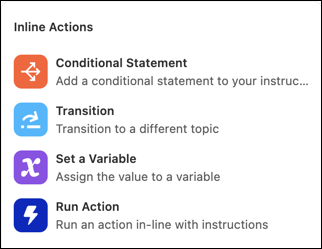
Add a subagent named Identity to verify the customer before any order data is exposed. Add the send_verification_code and validate_verification_code actions (both backed by flows) to actions available for reasoning. In the reasoning instructions, use the inline action shortcuts (/) to run the send action and store its outputs in variables, and reference the actions as resources (@) so the agent validates the code the customer enters. Add a transition to Order Management, available only when verified equals True.
Canvas Step 5: Build the Order Management Subagent
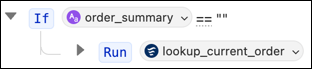
Add a subagent named Order Management to look up order details. Add the lookup_current_order and lookup_order actions. In the reasoning instructions, use a conditional (/) so that when order_summary is empty, the agent runs lookup_current_order and stores the result in the order_summary variable. Reference member_name and order_summary as resources (@) to personalize the response. Customers can also look up a past order by providing an Order ID.
Canvas Step 6: Preview and Test
In Canvas view, select Preview and start a conversation, such as I need help with my order. Confirm that the agent asks you to verify your identity first, and that order details return correctly after verification.


 j
j