


此文已使用 Salesforce 機器翻譯系統翻譯。更多詳細資料請參見此處。
使用範本擴充性來自訂元件。
在此教學中,我們將使用範本擴充性來為網站建立自訂元件。在此範例中,我們將建立一個自訂頁尾。因為頁尾是基本範本中現有的元件,我們不想改變頁面的版面配置,所以我們會在元件層級覆寫頁尾。
在執行本教學的命令之前,請以實際值取代預留位置。預留位置的格式為:$PLACEHOLDER
使用頁面右側的標題瀏覽本教學。
Tip
必要條件
若要完成本教學,請執行以下任一操作:
-
使用以 PWA Kit 版本 3.x 建立的專案。
或
-
如果沒有專案,請執行以下命令,建立 PWA Kit 專案:
npx @salesforce/pwa-kit-create-app@latest ——outputDir $PATH/TO/NEW/LOCAL/PROJECT
1. 建立檔案以覆寫預設值
- 在
overrides/app下,建立名為components的資料夾。 - 在
components資料夾中,建立名為footer的資料夾。 - 在
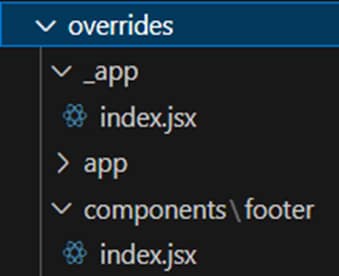
footer資料夾中,建立名為index.jsx的檔案。
新資料夾與檔案具有以下結構:
2. 建立自訂頁尾
將此程式碼新增至 overrides/components/footer/index.jsx:
1import React from "react";
2
3import {
4  Box,
5  Container,
6  Stack,
7  Text,
8  Link,
9  Icon,
10  Input,
11  Button,
12  useColorModeValue,
13} from "@chakra-ui/react";
14import {
15  SocialFacebookIcon,
16  SocialTwitterIcon,
17  SocialInstagramIcon,
18} from "@salesforce/retail-react-app/app/components/icons";
19
20const Footer = () => {
21  return (
22    <Box
23      bg={useColorModeValue("gray.50", "gray.900")}
24      color={useColorModeValue("gray.700", "gray.200")}
25    >
26      <Container as={Stack} maxW={"6xl"} py={10}>
27        <Stack direction={{ base: "column", md: "row" }} spacing={4}>
28          <Link href="/about">About Us</Link>
29          <Link href="/contact">Contact</Link>
30          <Link href="/faq">FAQ</Link>
31        </Stack>
32        <Stack
33          direction={{ base: "column", md: "row" }}
34          justifyContent={"space-between"}
35          alignItems={"center"}
36        >
37          <Text>
38            © {new Date().getFullYear()} Your Company Name. All rights reserved
39          </Text>
40          <Stack direction={"row"} spacing={6}>
41            <Icon as={SocialFacebookIcon} />
42            <Icon as={SocialTwitterIcon} />
43            <Icon as={SocialInstagramIcon} />
44          </Stack>
45        </Stack>
46        <Stack
47          direction={{ base: "column", md: "row" }}
48          spacing={4}
49          mt={10}
50          alignItems={"center"}
51        >
52          <Text>Subscribe to our newsletter</Text>
53          <Input placeholder="Your email address" />
54          <Button>Subscribe</Button>
55        </Stack>
56      </Container>
57    </Box>
58  );
59};
60
61export default Footer;
3. 預覽您的首頁
- 執行
npm start。 - 前往 http://localhost:3000。

4. 部署您的套件
也請參閱
 j
j