


 j
j성공을 위한 스킬
Ask the Community
Page Designer와 PWA Kit 통합
암호 재설정 구현
암호 없는 로그인 구현
소셜 로그인 구현
쿠키를 사용한 개인화
구매자 컨텍스트를 사용한 개인화
매장 찾기로 매장 매출 증대를 참조하십시오.
Tracking Consent Banner(추적 동의 배너)로 개인정보보호를 참조하십시오.
캐시 적중률 극대화
사이트맵으로 SEO 개선
PWA(Progressive Web App) Kit사이트에서 추적 동의 배너를 사용하여 구매자의 신뢰를 유지하십시오. 배너를 사용하여 구매자는 PWA Kit에 포함된 기본 활동 추적을 옵트인하거나 옵트아웃할 수 있습니다.
이 가이드에서는 추적 동의 배너의 기본 구현 및 사용자 지정 옵션에 대해 설명합니다.
이 가이드에서 설명하는 기능은하이브리드 스토어프런트에서 지원되지 않습니다.
Note
추적 동의 배너를 구성하고 사용하려면Retail React App버전 6.0 이상으로 사이트를 빌드합니다.
추적 동의 배너는 에서 사용할 수template-retail-react-app/app/components/_app/index.jsx있으므로 사이트의 모든 페이지에 표시할 수 있습니다. 배너는 에 정의되어 있습니다template-retail-react-app/app/hooks/use-dnt-notification.js .
기본적으로 배너는 이 예제와 비슷합니다.
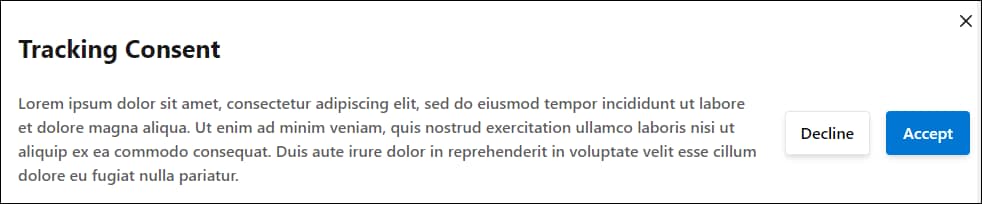
다음은 DNT 상태가 설정되는 대상을 정의하는 두 가지 값입니다.
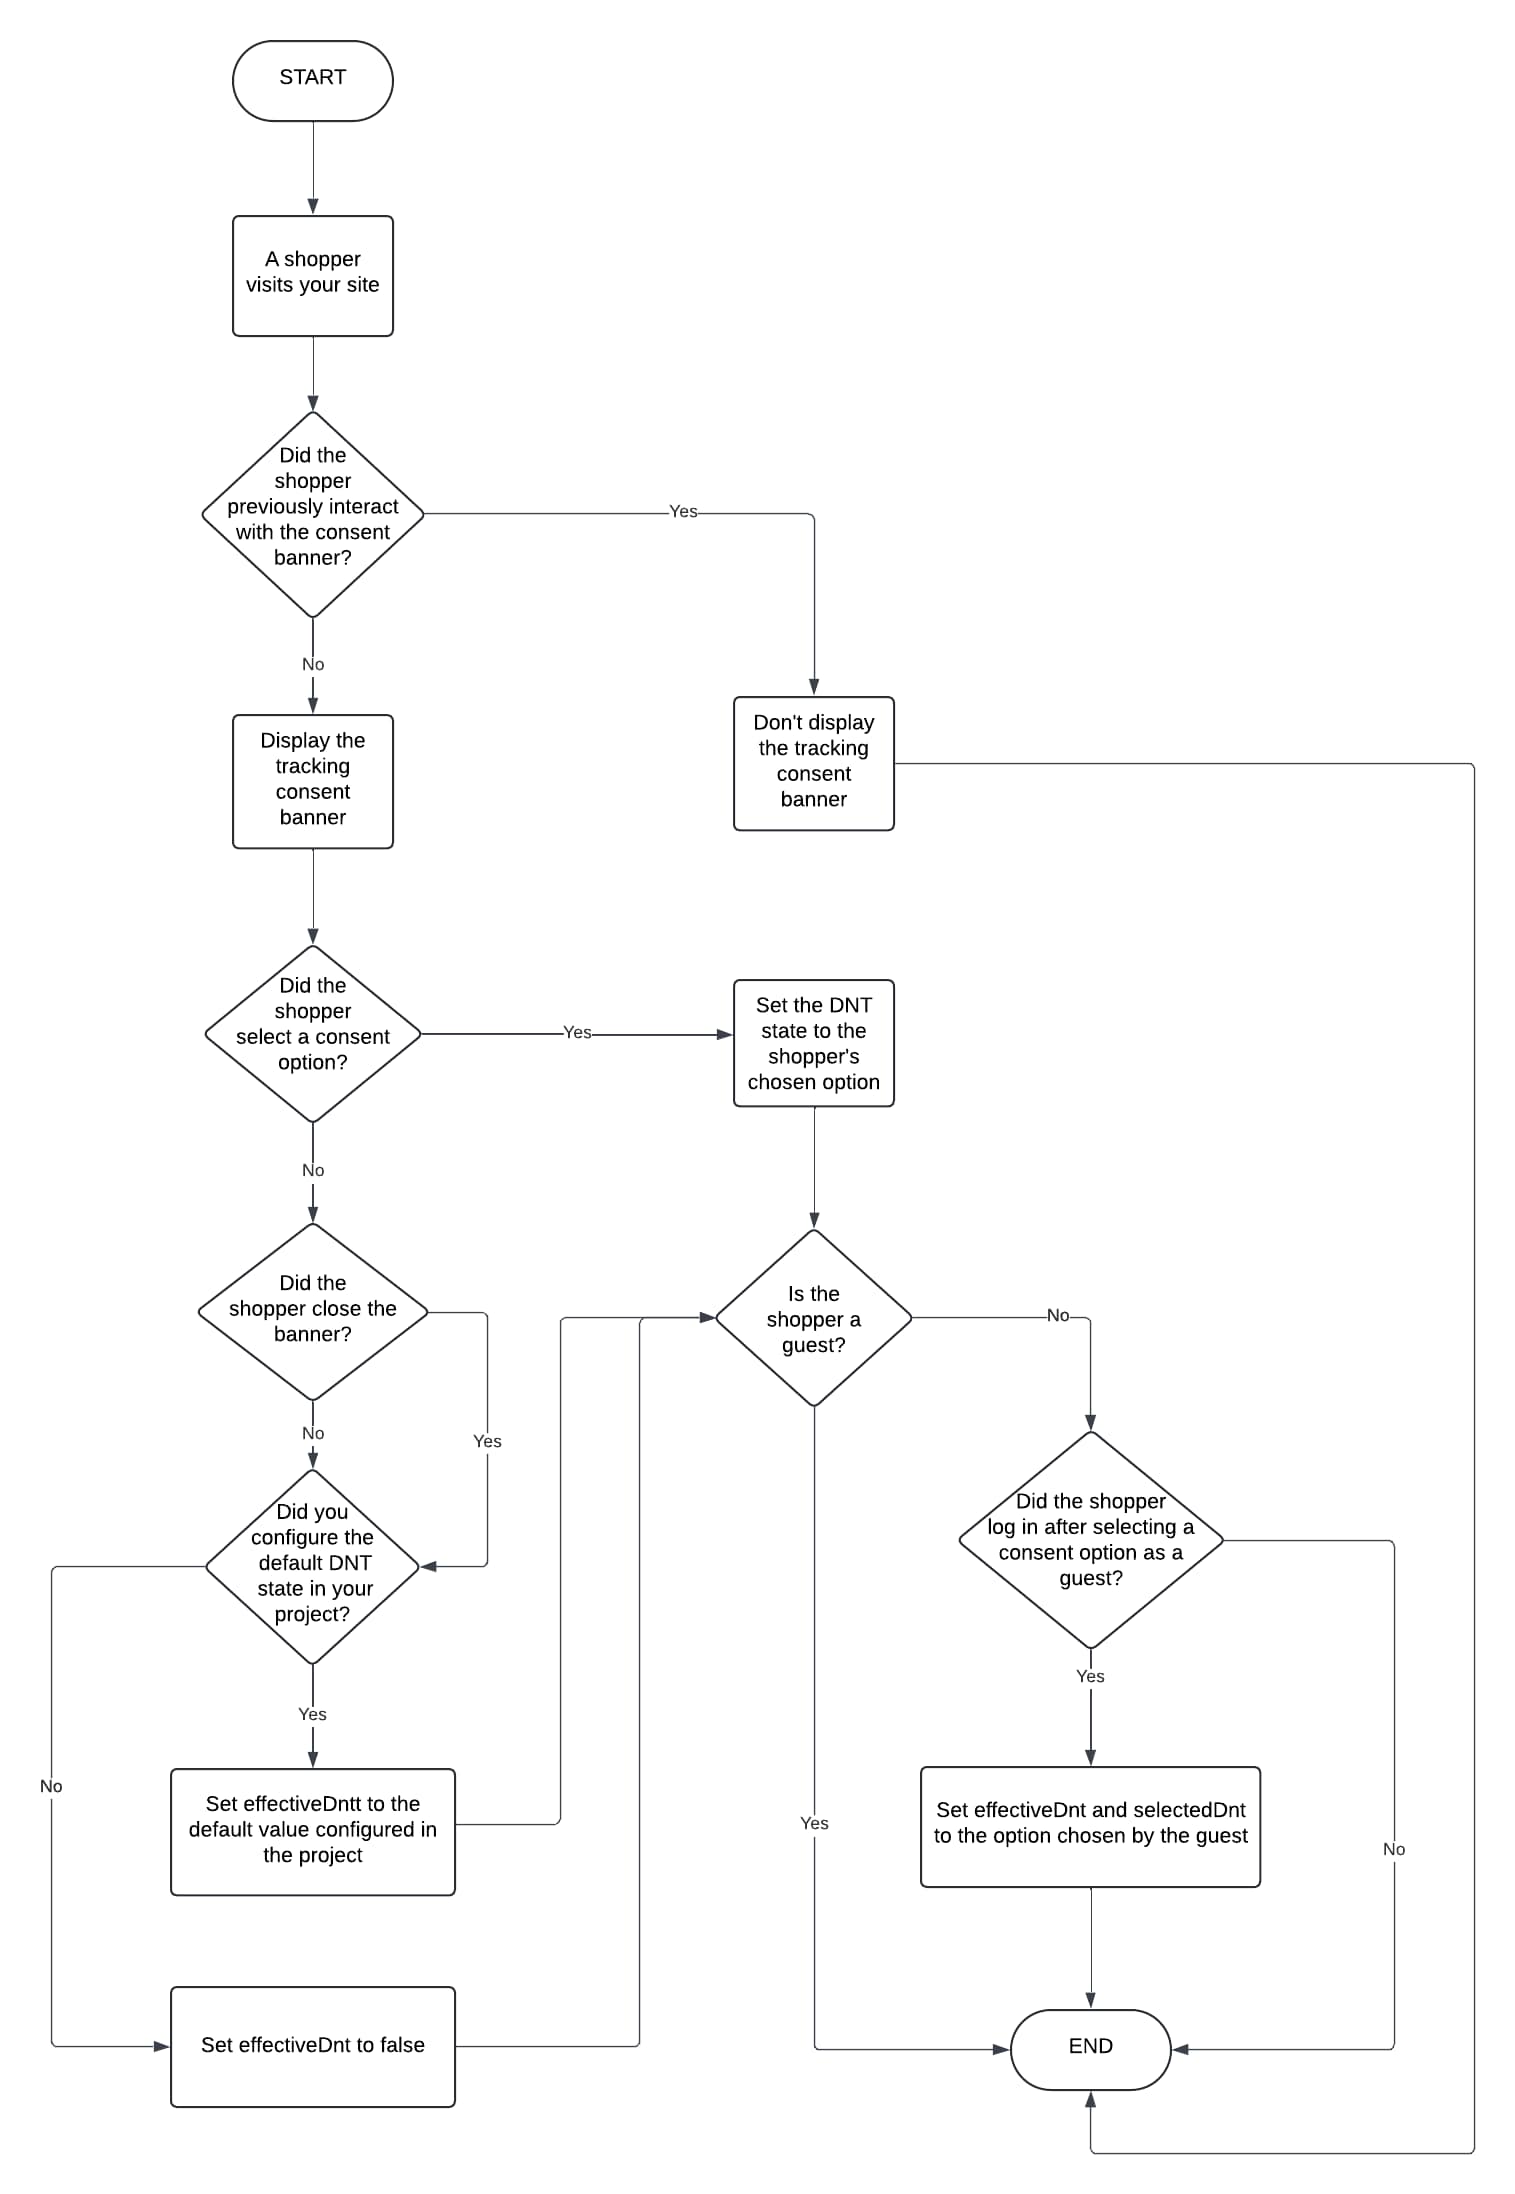
effectiveDnt: 구성한 기본 DNT 상태로 설정되거나 기본 DNT 상태를 구성하지 않은 경우 설정됩니다false . 이 값은 구매자가 추적에 동의한 경우 또는true구매자가 추적을 옵트아웃한 경우로false설정됩니다.selectedDnt: 구매자가 동의 배너와 상호 작용할 때까지 정의되지 않습니다. 이 값은 구매자가 추적에 동의한 경우 또는true구매자가 추적을 옵트아웃한 경우로false설정됩니다.구매자가 배너를 닫거나 배너에서 선택하지 않으면 기본 DNT 상태가 (활동 추적)으로false설정됩니다. 해당 동작을 변경하려면기본 DNT 상태 구성의내용을 참조하십시오. 이 배너는 구매자가 다음 작업 중 하나를 수행한 후 다음에 사이트를 방문할 때 다시 표시됩니다.
이 다이어그램은 추적 동의 배너의 동작과 구매자가 사이트를 방문할 때 DNT 상태가 설정되는 방식을 요약한 것입니다.
달리 명시되지 않는 한, 다이어그램의 모든 단계는 비회원 구매자와 알려진 구매자 모두에게 적용됩니다.
선택적으로, 구매자가 추적 동의 배너를 닫거나 배너에서 선택하지 않는 경우 적용되는 기본 DNT 상태를 지정할 수 있습니다. 이렇게 하려면 프로젝트에서{overridesDir}/app/components/_app-config/index.jsx이 파일의 속성을 설정합니다defaultDNT .
defaultDnt={true}: 구매자 활동이 추적되지 않음을 나타냅니다.defaultDnt={false}: 구매자 활동이 추적됨을 나타냅니다.이 예에서는defaultDnt로 설정됩니다false .
1// More code here...
2
3   <CommerceApiProvider
4            shortCode={commerceApiConfig.parameters.shortCode}
5            clientId={commerceApiConfig.parameters.clientId}
6            organizationId={commerceApiConfig.parameters.organizationId}
7            siteId={locals.site?.id}
8            locale={locals.locale?.id}
9            currency={locals.locale?.preferredCurrency}
10            redirectURI={`${appOrigin}/callback`}
11            proxy={`${appOrigin}${commerceApiConfig.proxyPath}`}
12            headers={headers}
13            // Add your chosen default DNT state.
14            defaultDnt={false}
15            // Uncomment 'enablePWAKitPrivateClient' to use SLAS private client login flows.
16            // Make sure to also enable useSLASPrivateClient in ssr.js when enabling this setting.
17            // enablePWAKitPrivateClient={true}
18            logger={createLogger({packageName: 'commerce-sdk-react'})}
19        >
20            <MultiSiteProvider site={locals.site} locale={locals.locale} buildUrl={locals.buildUrl}>
21                <ChakraProvider theme={theme}>{children}</ChakraProvider>
22            </MultiSiteProvider>
23            <ReactQueryDevtools />
24   </CommerceApiProvider>
25
26 // More code here...선택적으로, 모양이나 텍스트와 같은 부분을 변경하여 추적 동의 배너를 사용자 지정할 수 있습니다. 이렇게하려면 다음 두 가지 선택 사항이 있습니다.
또는
다음 단계를 완료하여기본 템플릿의 배너 파일을 재정의합니다.
{overridesDir}/app폴더를hooks만듭니다.use-dnt-notification.js된hooks파일을 만듭니다.use-dnt-notification.js . 이 예제에서는 구성 요소에 의해 제어되는 사용자 지정 배너를DntNotification렌더링하는 데 사용합니다selectedDnt . 또한 이updateDnt기능을 사용하여 구매자의 추적 기본 설정을 부울로 적용합니다. Do Not Track 값을참조하십시오.1import React, {useEffect} from 'react'
2import PropTypes from 'prop-types'
3import {FormattedMessage, useIntl} from 'react-intl'
4import {
5 Button,
6 Modal,
7 ModalContent,
8 ModalBody,
9 ModalCloseButton,
10 useDisclosure,
11 Heading,
12 Stack,
13 Text,
14 Flex
15} from '@salesforce/retail-react-app/app/components/shared/ui'
16import {useDNT} from '@salesforce/commerce-sdk-react'
17import {useLocation} from 'react-router-dom'
18
19export const DntNotification = ({isOpen, onOpen, onClose}) => {
20 const {selectedDnt, updateDNT} = useDNT()
21 const {formatMessage} = useIntl()
22 const location = useLocation()
23
24 useEffect(() => {
25 if (selectedDnt === undefined) {
26 onOpen()
27 } else {
28 onClose()
29 }
30 }, [location, selectedDnt])
31
32 const onCloseNotification = () => {
33 updateDNT(null)
34 onClose()
35 }
36
37 return (
38 <Modal
39 size="sm"
40 data-testid="sf-dnt-notification"
41 blockScrollOnMount={false}
42 closeOnOverlayClick={false}
43 trapFocus={false}
44 isOpen={isOpen}
45 onOpen={onOpen}
46 onClose={onCloseNotification}
47 >
48 <ModalContent
49 position="fixed"
50 bottom="4"
51 right="4"
52 maxW="400px"
53 pointerEvents="all"
54 containerProps={{
55 pointerEvents: 'none'
56 }}
57 border="2px solid"
58 >
59 <ModalCloseButton
60 aria-label={formatMessage({
61 id: 'dnt_notification.button.assistive_msg.close',
62 defaultMessage: 'Close consent tracking form'
63 })}
64 />
65 <ModalBody pb={8} bg="white" marginTop={4}>
66 <Heading as="h3" fontSize={25} width="100%" marginBottom={5}>
67 <FormattedMessage
68 defaultMessage="Your Privacy Matters to Us"
69 id="dnt_notification.title"
70 />
71 </Heading>
72 <Flex direction="column">
73 <Text>
74 <FormattedMessage
75 defaultMessage="We collect data to improve your experience, deliver personalized content or ads, and better understand how our site is used. By selecting 'Accept,' you agree to our use of tracking technologies. "
76 id="dnt_notification.description"
77 />
78 </Text>
79 <Stack direction="column" spacing={4} mt={4} align="flex-end">
80 <>
81 <Button
82 onClick={() => {
83 updateDNT(true)
84 onClose()
85 }}
86 width="100%"
87 >
88 <FormattedMessage defaultMessage="Decline" id="dnt_notification.button.decline" />
89 </Button>
90 <Button
91 onClick={() => {
92 updateDNT(false)
93 onClose()
94 }}
95 width="100%"
96 >
97 <FormattedMessage defaultMessage="Accept" id="dnt_notification.button.accept" />
98 </Button>
99 </>
100 </Stack>
101 </Flex>
102 </ModalBody>
103 </ModalContent>
104 </Modal>
105 )
106}
107
108DntNotification.propTypes = {
109 isOpen: PropTypes.bool.isRequired,
110 onOpen: PropTypes.func.isRequired,
111 onClose: PropTypes.func.isRequired
112}
113
114/**
115 *
116 * @returns {Object} - Object props to be passed into the DntNotification component
117 */
118export const useDntNotification = () => {
119 const {isOpen, onOpen, onClose} = useDisclosure()
120
121 return {
122 isOpen,
123 onOpen,
124 onClose
125 }
126}app/components/_app/index.jsx한 경우 후크를useDntNotification사용하여 사용자 지정된 추적 동의 배너를 표시합니다.1import {
2 DntNotification,
3 useDntNotification
4} from '{overridesDir}/app/hooks/use-dnt-notification'
5
6const App = (props) => {
7 ...
8 const dntNotification = useDntNotification()
9 ...
10
11 return (
12 ...
13 // Put the consent tracking banner in your chosen location in your code by adding the dntNotification component.
14 <DntNotification {...dntNotification} />
15 ...
16 )
17}필요에 따라 PWA Kit 프로젝트에 코드를 추가하여 구매자의 추적 기본 설정 또는 기본 DNT 상태에 따라 작업을 트리거하거나 방지할 수 있습니다.
API 호출과 같은 작업을 트리거하거나 방지하는 데 사용합니다effectiveDnt . 예를 들어 Google Analytics에 액세스하기 위한 API 호출이 있습니다. Do Not Track 값을참조하십시오.
이 예에서는 구매자와 사이트의 상호 작용을 기반으로 데이터를 수집하기 위해 Analytics API 호출을 트리거하는 데 사용합니다effectiveDnt . 이 데이터는 구매자 행동, 웹사이트 트래픽 또는 판매 실적과 같은 요인에 대한 통찰력을 제공할 수 있습니다.
1import {
2    useDNT
3} from '@salesforce/commerce-sdk-react'
4function reportClickTracking() {
5  const {effectiveDnt} = useDNT()
6  if (effectiveDnt) {
7    return
8  }
9  return fetch('https://tracking.example.com/collect')
10}구매자가 추적을 옵트아웃하거나(DNT 상태가 로true설정됨) DNT 상태가 설정되지 않은 경우:
PWA Kit는 Business Manager의개인정보보호 기본 설정에서 설정한 모든 기본 추적 구성을 재정의합니다. PWA Kit 사이트는 다음 구성 중 하나를 적용합니다.
이 섹션에서는 추적 동의 배너를 사용하는 동안 발생할 수 있는 일반적인 오류에 대한 제안된 해결 방법을 제공합니다.
원인: CSS 또는 자바스크립트 문제로 인해 특정 장치 또는 브라우저에서 기능이 저하되거나 배너가 잘못 표시되거나 전혀 표시되지 않을 수 있습니다.
**제안된 솔루션:**여러 브라우저와 장치에서 배너를 테스트하여 일관된 기능을 보장합니다. 쿠키 정책이 더 엄격한 브라우저(예: Safari의 지능형 추적 방지)에 특히 주의하십시오. 다양한 화면 크기와 해상도를 테스트하여 배너가 반응형이고 사용자 친화적인지 확인합니다. 배너가 사이트 기능이나 구매자 상호 작용을 방해하지 않는지 확인합니다.
j