Example: Custom Property Editor for an Invocable Action
This example creates an invocable action and its custom property editor. In Flow Builder, an admin sets input values for the Send HTML Email invocable action. When users run the flow, the invocable action sends the email.
This Apex class file defines the sendEmails method that can run as an invocable action and its input variables. The @InvocableMethod annotation identifies the invocable method that can run as an invocable action. The @InputVariable annotation identifies variables used by the invocable method.
The invocable method registers the custom property editor in the configurationEditor modifier. The namespace is c unless the org has a custom namespace. If the org has a custom namespace, use that namespace to register the custom property editor. For this example, the name of the custom property editor is c-html-email-editor.
1// HtmlEmailAction.cls
2global class HtmlEmailAction {
3    global class EmailActionRequest {
4        @InvocableVariable
5        global String senderName;
6
7        @InvocableVariable
8        global String replyToEmail;
9
10        @InvocableVariable
11        global String recipientName;
12
13        @InvocableVariable
14        global String sendToEmail;
15
16        @InvocableVariable
17        global String subject;
18
19        @InvocableVariable
20        global String htmlBody;
21    }
22
23    global class EmailActionResult {
24        @InvocableVariable
25        global Boolean isSuccess;
26
27        @InvocableVariable
28        global String errorMessage;
29    }
30
31    @InvocableMethod(label='Send HTML Email' configurationEditor='c-html-email-editor')
32    global static List<EmailActionResult> sendEmails(List<EmailActionRequest> requests) {
33        List<EmailActionResult> results = new List<EmailActionResult>();
34
35        for(EmailActionRequest request : requests){
36            results.add(sendEmail(request));
37        }
38
39        return results;
40    }
41
42    public static EmailActionResult sendEmail(EmailActionRequest request) {
43        Messaging.SingleEmailMessage mail = new Messaging.SingleEmailMessage();
44
45        String[] sendToEmail = new String[]{ request.sendToEmail };
46        mail.setToAddresses(sendToEmail);
47        mail.setSenderDisplayName(request.senderName);
48        mail.setReplyTo(request.replyToEmail);
49        mail.setSubject(request.subject);
50        mail.setHtmlBody(request.htmlBody);
51        mail.setOptOutPolicy('FILTER');
52
53        Messaging.SingleEmailMessage[] messages = new List<Messaging.SingleEmailMessage>();
54        messages.add(mail);
55
56        Messaging.SendEmailResult[] results = Messaging.sendEmail(messages);
57        EmailActionResult emailActionResult = new EmailActionResult();
58
59        for(Messaging.SendEmailResult result :results) {
60            if(result.IsSuccess()) {
61                emailActionResult.isSuccess = true;
62            } else {
63                emailActionResult.isSuccess = false;
64                Messaging.SendEmailError[] errors = result.getErrors();
65                if (errors.size() > 0 ){
66                    emailActionResult.errorMessage = errors[0].getMessage();
67                }
68            }
69        }
70
71        return emailActionResult;
72    }
73}
These HTML, CSS, JavaScript, and configuration files define the custom property editor for the action.
The HTML template defines the UI for the custom property editor in Flow Builder.
1
2<template>
3 <div class="slds-m-bottom_x-small">
4 <h2 class="slds-text-heading_medium slds-p-around_xx-small lgc-bg-inverse">
5 Sender Information
6 </h2>
7
8 <div class="slds-p-around_xx-small lgc-bg">
9 <lightning-input
10 type="text"
11 label="Sender Name"
12 placeholder="Enter sender name here..."
13 value={senderName}
14 onchange={handleSenderNameChange}
15 >
16 </lightning-input>
17
18 <lightning-input
19 type="email"
20 label="Reply-To Email Address"
21 placeholder="Enter reply-to email address here..."
22 value={replyToEmail}
23 onchange={handleReplyToEmailChange}
24 >
25 </lightning-input>
26 </div>
27 </div>
28
29 <div class="slds-m-bottom_x-small">
30 <h2 class="slds-text-heading_medium slds-p-around_xx-small lgc-bg-inverse">
31 Recipient Information
32 </h2>
33
34 <div class="slds-p-around_xx-small lgc-bg">
35 <lightning-input
36 type="text"
37 label="Recipient Name"
38 placeholder="Enter recipient name here..."
39 value={recipientName}
40 onchange={handleRecipientNameChange}
41 >
42 </lightning-input>
43
44 <lightning-input
45 type="email"
46 label="Send-To Email Address"
47 placeholder="Enter send-to email address here..."
48 value={sendToEmail}
49 onchange={handleSendToEmailChange}
50 required
51 >
52 </lightning-input>
53 </div>
54 </div>
55
56 <div class="slds-m-top_small">
57 <h2 class="slds-text-heading_medium slds-p-around_xx-small lgc-bg-inverse">Subject and Body</h2>
58
59 <div class="slds-p-around_xx-small lgc-bg">
60 <lightning-input
61 type="text"
62 label="Subject"
63 placeholder="Enter subject here..."
64 value={subject}
65 onchange={handleSubjectChange}
66 >
67 </lightning-input>
68
69 <div class="row">
70 <lightning-textarea
71 name="body"
72 label="HTML Body"
73 placeholder="Enter html body here..."
74 value={htmlBody}
75 onchange={handleHtmlBodyChange}
76 >
77 </lightning-textarea>
78 </div>
79 </div>
80 </div>
81</template>
This example shows the custom property editor UI.
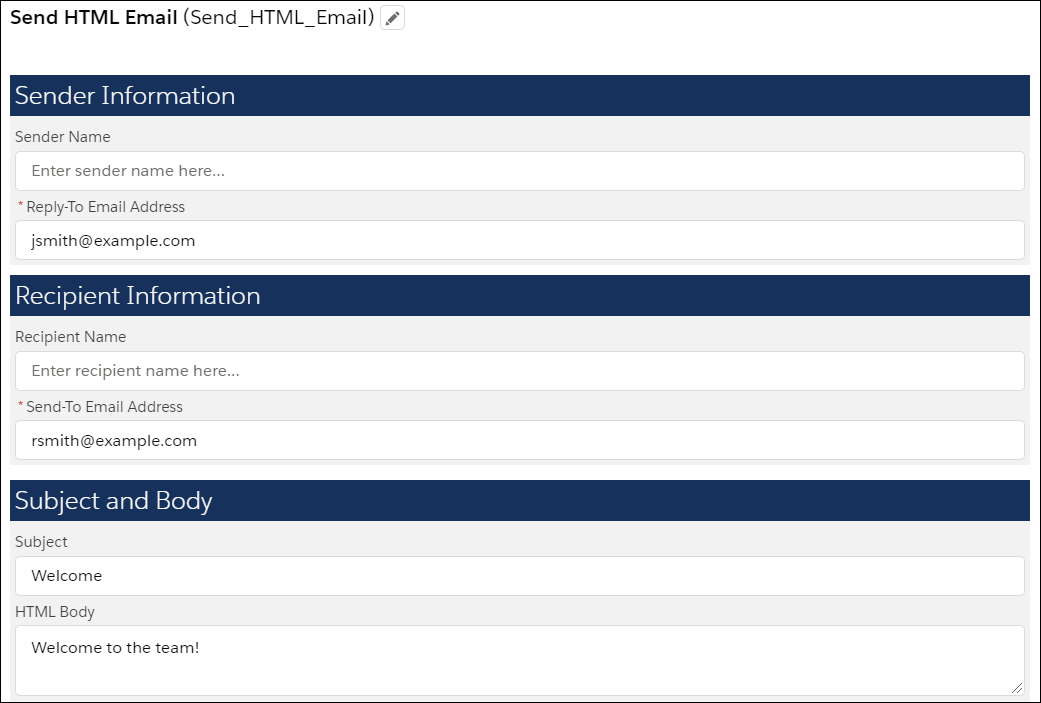
When the custom property editor is initialized, the JavaScript class receives a copy of the flow metadata from Flow Builder. When the admin changes a value in the custom property editor, the custom property editor dispatches an event to propagate the change back to Flow Builder.
Use @api properties to capture data from flows. Use events to report changes to flows at run time.
1// htmlEmailEditor.js
2import { LightningElement, api } from "lwc";
3export default class HtmlEmailEditor extends LightningElement {
4  @api
5  inputVariables;
6
7  get senderName() {
8    const param = this.inputVariables.find(({ name }) => name === "senderName");
9    return param && param.value;
10  }
11
12  get replyToEmail() {
13    const param = this.inputVariables.find(({ name }) => name === "replyToEmail");
14    return param && param.value;
15  }
16
17  get recipientName() {
18    const param = this.inputVariables.find(({ name }) => name === "recipientName");
19    return param && param.value;
20  }
21
22  get sendToEmail() {
23    const param = this.inputVariables.find(({ name }) => name === "sendToEmail");
24    return param && param.value;
25  }
26
27  get subject() {
28    const param = this.inputVariables.find(({ name }) => name === "subject");
29    return param && param.value;
30  }
31
32  get htmlBody() {
33    const param = this.inputVariables.find(({ name }) => name === "htmlBody");
34    return param && param.value;
35  }
36
37  @api validate() {
38    const validity = [];
39    if (
40      !this.isValidEmailAddress(this.sendToEmail) ||
41      !this.isValidEmailAddress(this.replyToEmail)
42    ) {
43      validity.push({
44        key: "SendToAddress",
45        errorString: "You have entered an invalid email format.",
46      });
47    }
48    return validity;
49  }
50
51  isValidEmailAddress(email) {
52    const emailRegex = /^\w+([\.-]?\w+)+@\w+([\.:]?\w+)+(\.[a-zA-Z0-9]{2,3})+$/;
53    return emailRegex.test(email);
54  }
55
56  handleSenderNameChange(event) {
57    this.handleChange(event, "senderName");
58  }
59
60  handleReplyToEmailChange(event) {
61    this.handleChange(event, "replyToEmail");
62  }
63
64  handleRecipientNameChange(event) {
65    this.handleChange(event, "recipientName");
66  }
67
68  handleSendToEmailChange(event) {
69    this.handleChange(event, "sendToEmail");
70  }
71
72  handleSubjectChange(event) {
73    this.handleChange(event, "subject");
74  }
75
76  handleHtmlBodyChange(event) {
77    this.handleChange(event, "htmlBody");
78  }
79
80  handleChange(event, name) {
81    if (event && event.detail) {
82      const newValue = event.detail.value;
83      const valueChangedEvent = new CustomEvent("configuration_editor_input_value_changed", {
84        bubbles: true,
85        cancelable: false,
86        composed: true,
87        detail: {
88          name,
89          newValue,
90          newValueDataType: "String",
91        },
92      });
93      this.dispatchEvent(valueChangedEvent);
94    }
95  }
96}
Flow Builder has a JavaScript interface for communicating with a custom property editor. This JavaScript class uses the inputVariables and validate interfaces.
When the custom property editor is initialized, inputVariables receives the values of the input variables in the invocable action from Flow Builder.
The inputVariables data structure includes the name, value, and data type for each input variable.
1[
2  {
3    name: "senderName",
4    value: "Test Inc",
5    valueDataType: "String",
6  },
7];
The get methods, such as get senderName() and get replyToEmail(), get the value for each input variable for use in the custom property editor.
When an admin clicks Done in Flow Builder’s screen editor UI, Flow Builder evaluates the validate function in the custom property editor. If the function returns the key and errorString data structure, the screen editor shows the number of errors and prevents the admin from saving changes in the screen editor.
Flow Builder shows only the number of errors. To show error strings, write code in the validate method. For more information, see Custom Property Editor JavaScript Interface.
When an admin enters a value for an input in the custom property editor, the handleChange method dispatches a configuration_editor_input_value_changed event to Flow Builder. Flow Builder receives the event and updates the value in the flow.
Here’s the configuration file for htmlEmailEditor.
1
2<?xml version="1.0" encoding="UTF-8"?>
3<LightningComponentBundle xmlns="http://soap.sforce.com/2006/04/metadata">
4 <apiVersion>49.0</apiVersion>
5
6 <isExposed>true</isExposed>
7</LightningComponentBundle>


 j
j