Extensions are a mechanism for using Apex to customize the functionality that powers B2B and B2C storefronts. The custom Apex class that implements an extension is called an extension provider.
There are two types of extensions: domain extensions and endpoint extensions. Domain extensions are related to a functional domain, such as pricing. Endpoint extensions are related to specific Connect API endpoints (resources).
When you implement an extension provider for a domain extension, you affect a functional area, and the customizations that you provide can affect multiple Connect API endpoints. In contrast, when you implement an extension provider for an endpoint extension, you affect only a single Connect API endpoint (resource).
For domain extensions, a provider can extend or replace the default functionality of a commerce domain. Extensions are available for a wide range of commerce domains, including cart, pricing, inventory, and more.
For endpoint extensions, a provider can modify the request and response of the Connect API endpoint, but can’t replace the default functionality.
For the complete list of extensions that you can customize, see Available Extensions.
Extensions don’t apply to the B2C Commerce architecture, which uses a different extensibility system called hooks.
Important
Extensions and Integrations
Extensions represent the next step for Salesforce Commerce extensibility that began with integrations. Extensions allow you to customize functionality in a more targeted way than integrations. Also, extensions are available for more commerce domains than integrations.
Here’s a summary of the key differences between integrations and extensions:
Integrations
Extensions
Coding approach
Implement Apex interface
Extend Apex base class
Customization
Replace
Extend (for both domain or endpoint extensions) or replace (for domain extensions)
Commerce domains
Checkout calculators (4)
Cart/checkout calculators (5), pricing service, other services
Although extensions are now the preferred way to customize Salesforce Commerce, integrations remain fully supported. Currently, payments can’t be customized with an extension.
Use Cases
Extensions can be used by a wide range of developers. An in-house team or a systems integrator can create an extension provider to make small, targeted changes to a storefront to meet a merchant’s unique business needs. For more comprehensive solutions, a vendor can bundle several extension providers together and distribute them as a package on AppExchange.
Extensions unlock new opportunities to integrate B2C Commerce with other software (such as ERP systems), cut maintenance costs, and deliver great customer experiences.
Cart and Checkout Calculations
Several domain extensions are designed to support cart calculation use cases, including cart calculations that occur during checkout. These extensions, taken together, comprise the Cart Calculate API. For more information, see Cart Calculate API.
Architecture
In the Salesforce Commerce architecture, extensions can interact with many other parts of the system, including other extensions.
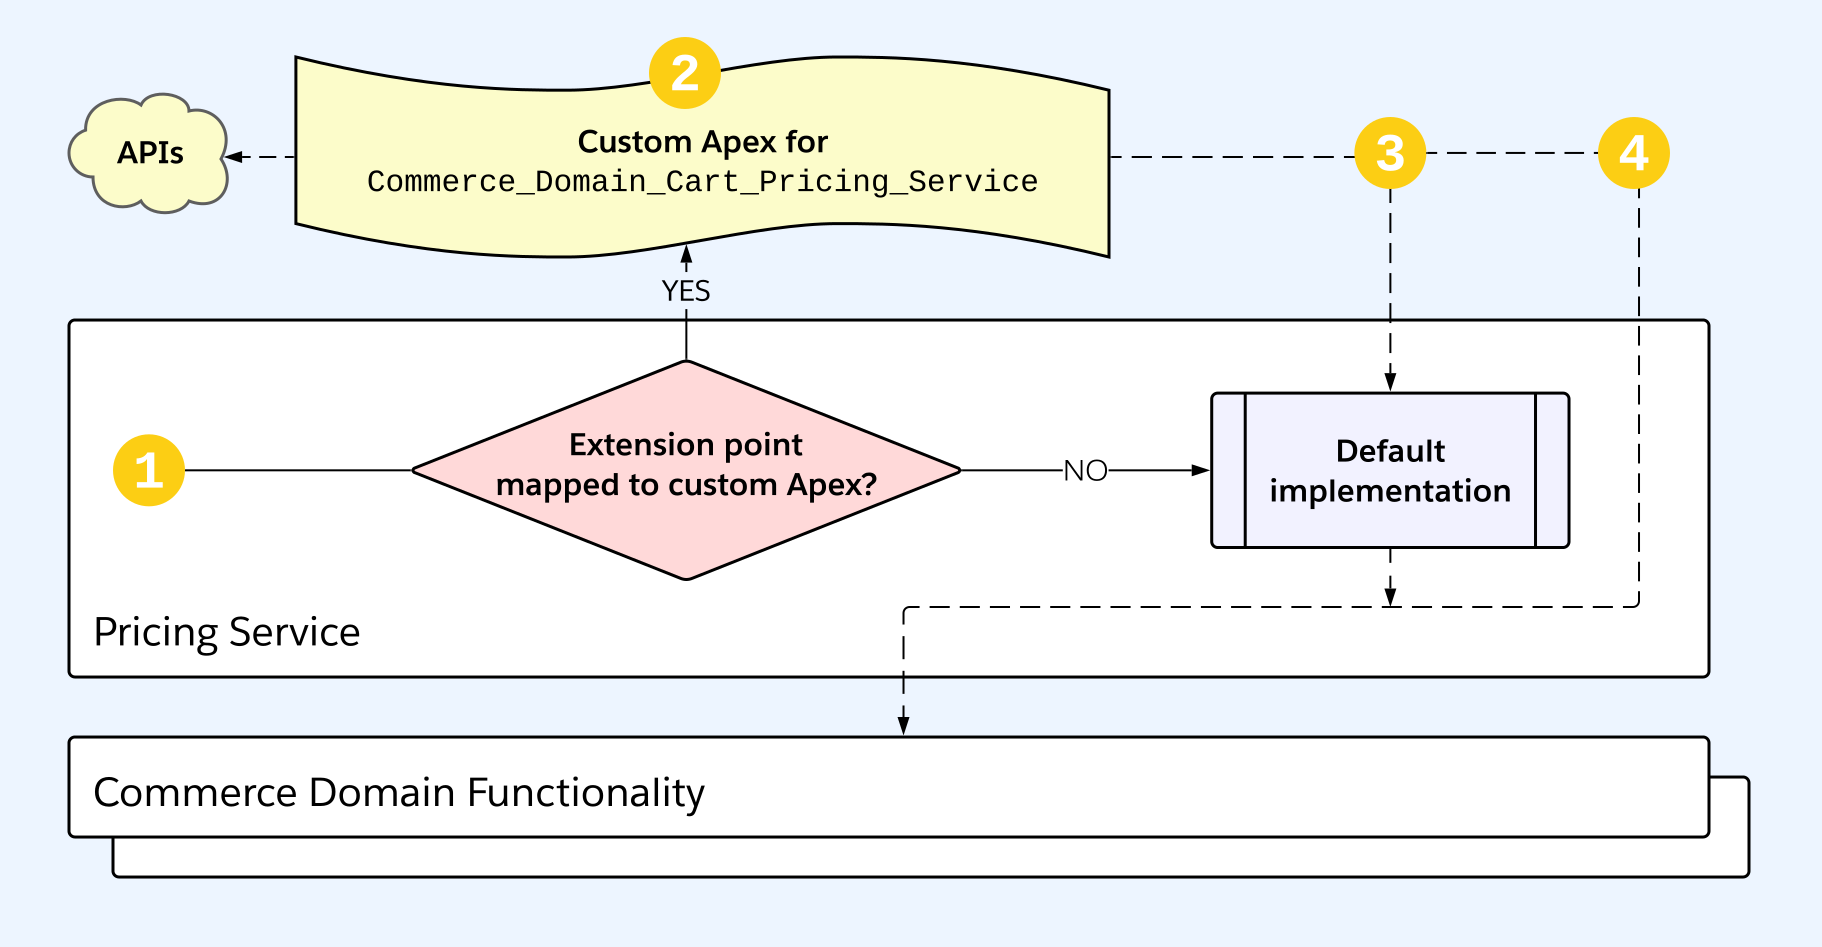
This diagram traces how a domain extension fits into the architecture using Pricing Service as an example.
Let’s look at what’s happening at each stage of the extension flow, as indicated by the corresponding numbers in the diagram:
The Pricing Service extension is invoked. An extension can be triggered by a user action, a Connect API request—or even another extension. The extensible code checks to see if an extension provider class is mapped for the specific extension and store. The code that checks the mapping is called an extension point. The identifier used to uniquely identify an extension is called an extension point name (EPN). The EPN is used to map an extension point to one or more extension providers.
If an extension provider class is registered and mapped to the extension point name, the custom Apex in the extension provider class is executed. The extension provider can optionally make API requests.
For domain extensions, the extension provider can invoke the default implementation using the super() method. If you plan to modify – but not completely replace – default functionality, we strongly recommend calling the super() method as a best practice to ensure platform compatibility. If we add features, the features are automatically supported in the super() method implementation.
The extension provider can optionally invoke other commerce domain functionality, which can also be extended.
Each domain extension has a corresponding base class. Endpoint extensions, in contrast, all extend the same base class, and the extension provider can’t invoke a super() method.
Domain Extension Provider Class Walkthrough
To show how a domain extension provider class is constructed, let’s walk through a series of code snippets. The snippets extend the base Apex class for the Pricing Service extension.
The actual implementation details are left out of the snippets so that you can follow the structure of the extension class more easily. A working version of this extension class (along with other examples) is available on the Extension Provider Examples page. This example class is provided for illustration purposes only and isn’t designed to represent a realistic use case.
1public class PricingServiceSample extends commercestorepricing.PricingService{2 // Extension code.3}
You can override the processPrice method of commercestorepricing.PricingService, which is used on PLPs and PDPs. In this example, we’ve replaced the entire method with custom logic to extract product data, get the price from an external service, and process the pricing response.
1public override commercestorepricing.PricingResponse processPrice(commercestorepricing.PricingRequest request){23 // Extract product data from the request with custom logic and get the product's price from an external service.45 // Create a pricing response without the default processing.6 commercestorepricing.PricingResponse response = new commercestorepricing.PricingResponse('USD');78 // Process the pricing response with more custom logic.910 // Return the processed pricing response.11 return response;12}
The base class has another method that you can override: processTransactionalPrice. Overriding this method affects cart and checkout. For illustration purposes only, we treat this method differently than processPrice. Instead of replacing the entire method with custom logic, we call the base method with the super() method. Although we’re calling the base method, we can still insert custom logic before and after the super() call.
1public override commercestorepricing.TransactionalPricingResponse processTransactionalPrice(commercestorepricing.TransactionalPricingRequest request2){2 // Get the transactional pricing response using the default implementation of the processPrice method. Although processTransactionalPrice is called unmodified, you can supply it with a modified version of the request.3 commercestorepricing.TransactionalPricingResponse txnResponse = super.processTransactionalPrice(request2);45 // Modify the transactional pricing response with custom logic.67 // Return the modified transactional pricing response.8 return txnResponse;9}
We define a custom private method to get the prices from an external service:
The ConnectApi.BaseEndpointExtension class defines the following virtual methods:
global virtual ConnectApi.EndpointExtensionRequest beforeGet(ConnectApi.EndpointExtensionRequest request)
global virtual ConnectApi.EndpointExtensionResponse afterGet(ConnectApi.EndpointExtensionResponse response, ConnectApi.EndpointExtensionRequest request)
global virtual ConnectApi.EndpointExtensionRequest beforePost(ConnectApi.EndpointExtensionRequest request)
global virtual ConnectApi.EndpointExtensionResponse afterPost(ConnectApi.EndpointExtensionResponse response, ConnectApi.EndpointExtensionRequest request)
global virtual ConnectApi.EndpointExtensionRequest beforePatch(ConnectApi.EndpointExtensionRequest request)
global virtual ConnectApi.EndpointExtensionResponse afterPatch(ConnectApi.EndpointExtensionResponse response, ConnectApi.EndpointExtensionRequest request)
global virtual ConnectApi.EndpointExtensionRequest beforePut(ConnectApi.EndpointExtensionRequest request)
global virtual ConnectApi.EndpointExtensionResponse afterPut(ConnectApi.EndpointExtensionResponse response, ConnectApi.EndpointExtensionRequest request)
global virtual ConnectApi.EndpointExtensionRequest beforeDelete(ConnectApi.EndpointExtensionRequest request)
global virtual ConnectApi.EndpointExtensionResponse afterDelete(ConnectApi.EndpointExtensionResponse response, ConnectApi.EndpointExtensionRequest request)
For each HTTP method, the base class provides a before and after method. You can override before methods to modify the request before the Connect API endpoint is called. And you can override after methods to modify the response of the Connect API endpoint after it’s called.
ConnectApi.EndpointExtensionRequest
The ConnectApi.EndpointExtensionRequest object wraps the request payload for the Connect API endpoint request. This object provides the following methods:
global Object getParam(String name) – get the value for a parameter name.
global void setParam(String name, Object value) – set the value for a parameter name.
global Set<String> getKeys() – return all parameter names in the request.
ConnectApi.EndpointExtensionResponse
The ConnectApi.EndpointExtensionResponse object wraps the response payload returned by the Connect API endpoint, and provides the following method:
global Object getResponseObject() – returns the Connect API response wrapped as an Object.
Manipulating Requests and Responses
To manipulate a request or response, you cast the request or response to a type that’s expected for the Connect API endpoint.
This endpoint has an HTTP GET method and an HTTP POST method. Therefore, in your extension provider class for this endpoint, you can override the beforeGet, afterGet, beforePost, and afterPost methods.
To handle the requests and responses, you must know the Apex types for the various inputs and outputs.
In this example, the GET method doesn’t take an input, but the request URL can specify multiple URL parameters.
The GET method returns a Commerce Address Collection output. Within your Apex code, you reference this type as ConnectApi.CommerceAddressCollectionRepresentation.
The POST method takes an input, but the request URL doesn’t specify URL parameters. The POST method takes a Commerce Address Input input. Within your Apex code, you reference this type as ConnectApi.CommerceAddressInputRepresentation.
The POST method returns a Commerce Address output. Within your Apex code, you reference this type as ConnectApi.CommerceAddressOutputRepresentation.
In the beforeGet method, you can access the URL parameters in the request like this:
1// Getting the value of the sortOrder request parameter2String mySortOrder = request.getParam('sortOrder');
In the afterGet method, you access the body of the response like this:
1// Cast the response object to the type returned by Connect API endpoint2ConnectApi.CommerceAddressCollectionRepresentation output = (ConnectApi.CommerceAddressCollectionRepresentation)response.getResponseObject();
In the beforePost method, you can access the request like this:
1// Cast the request body to the input type for the Connect API endpoint2// Notice the lowercase "c" in the argument to getParam()3ConnectApi.CommerceAddressInputRepresentation input = (ConnectApi.CommerceAddressInputRepresentation)request.getParam('commerceAddressInputRepresentation');
Lastly, in the afterPost method, you can access the response like this:
1// Cast the response object to the type returned by Connect API endpoint2ConnectApi.CommerceAddressOutputRepresentation output = (ConnectApi.CommerceAddressOutputRepresentation)response.getResponseObject();
After you create a variable for the request or response, you can access the properties of the request and response with getters and setters. Each property has a corresponding getter and setter.
For example, you can access the count property of the ConnectApi.CommerceAddressCollectionRepresentation response like this:
After adding an extension class to a Salesforce org, there are two more tasks required before you can fill an extension slot with a custom extension provider:
Register the extension class.
Map the extension class to a B2B store.
The easiest way to register and map extension classes is with Salesforce CLI and the Salesforce Commerce plug-in for sf.
Developers can register an extension Apex class and map it to a web store using the Commerce Extensions resources. To accomplish this, make a POST request to the Commerce Extension Providers API to register the extension class. Then, make a POST request to the Commerce Extension Mappings API to map the extension class to the store. To unmap the extension class, send a DELETE request to the Commerce Extension Mapping API.
In this guide we’ve explored how Salesforce Commerce extensions give you fine-grained control over storefront functionality. We’ve examined how extensions fit into the Salesforce Commerce architecture. We’ve walked through the construction of an example extension provider. We’ve also described the methods for registering and mapping extension providers.
Now that you have a solid understanding of extensions, the next steps are to:


 j
j