Example: Customizing User Interface Using Custom Lightning Types with Top-Level Editor and Top-Level Renderer Overrides

This example explains how to override the default user interface to create a customized appearance of responses on the custom agent’s action input and output with custom Lightning types.

In this example, you specify an editor override and a renderer override for the custom Lightning type that you created.

Before You Begin 

Download these sample data files.

Example Apex Class for Retrieving Flight Information 

Use these Apex classes together to create a custom agent action that finds flights. The main FlightAgent class contains the invocable method, and the other classes define the complex data structures for the request and response.

When you create your custom agent action, select the method Find Flights.

FlightAgent Class

This class is the main class that contains the logic for the Find Flights agent action. It also defines the FlightRequest and FlightResponse inner classes to handle the action’s input and output.

1global class FlightAgent {
2
3    @InvocableMethod(label='Find Flights' description='Finds available flights')
4    global static List<FlightResponse> findFlights(List<FlightRequest> req) {
5        List<FlightResponse> flightResponses = new List<FlightResponse>();
6
7        // For example, we hardcode the data and don’t focus on how we retrieve it.
8        // However, consider that we receive available flight data from a service
9        // and then iterate through the data to generate the final response.
10
11        List<Flight> flights = new List<Flight>();
12        Flight f1 = new Flight('IX 2814', 1, false, 1000l, 20.20d, 70);
13        Flight f2 = new Flight('6E 488', 2, false, 2000l, 15.15d, 120);
14        Flight f3 = new Flight('6E 523', 1, false, 3000l, 13.14d, 75);
15        Flight f4 = new Flight('6E 6166', 2, false, 4000l, 14.14d, 130);
16        flights.add(f1);  flights.add(f2); flights.add(f3); flights.add(f4);
17        AvailableFlight availableFlights = new AvailableFlight();
18        availableFlights.flights = flights;
19
20        FlightResponse fr = new FlightResponse();
21        fr.aFlight = availableFlights;
22        flightResponses.add(fr);
23
24        return flightResponses;
25    }
26
27    @JsonAccess(serializable='always' deserializable='always')
28    global class FlightRequest {
29
30        @InvocableVariable
31        global String originCity;
32
33        @InvocableVariable
34        global String destinationCity;
35
36        @InvocableVariable
37        global Date dateOfTravel;
38
39        @InvocableVariable
40        global FlightRequestFilter filters;
41    }
42
43    @JsonAccess(serializable='always' deserializable='always')
44    global class FlightResponse {
45
46        @InvocableVariable
47        global AvailableFlight aFlight;
48    }
49}

AvailableFlight Class

This class defines a list that holds multiple Flight objects.

1@JsonAccess(serializable='always' deserializable='always')
2global class AvailableFlight {
3
4    @AuraEnabled
5    global List<Flight> flights;
6}

Flight Class

This class defines the data structure for flight details.

1@JsonAccess(serializable='always' deserializable='always')
2global class Flight {
3
4    @AuraEnabled
5    global String flightId;
6
7    @AuraEnabled
8    global Integer numLayovers;
9
10    @AuraEnabled
11    global Boolean isPetAllowed;
12
13    @AuraEnabled
14    global Long price;
15
16    @AuraEnabled
17    global Double discountPercentage;
18
19    @AuraEnabled
20    global Integer durationInMin;
21
22    global Flight(String flightId, Integer numLayovers, Boolean isPetAllowed,
23                  Long price, Double discountPercentage, Integer durationInMin) {
24        this.flightId = flightId;
25        this.numLayovers = numLayovers;
26        this.isPetAllowed = isPetAllowed;
27        this.price = price;
28        this.discountPercentage = discountPercentage;
29        this.durationInMin = durationInMin;
30     }
31}

FlightRequestFilter

This class defines the data structure for the optional filters a user can apply when searching for flights.

1@JsonAccess(serializable='always' deserializable='always')
2global class FlightRequestFilter {
3
4    @AuraEnabled
5    global Long price;
6
7    @AuraEnabled
8    global Double discountPercentage;
9}

The Apex class FlightAgent accepts the flight search criteria, including the origin city, destination city, and date of travel, and then returns a list of available flights.

For this example, flight availability data is already included in the FlightAgent Apex class. However, in a real-time scenario, flight information is fetched from an external service, and the Apex class processes that data to generate the final response.

Note

Create Agent Action by Using Apex Class 

For information about how to create a custom action by using Apex class, see Create a Custom Agent Action.

Inputs and outputs for the agent action are defined by using standard Lightning types and Apex classes.

Input:

  • dateOfTravel, destinationCity, and originCity use standard Lightning types such as lightning__dateType and lightning__textType.
  • The filters input is a complex type that references an Apex class.

Output:

  • The output aFlight for the agent action is a complex type that references an Apex class.

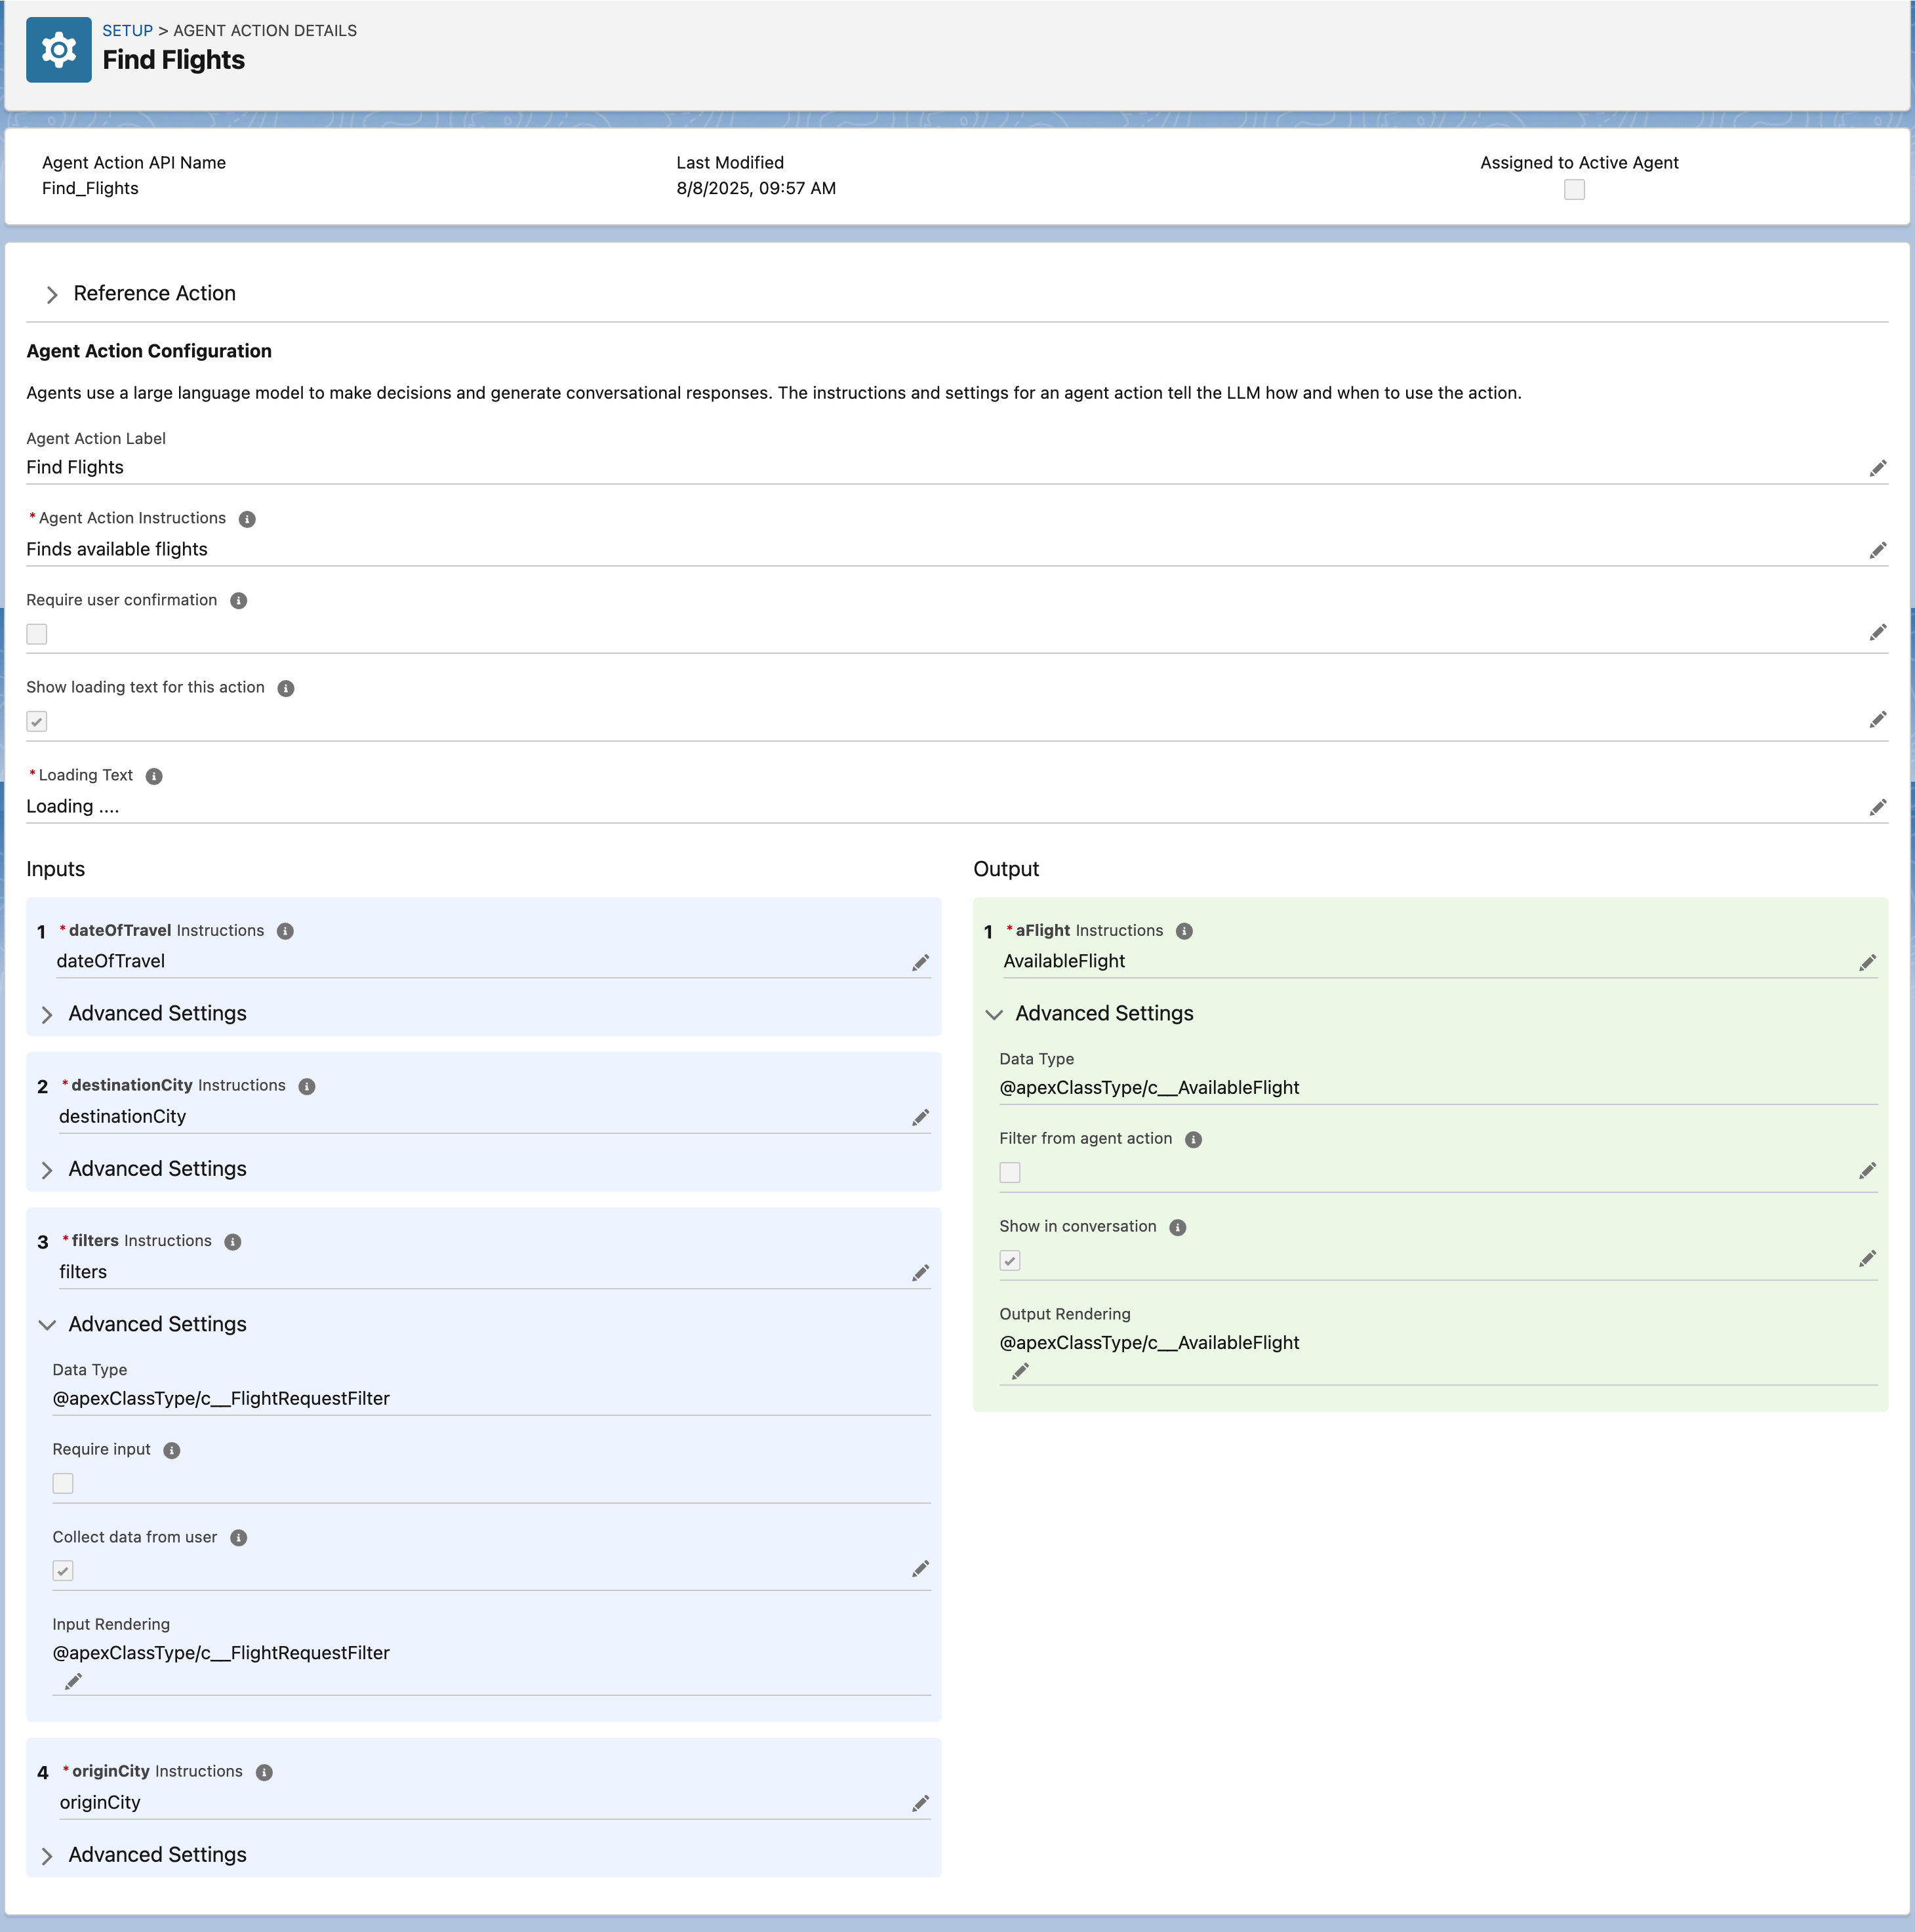
Here’s an image that shows the custom agent action created.

Input and output settings for a 'Find Flights' agent action. Inputs: dateOfTravel, destinationCity, filters, originCity. Output: aFlight.

The available flight information is retrieved by using @apexClassType/c__AvailableFlight in the agent action output, where:

  • apexClassType is the bundle name.
  • AvailableFlight is the Apex class.

When you execute this agent action, it prompts you to provide input and then generates the output.

Agent Action Execution Input 

The agent’s action UI collects these details to find available flights.

  • Origin city
  • Destination city
  • Date of travel

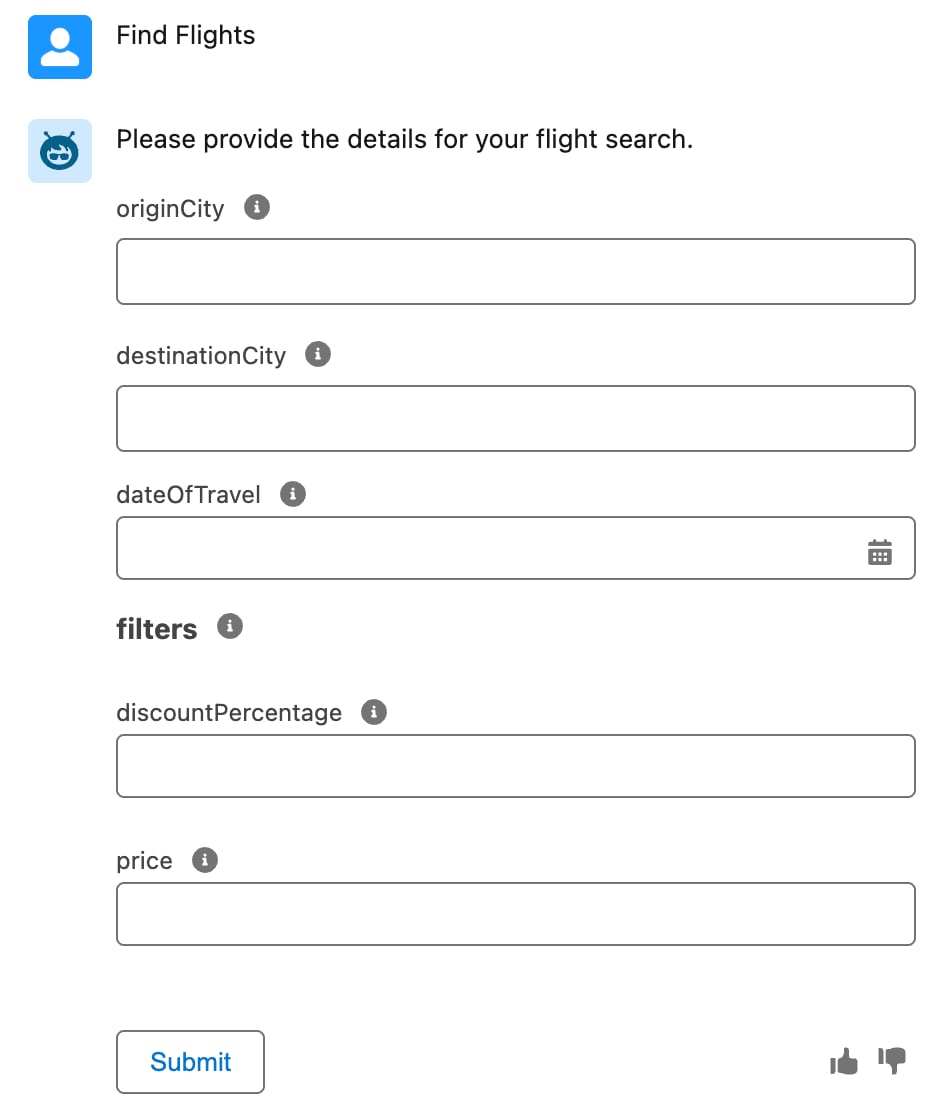
Here’s the image that shows how the custom agent action input appears in an agent conversation.

Agent's response to collect flight details. The response lacks filter details for price and discount percentage, making it difficult to filter flight data.

Agent Action Execution Output 

The agent’s action UI returns the available flight details.

Here’s the image that shows how the custom agent action’s output appears in an agent conversation.

Agent's response to a flight details request. The response lacks labels and is presented in a format that is hard to understand.

Result Data 

The agent displays the flight data in the response.

Here’s the sample code that shows the available flight data.

1{
2  "aFlight": {
3    "flights": [
4      {
5        "price": 1000,
6        "numLayovers": 1,
7        "isPetAllowed": false,
8        "flightId": "IX 2814",
9        "durationInMin": 70,
10        "discountPercentage": 20.2,
11        "departureTime": "08:30"
12      },
13      {
14        "price": 2000,
15        "numLayovers": 2,
16        "isPetAllowed": true,
17        "flightId": "6E 488",
18        "durationInMin": 120,
19        "discountPercentage": 15.15,
20        "departureTime": "09.00"
21      }
22    ]
23  }
24}

Customize UI for Output 

Create a custom Lightning type named flightResponse to enhance the visibility of the information in the output UI.

Override Default UI for Output With Custom Lightning Types 

Override the agent’s action UI for output to enhance the user experience by using Custom Lightning Types (CLTs). With CLTs, you can add your own Lightning Web Components (LWC) to present data in a more structured and intuitive format.

Configure the renderer.json file to override the default UI of a custom Lightning type in the agent action.

Here’s an example showing a lightningTypes folder for a custom Lightning type named flightResponse.

1+--lightningTypes
2        +--flightResponse
3            +--schema.json
4            +--lightningDesktopGenAi
5               +--renderer.json

This example uses lightningDesktopGenAi to configure the custom Lightning type. To configure the type for the enhancedWebChat channel, create the renderer.json file in the corresponding channel folder.

Note

The custom Lightning type flightResponse includes a schema.json file and a renderer.json file. The renderer.json file controls how the data is displayed to the user in the agent action output.

This sample code shows the contents of the schema.json file.

1{
2  "title": "My Flight Response",
3  "description": "My Flight Response",
4  "lightning:type": "@apexClassType/c__AvailableFlight"
5}

This sample code shows the contents of the renderer.json file.

1{
2  "renderer": {
3    "componentOverrides": {
4      "$": {
5        "definition": "c/flightDetails"
6      }
7    }
8  }
9}

See Also

Build Output Components with Lightning Web Components 

This section explains how the components are created and deployed for agent action output.

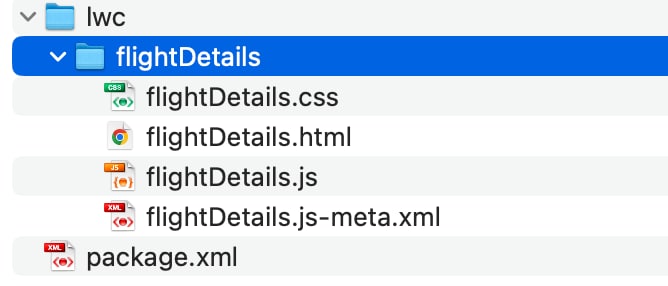
This image shows the Lightning Web Component (LWC) folder structure.

The lwc folder contains a folder named flightDetails, which is the LWC component. The flightDetails folder includes CSS, HTML, JS, and metadata files.

The LWC component includes HTML markup designed to represent the data that the agent returns for @apexClassType/c__AvailableFlight. This HTML markup ensures that the data is displayed in an intuitive and customized format.

This sample code shows the contents of the flightDetails.js-meta.xml file.

1<?xml version="1.0" encoding="UTF-8"?>
2<LightningComponentBundle xmlns="http://soap.sforce.com/2006/04/metadata">
3    <apiVersion>64.0</apiVersion>
4    <isExposed>true</isExposed>
5    <masterLabel>Flight LWC</masterLabel>
6    <targets>
7      <target>lightning__AgentforceOutput</target>
8    </targets>
9    <targetConfigs>
10      <targetConfig targets="lightning__AgentforceOutput">
11        <sourceType name="c__flightResponse"/>
12      </targetConfig>
13    </targetConfigs>
14</LightningComponentBundle>

When you create an LWC component to override the UI for action input, use lightning__AgentforceInput as the target. For output, use lightning__AgentforceOutput. For information about LWC target types, see lightning__AgentforceInput Target and lightning__AgentforceOutputTarget.

Note

This sample code shows the contents of the flightDetails.html file.

1<template>
2    <lightning-card icon-name="standard:flight" class="flight-card-container">
3    <span class="flightTitle">AvailableFlights</span>
4        <!-- Flight Cards List -->
5        <div class="flight-list-container">
6            <template for:each={flightData} for:item="flight">
7                <div key={flight.flightId} class="flight-card">
8                    <!-- Flight Info Section -->
9                    <div class="flight-info">
10                        <h2 class="flight-id">{flight.flightId}</h2>
11                        <div class="discount-tag">{flight.discountPercentage}% Off</div>
12                    </div>
13
14                    <!-- Flight Price, Duration, Departure and Arrival -->
15                    <div class="price-duration">
16                        <div class="price">
17                            <strong>${flight.price}</strong>
18                        </div>
19                        <div class="duration">
20                            {flight.durationInHr}
21                        </div>
22                    </div>
23
24                    <!-- Timeline for Departure, Duration and Arrival -->
25                    <div class="flight-timeline">
26                        <div class="timeline">
27                            <div class="time-point departure">
28                                <span>Departure Time: {flight.departureTime}</span>
29                            </div>
30                            <div class="time-point arrival">
31                                <span>Arrival Time: {flight.arrivalInHr}</span>
32                            </div>
33                        </div>
34                    </div>
35
36                    <!-- Additional Info Section (Layovers, Pets, etc.) -->
37                    <div class="additional-info">
38                        <div class="layovers">
39                            <lightning-icon icon-name="utility:loop" size="small"></lightning-icon>
40                            <span>Layovers: {flight.numLayovers}</span>
41                        </div>
42                        <div class="pets">
43                            <lightning-icon icon-name="utility:paw" size="small"></lightning-icon>
44                            <span>Pets Allowed: {flight.petAllowedStatus}</span>
45                        </div>
46                    </div>
47                    
48                </div>
49            </template>
50        </div>
51    </lightning-card>
52</template>

This sample code shows the contents of the flightDetails.js file.

1import { LightningElement, api } from "lwc";
2
3export default class FlightDetails extends LightningElement {
4  @api value;
5  flightData = [];
6
7  // Method to convert duration from minutes to hours and minutes
8  formattedDuration(durationInMin) {
9    if (durationInMin) {
10      const hours = Math.floor(durationInMin / 60); // Get whole hours
11      const minutes = durationInMin % 60; // Get remaining minutes
12      return `${hours} hr ${minutes} min`;
13    }
14    return;
15  }
16
17  // Method to calculate arrival time based on departure time and duration
18  arrivalTime(durationInMin) {
19    const hours = 7,
20      minutes = 0;
21    const departureDate = new Date(2025, 0, 1, hours, minutes); // Sample date for calculation
22
23    const arrivalDate = new Date(departureDate.getTime() + durationInMin * 60000); // Add duration to departure time
24
25    const arrivalHours = String(arrivalDate.getHours()).padStart(2, "0");
26    const arrivalMinutes = String(arrivalDate.getMinutes()).padStart(2, "0");
27
28    return `${arrivalHours}:${arrivalMinutes}`;
29  }
30
31  connectedCallback() {
32    const flights = this.value?.flights || [];
33    this.flightData = flights.map((flight) => ({
34      ...flight,
35      petAllowedStatus: flight.isPetAllowed ? "Yes" : "No",
36      durationInHr: this.formattedDuration(flight.durationInMin),
37      departureTime: "07:00",
38      arrivalInHr: this.arrivalTime(flight.durationInMin),
39    }));
40  }
41}

See Also

Integrate Custom Lightning Type into Agent Action Output 

To add a custom Lightning type to the agent action, complete these steps.

  1. Open the agent action.
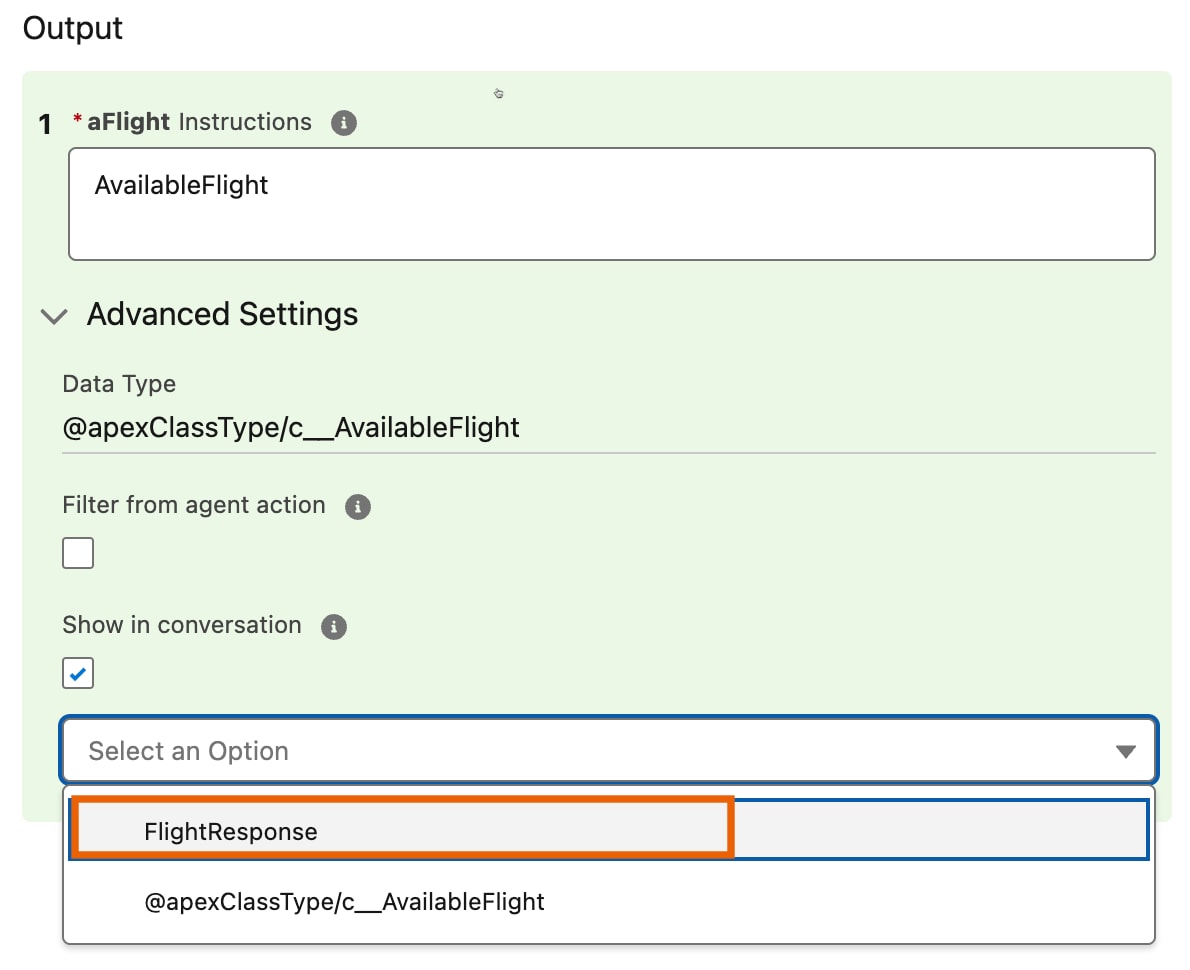
  2. Edit the Output Rendering parameter of the agent action output for aFlight.
  3. Select the custom lightning type flightResponse.
  4. Save the agent action.

The Unsupported Data Type message appears in the Map to Variable parameter. You see this message when you refer to types such as @apexClassType and custom Lightning types in an agent action’s Output Rendering parameter. This message doesn’t affect your saved work and can be safely ignored.

This image shows the custom Lightning type that you created.

The agent action output settings with 'flightResponse' selected in the Output Rendering field.

Customized Output UI 

Before executing the agent action that you modified, reload the agent page. The agent prompts you to provide input and then generate the output. The output provides a new UI experience.

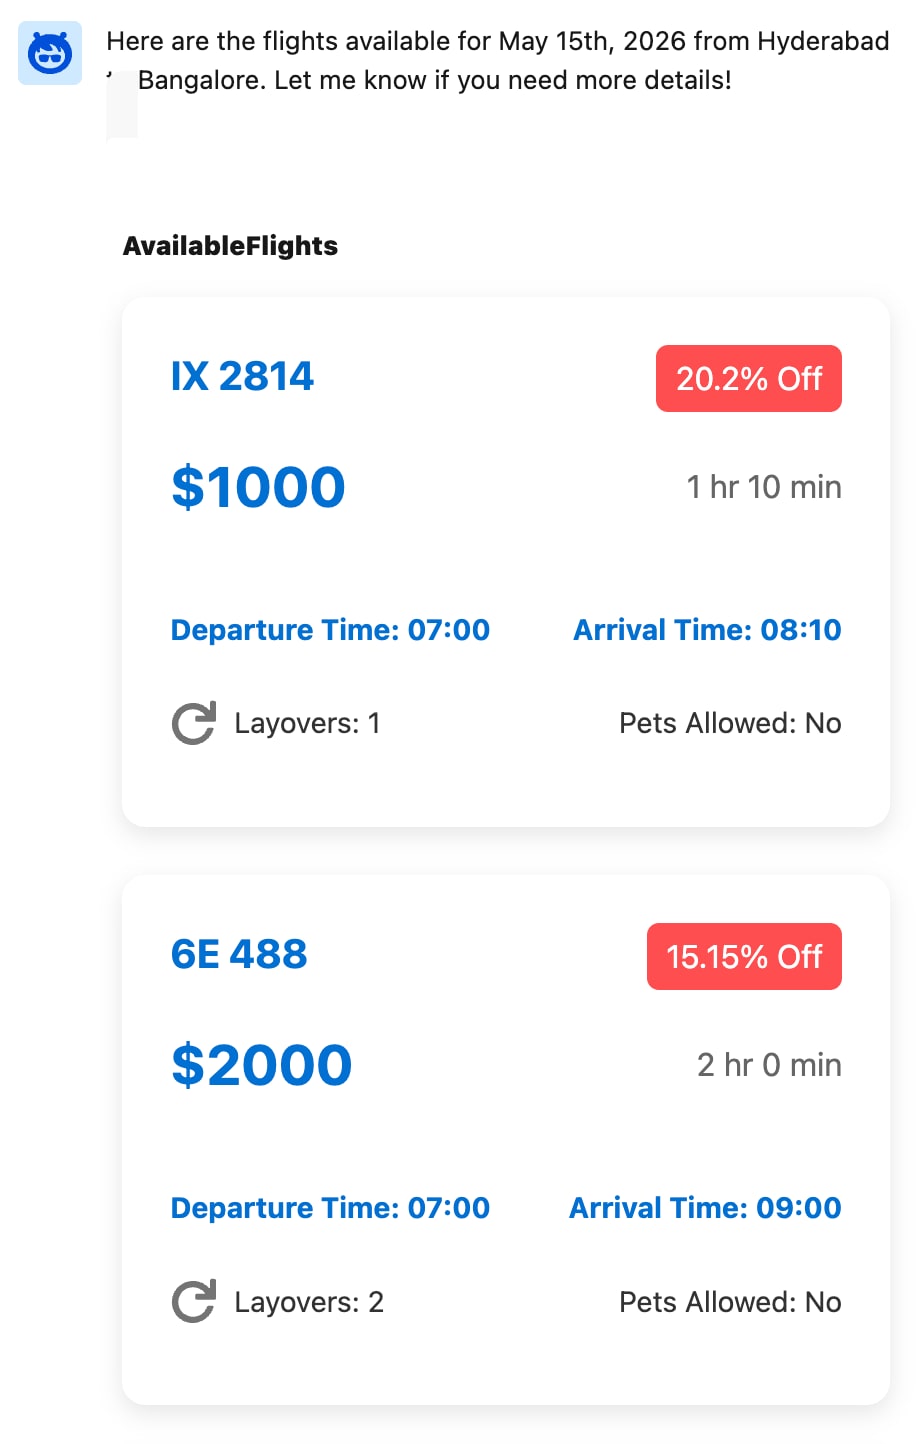
This image shows how the custom agent action’s output appears in an agent conversation.

Agent's response to a flight details request. The response includes clear labels and is presented in a format that is easy to understand.

Customize UI for Input 

Create a custom Lightning type named flightFilter to show filters in the input UI that suits your business needs.

Override Default UI for Input with Custom Lightning Types 

Override the agent’s action UI for input to enhance the user experience by using Custom Lightning Types (CLTs). With CLTs, you can add your own Lightning Web Components (LWC) to present data in a more structured and intuitive format

Configure the editor.json file to override the default UI of a custom Lightning type in the agent action.

Here’s an example that shows a lightningTypes folder for a custom Lightning type named flightFilter.

1+--lightningTypes
2        +--flightFilter
3            +--schema.json
4            +--lightningDesktopGenAi
5               +--editor.json

This example uses lightningDesktopGenAi to configure the custom Lightning type. To configure the type for the enhancedWebChat channel, create the editor.json file in the corresponding channel folder.

Note

The custom Lightning type flightFilter includes a schema.json file and an editor.json file. The editor.json file controls how the data is displayed to the user in the agent action input.

This sample code shows the contents of the schema.json file.

1{
2  "title": "Flight Filter",
3  "description": "Flight Filter",
4  "lightning:type": "@apexClassType/c__FlightRequestFilter"
5}

This sample code shows the contents of the editor.json file.

1{
2  "editor": {
3    "componentOverrides": {
4      "$": {
5        "definition": "c/flightRequestFilter"
6      }
7    }
8  }
9}

See Also

Build Input Components with Lightning Web Components 

This section explains how the components are created and deployed for agent action input.

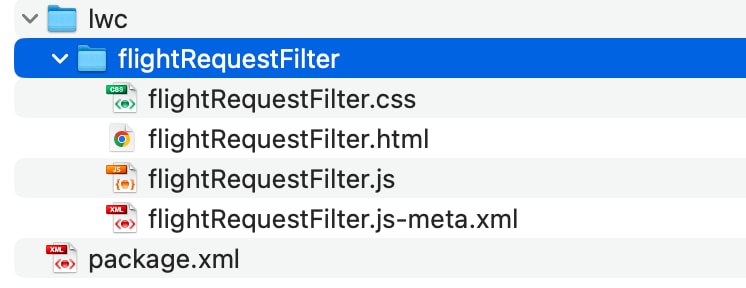
This image shows the Lightning Web Component (LWC) folder structure.

The lwc folder contains a folder named flightRequestFilter, which is the LWC component. The flightRequestFilter folder includes CSS, HTML, JS, and metadata files.

The LWC component includes HTML markup designed to accept input for @apexClassType/c__FlightRequestFilter. This HTML markup ensures that the data is displayed in an intuitive and customized format.

This sample code shows the contents of the flightRequestFilter.js-meta.xml file.

1<?xml version="1.0" encoding="UTF-8"?>
2<LightningComponentBundle xmlns="http://soap.sforce.com/2006/04/metadata">
3    <apiVersion>64.0</apiVersion>
4    <isExposed>true</isExposed>
5    <masterLabel>Flight Filter LWC</masterLabel>
6    <targets>
7      <target>lightning__AgentforceInput</target>
8    </targets>
9    <targetConfigs>
10      <targetConfig targets="lightning__AgentforceInput">
11        <targetType name="c__flightFilter"/>
12      </targetConfig>
13    </targetConfigs>
14</LightningComponentBundle>

When you create an LWC component to override the UI for action input, use lightning__AgentforceInput as the target. For output, use lightning__AgentforceOutput. For information about LWC target types, see lightning__AgentforceInput Target and lightning__AgentforceOutput Target.

Note

This sample code shows the contents of the flightRequestFilter.html file.

1<template>
2    <lightning-card title="Price and Discount Percentage">
3        <div class="slds-p-horizontal_medium">
4            <!-- Price input -->
5            <lightning-input 
6                label="Enter Price (between 1,000 and 20,000)" 
7                name="price"
8                value={price} 
9                type="number" 
10                min="1000" 
11                max="20000" 
12                step="1"
13                onchange={handleInputChange}
14                read-only={readOnly}>
15            </lightning-input>
16
17            <!-- Discount Percentage input -->
18            <lightning-input 
19                label="Enter Discount Percentage (0% to 100%)" 
20                name="discountPercentage"
21                value={discountPercentage} 
22                type="number" 
23                min="0" 
24                max="100" 
25                step="1"
26                onchange={handleInputChange}
27                read-only={readOnly}>
28            </lightning-input>
29        </div>
30    </lightning-card>
31</template>

This sample code shows the contents of the flightRequestFilter.js file.

1import { api, LightningElement } from "lwc";
2export default class FlightFilter extends LightningElement {
3  @api
4  get readOnly() {
5    return this._readOnly;
6  }
7
8  set readOnly(value) {
9    this._readOnly = value;
10  }
11  _readOnly = false;
12  _value;
13  @api
14  get value() {
15    return this._value;
16  }
17  set value(value) {
18    this._value = value;
19  }
20  price;
21  discountPercentage;
22
23  connectedCallback() {
24    if (this.value) {
25      this.price = this.value?.price || "";
26      this.discountPercentage = this.value?.discountPercentage || "";
27    }
28  }
29  handleInputChange(event) {
30    event.stopPropagation();
31    const { name, value } = event.target;
32    this[name] = value;
33    this.dispatchEvent(
34      new CustomEvent("valuechange", {
35        detail: {
36          value: {
37            price: this.price,
38            discountPercentage: this.discountPercentage,
39          },
40        },
41      }),
42    );
43  }
44}

You must include the handleInputChange() function to capture user input, update the component’s state, and notify the parent component (planner component) by using the valuechange event. The function ensures real-time data binding and prevents unwanted event propagation.

Note

See Also

Integrate Custom Lightning Type into Agent Action Input 

To add a custom Lightning type to the agent action, complete these steps.

  1. Open the agent action.
  2. Edit the Input Rendering parameter of the agent action input for filters.
  3. Select the custom lightning type flightFilter.
  4. Save the agent action.

The Unsupported Data Type message appears in the Map to Variable parameter. You see this message when you refer to types such as @apexClassType and custom Lightning types in an agent action’s Input Rendering parameter. This message doesn’t affect your saved work and can be safely ignored.

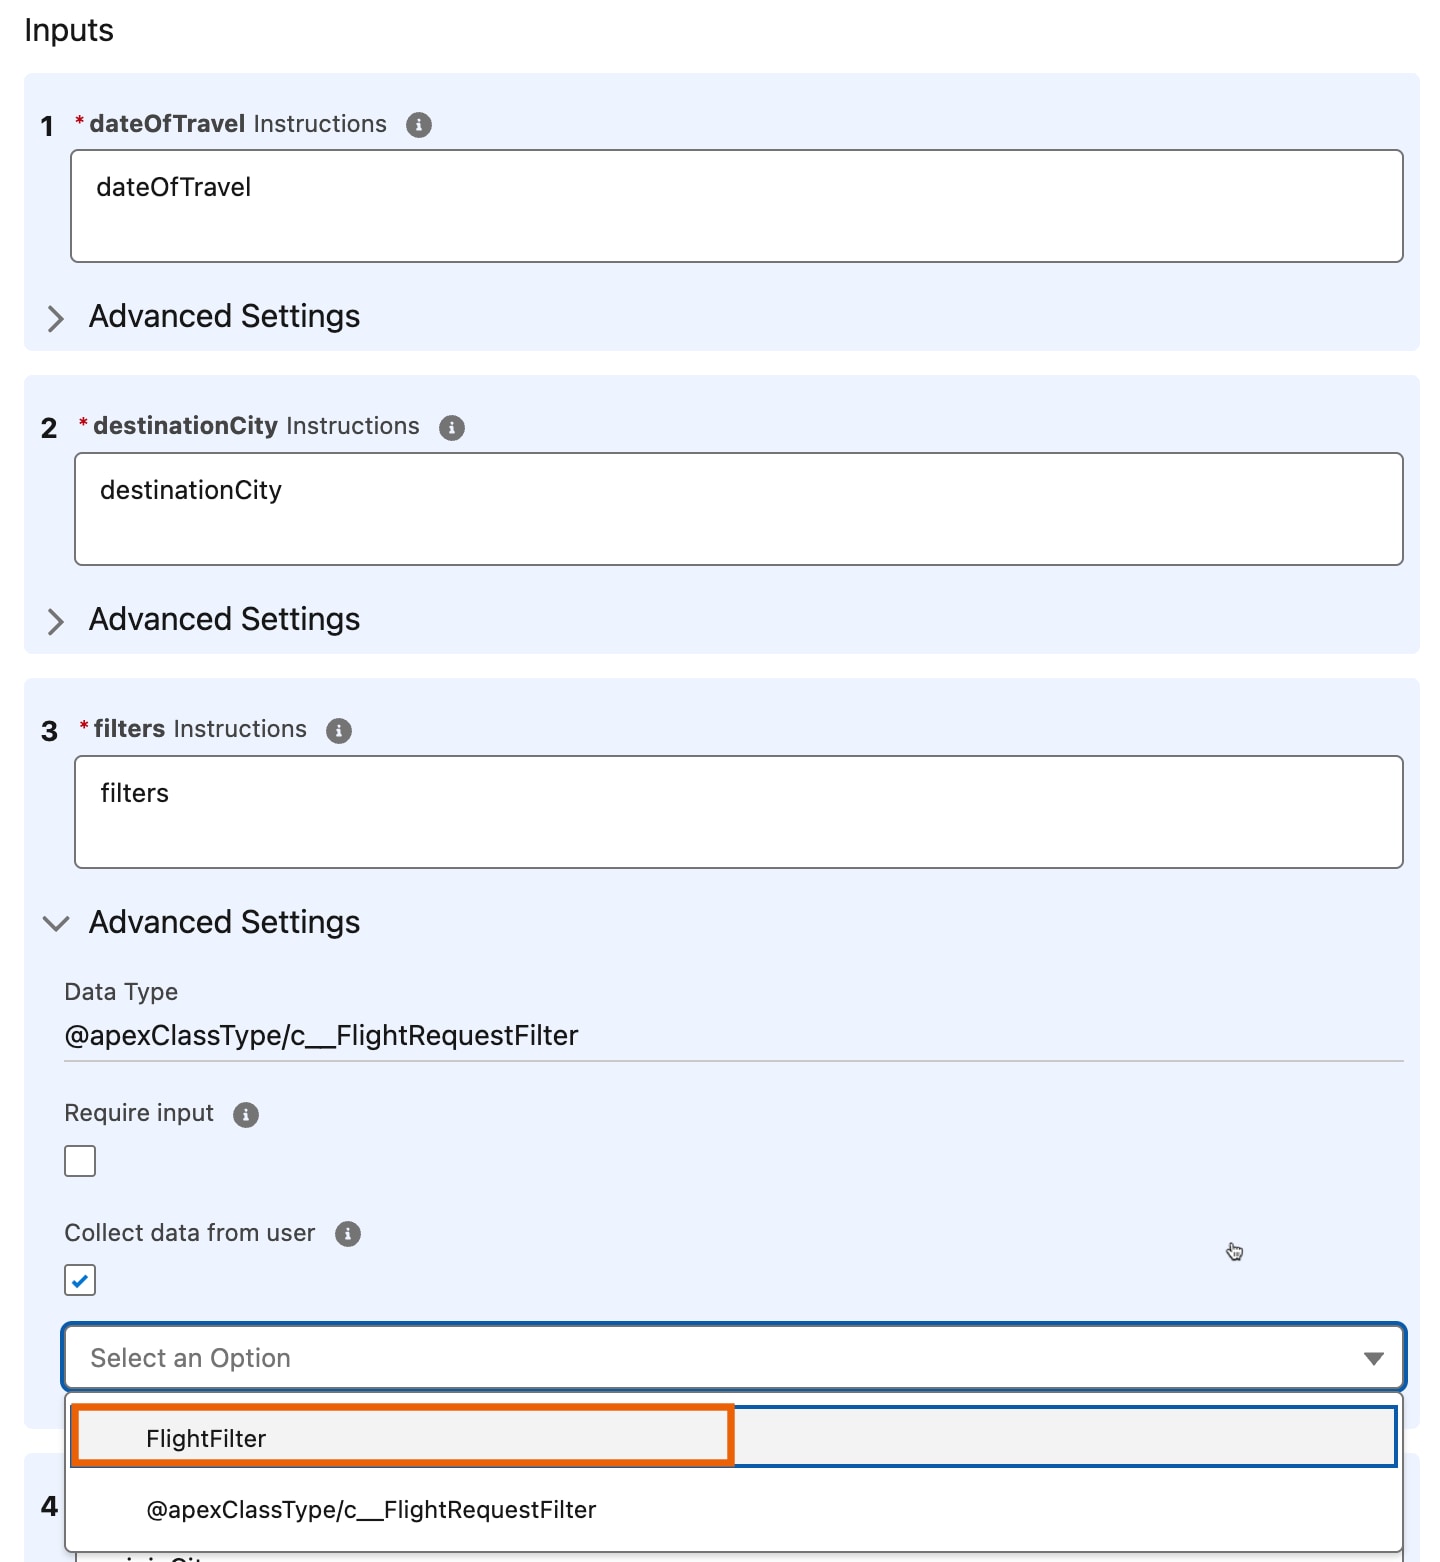
This image shows the custom Lightning type that you created.

The agent action output settings with 'flightFilter' selected in the Input Rendering field.

Customized Input UI 

Before executing the agent action that you modified, reload the agent page. The agent prompts you to provide input and then generate the output. The input provides a new UI experience.

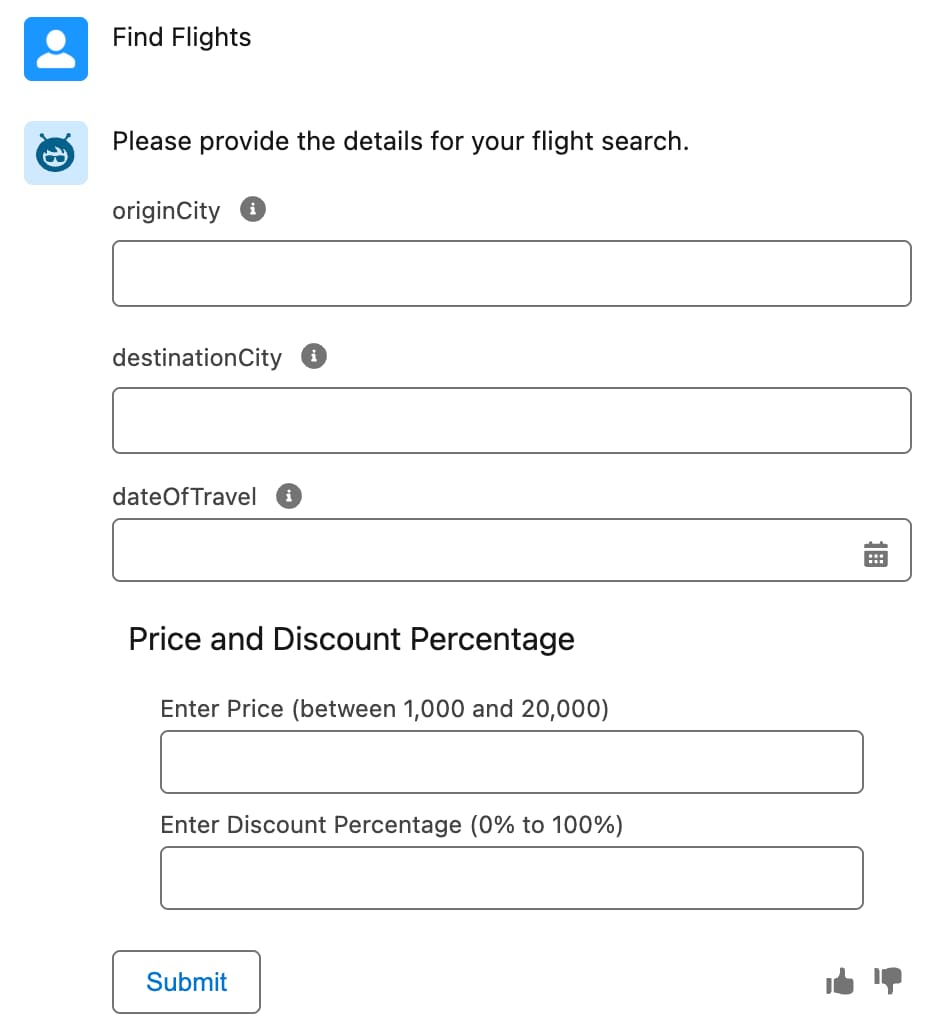
This image shows how the custom agent action’s input appears in an agent conversation.

Agent's response to collect flight details. The response includes filter fields for price and discount percentage, making it easy to filter flight data.

In certain instances the large language model (LLM) requests input as text, so make sure to accurately update the subagent instructions for the correct selection of the Override Input component. For example, when you enter a prompt to find flights, the agent executes the Find Flight action. The Find Flight action executes by taking input through a UI form, and not in the form of Text because it includes a price and discount range.

Note