


Create a Custom Exercise Type That Uses a Screen Flow
This implementation example demonstrates how to create a custom exercise type that uses an active screen flow. After creating this custom exercise type, an Enablement admin can search for a screen flow to use with the exercise in Program Builder. When users take the program in the Guidance Center, they see the screen flow when they complete the exercise.
To follow the code in this custom exercise implementation example, download the enablement_custom_exercise_screen_flow.zip file.
Set Up the Objects for the Custom Exercise Type
To store the records associated with the screen flows, create a custom object. Connect the screen flow records to the LearningItem object. You can find the code examples in the objects folder of the downloaded files.
-
Create a custom object called
ScreenFlow_Object__c.See Create a Custom Object in Salesforce Help or Custom Objects in the Object Reference for the Salesforce Platform.
1<CustomObject xmlns="http://soap.sforce.com/2006/04/metadata"> 2 <fields> 3 <fullName>ScreenFlow_Field__c</fullName> 4 <deleteConstraint>SetNull</deleteConstraint> 5 <label>Screen Flow</label> 6 <referenceTo>ScreenFlow_Object__c</referenceTo> 7 <relationshipLabel>Learning</relationshipLabel> 8 <relationshipName>Learning</relationshipName> 9 <required>false</required> 10 <type>Lookup</type> 11 </fields> 12</CustomObject> -
On the standard object LearningItem, create a custom field called
ScreenFlow_Field__cthat references theScreenFlow_Object__cobject, as shown in this example.See Create Custom Fields in Salesforce Help and Custom Fields in the Object Reference for the Salesforce Platform.
1<CustomObject xmlns="http://soap.sforce.com/2006/04/metadata">
2    <fields>
3        <fullName>ScreenFlow_Field__c</fullName>
4        <deleteConstraint>SetNull</deleteConstraint>
5        <label>Screen Flow</label>
6        <referenceTo>ScreenFlow_Object__c</referenceTo>
7        <relationshipLabel>Learning</relationshipLabel>
8        <relationshipName>Learning</relationshipName>
9        <required>false</required>
10        <type>Lookup</type>
11    </fields>
12</CustomObject>
Create a Subcategory for the Custom Exercise Type
To configure how a custom exercise appears when Enablement admins edit a program or when users take the program in the Guidance Center, define a corresponding category and subcategory for each custom exercise type.
For the category property, assign the value Exercise. The subcategory property contains the name and icon of the custom exercise type in Program Builder and the Guidance Center.
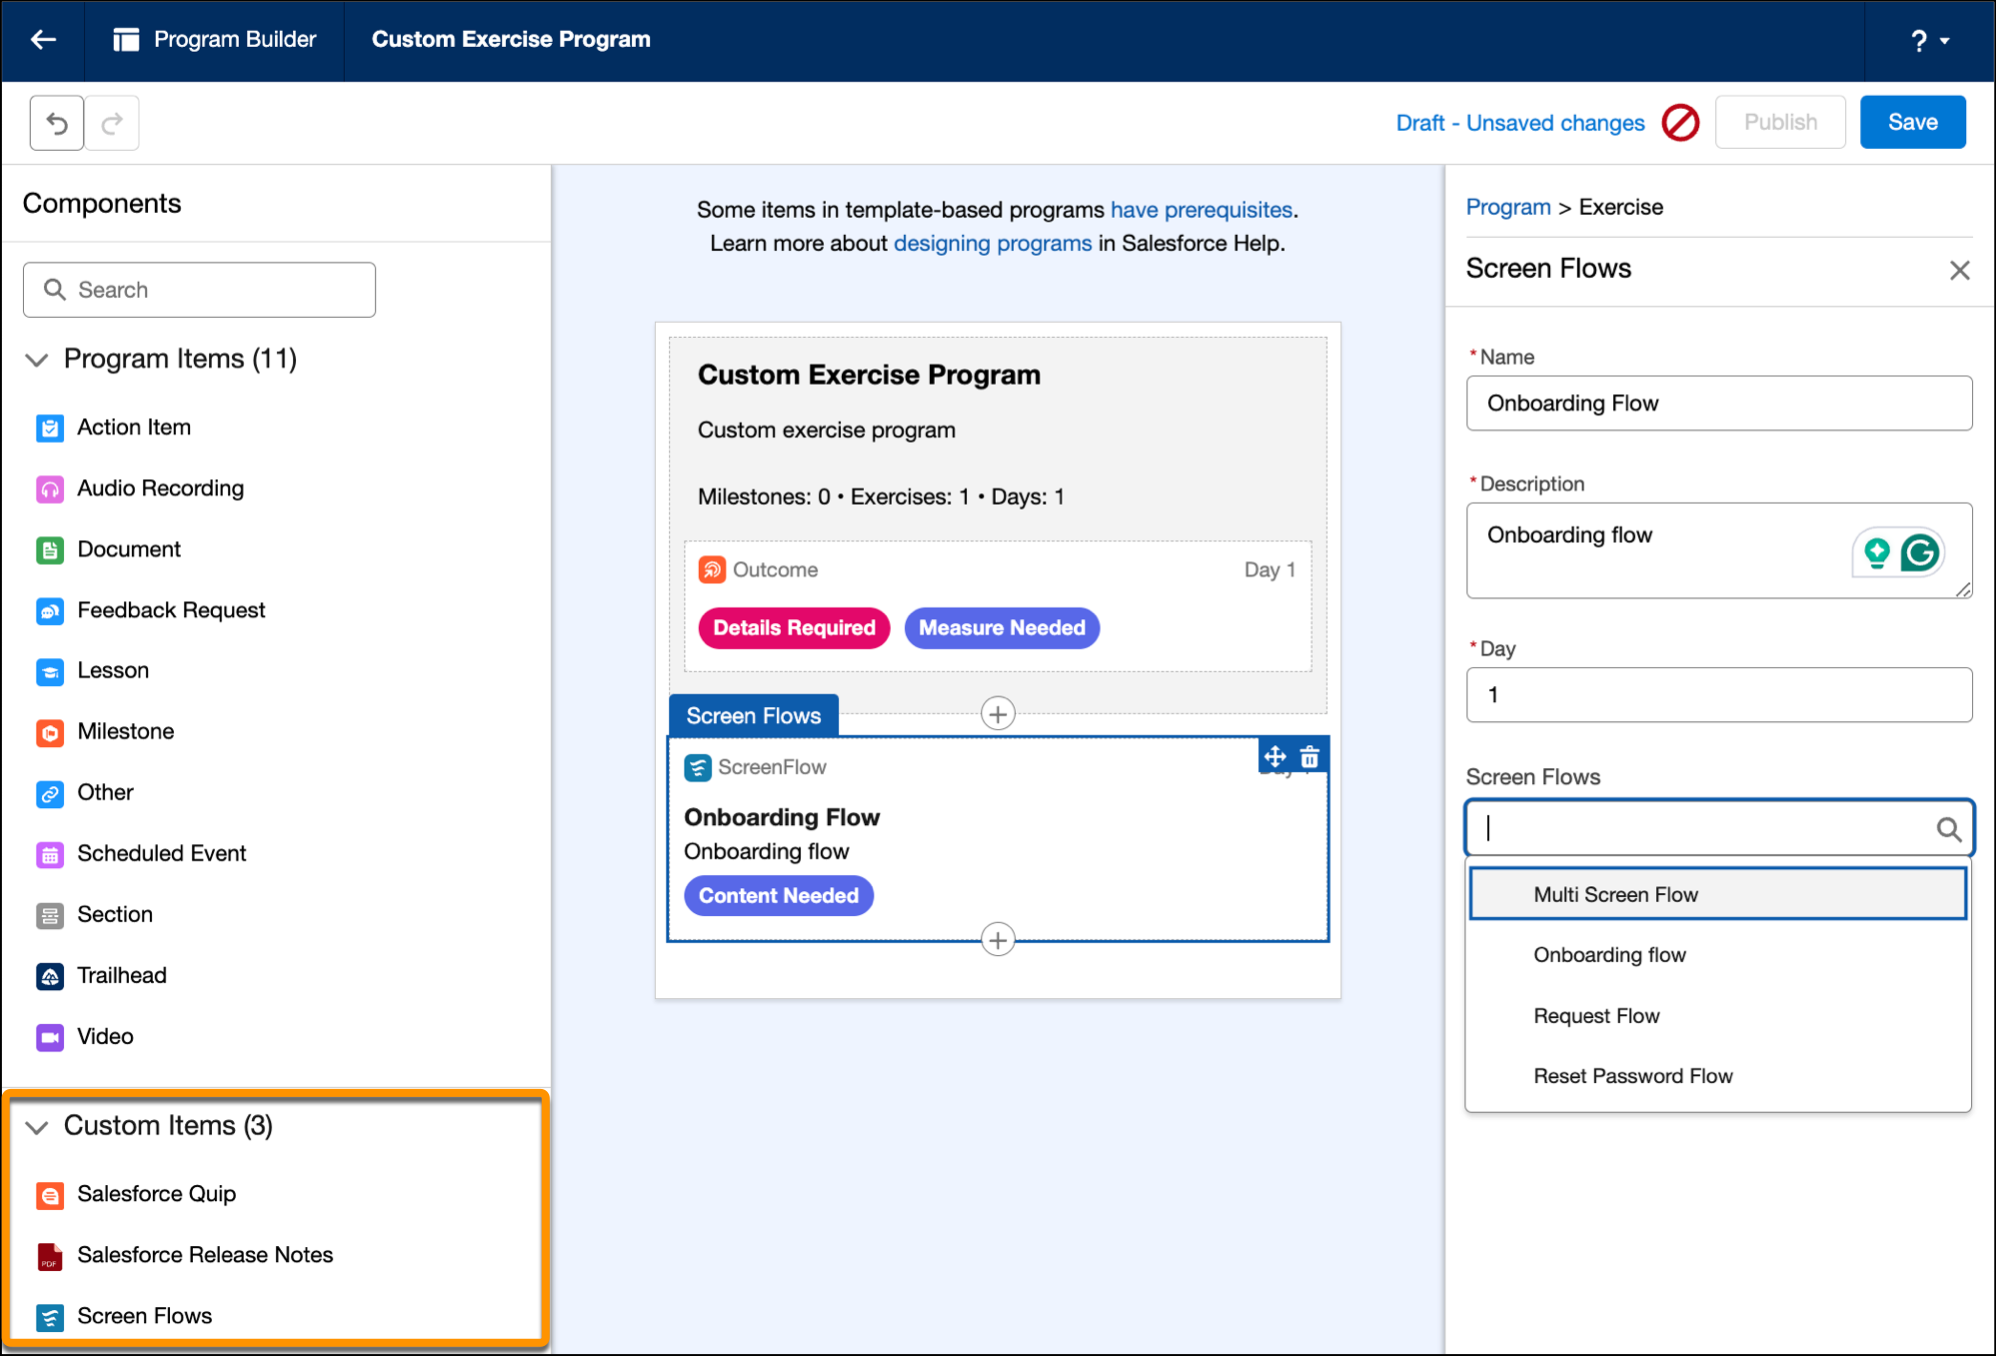
Create a Screen Flow subcategory by using Metadata API. See Quick Start: Metadata API in the Metadata API Developer Guide. You can find the code examples in the learningItemTypes and enblProgramTaskSubCategories folders of the downloaded files.
-
Create a LearningItemType metadata type record that represents the custom exercise type in the Guidance Center.
This definition references the custom object and the custom field on the LearningItem object that you created in Set Up the Objects for the Custom Exercise Type.
1<LearningItemType xmlns="http://soap.sforce.com/2006/04/metadata">
2    <apexEvaluationHandler>ScreenFlowEvaluationHandler</apexEvaluationHandler>
3    <apexSerializerDeserializer>ScreenFlowSerializerDeserializer</apexSerializerDeserializer>
4    <customField>ScreenFlow_Field__c</customField>
5    <customObject>ScreenFlow_Object__c</customObject>
6    <developerName>ScreenFlowLearningItemType</developerName>
7    <icon>standard:flow</icon>
8    <lightningComponentDefinition>screenFlowViewer</lightningComponentDefinition>
9    <masterLabel>Screen Flow Learning Item Type</masterLabel>
10</LearningItemType>
Specify these properties:
<apexEvaluationHandler>Specifies an Apex class that defines how progress and completion of the custom exercise are assessed when users take the program in the Guidance Center. See Track a User's Progress in a Custom Exercise.
<apexSerializerDeserializer>Specifies an Apex class that defines how data related to the custom exercise type is retrieved and deployed with change sets or managed packages.
<icon>Specifies the icon to use for the custom exercise type. Use the format iconType:iconName, where the values correspond to icon types and names from the Salesforce Lightning Design System. This example uses the Standard type Flow icon, so this value is
standard:flow.
-
Create an EnblProgramTaskSubCategory metadata type record that represents the custom exercise type in Program Builder. This definition references the LearningItemType metadata record that you created.
1<EnblProgramTaskSubCategory xmlns="http://soap.sforce.com/2006/04/metadata">
2    <developerName>ScreenFlowTaskSubCategory</developerName>
3    <icon>standard:flow</icon>
4    <learningItemType>ScreenFlowLearningItemType</learningItemType>
5    <masterLabel>Screen Flow</masterLabel>
6</EnblProgramTaskSubCategory>
Customize the Property Editor for the Custom Exercise Type
When an Enablement admin adds the custom exercise type to a program in Program Builder, they search for a specific content record to use for that instance of the exercise. To specify how Enablement admins find the appropriate content for the exercise, customize the exercise’s property editor. This example implements a search box for finding screen flow records and a dropdown to select a record.
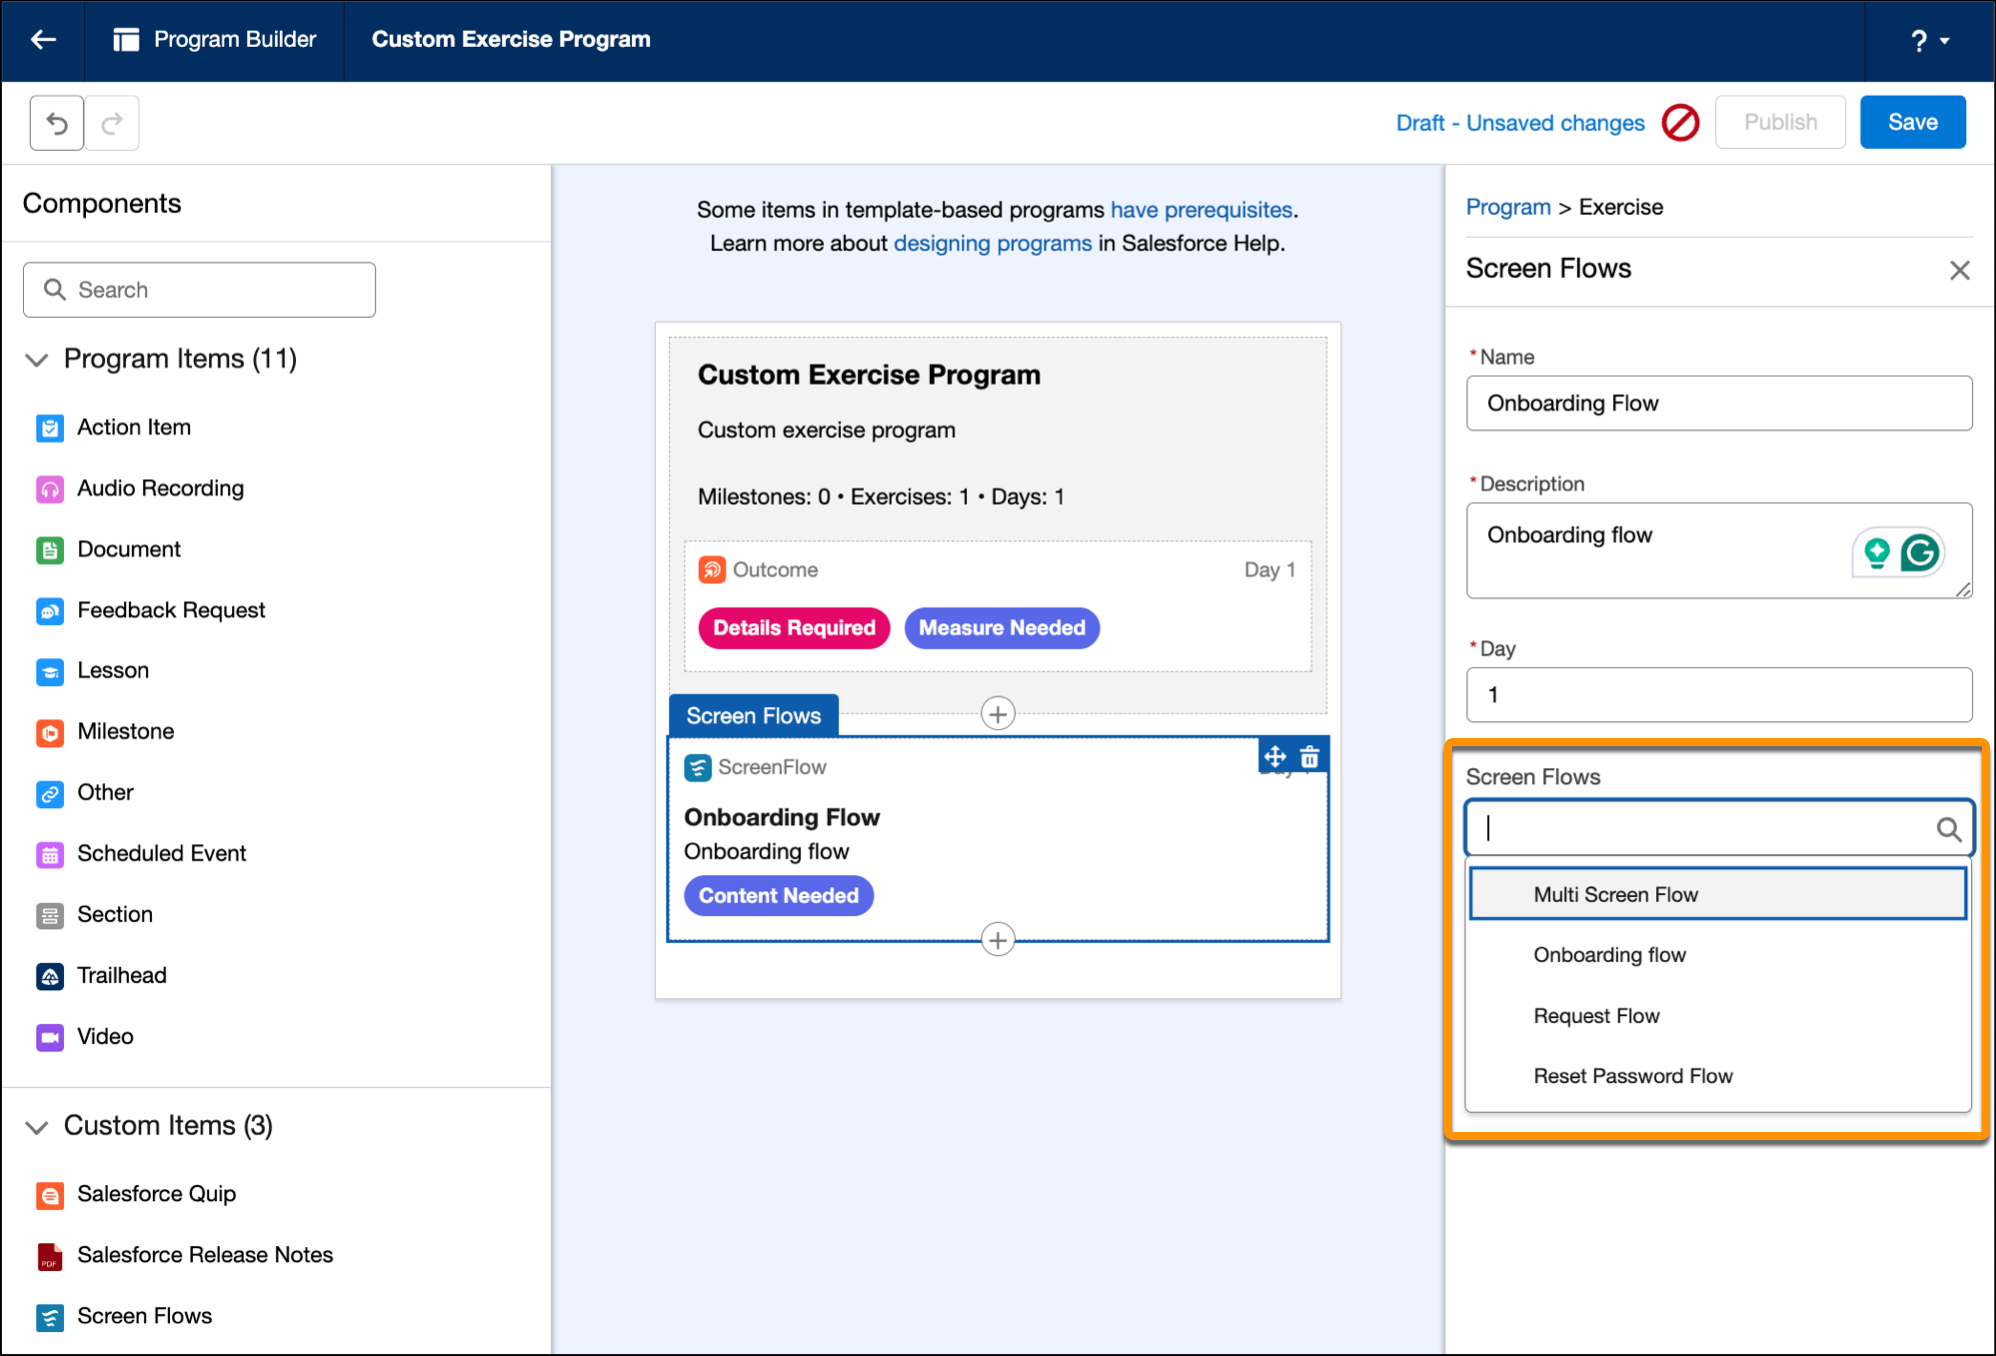
To customize the property editor, create an LWC and add it to the Program Builder’s property sheet of the custom learning item. You can find the code examples in the lwc folder of the downloaded files.
-
Create an LWC bundle. Let’s name our example bundle
screenFlowPropertyEditor.See Trailhead: Build Lightning Web Components or Create Lightning Web Components in the Lightning Web Components Developer Guide.
-
In the
screenFlowPropertyEditor.htmlfile, configure how the screen flow picker is rendered in the property editor.1<template> 2 <lightning-record-picker 3 lwc:ref="screenFlowPickerRef" 4 label="Screen Flow" 5 placeholder="Search Screen Flows..." 6 object-api-name="ScreenFlow_Object__c" 7 value="{_value}" 8 onchange="{handleRecordChanged}" 9 > 10 </lightning-record-picker> 11 12 <a 13 href="/builder_platform_interaction/flowBuilder.app" 14 class="slds-button slds-button_outline-brand slds-m-bottom_x-small slds-m-top_x-small" 15 target="_blank" 16 >Create Screen Flow</a 17 > 18 <a 19 href="/lightning/o/ScreenFlow_Object__c/new" 20 class="slds-button slds-button_brand slds-m-left_none" 21 target="_blank" 22 >Create Screen Flow Custom Object Record</a 23 > 24</template> -
In the
screenFlowPropertyEditor.js-meta.xmlconfiguration file, specify thelightning__PropertyEditortarget, as shown in this example.1<LightningComponentBundle xmlns="http://soap.sforce.com/2006/04/metadata"> 2 <apiVersion>62.0</apiVersion> 3 <isExposed>true</isExposed> 4 <masterLabel>Screen Flow Custom Property Editor Component</masterLabel> 5 6 <targets> 7 <target>lightning__PropertyEditor</target> 8 </targets> 9 10</LightningComponentBundle> -
In the
screenFlowPropertyEditor.jsfile, declare an@apivariable namedvalueto store the selected custom object record ID in Program Builder.Add the LWC of the custom property editor to the
customContentproperty of the property sheet. See the Add the Custom Exercise Type to Program Builder section. The ID of the record that the Enablement admin selects for the exercise in Program Builder is stored in thevalueattribute of thecustomContentproperty. To change thevaluefrom this property editor component, call thevaluechangeevent and specify the custom object record ID.1import { LightningElement, api, track } from "lwc"; 2 3// This component is rendered in place of the customContent property 4// in the custom exercise that uses this LWC component as an editor. 5export default class ScreenFlowPropertyEditor extends LightningElement { 6 @track _value; 7 @track compConnected; 8 9 connectedCallback() { 10 this.compConnected = true; 11 } 12 13 // The value variable holds the selected custom object record ID. 14 @api 15 get value() { 16 return this._value; 17 } 18 19 // Set the record-picker value. 20 set value(val) { 21 if (this.compConnected && this._value !== val) { 22 this.refs?.screenFlowPickerRef?.clearSelection(); 23 } 24 25 this._value = val; 26 } 27 28 // Fire the value change event to let the Program Builder know 29 // that the value for the customContent property has changed. 30 handleRecordChanged(event) { 31 this._value = event.detail.recordId; 32 33 this.dispatchEvent( 34 new CustomEvent("valuechange", { 35 detail: { 36 value: CUSTOM_OBJECT_RECORD_ID, 37 }, 38 }), 39 ); 40 } 41}
Limitations of Custom Property Editor
-
Only the selected
customContentpropertyvalueis passed to the LWC. No other metadata information likemin,max, orlabel, are passed. -
When the program is in the Published state, custom exercise properties in Program Builder, such as
day, are in read-only mode. However, when you implement a custom property editor by adding the custom LWC to theeditorattribute of thecustomContentproperty, the LWC doesn’t automatically get disabled when the program is published. This is because the LWC doesn’t know about the published state or read-only mode. -
To add the LWC of the custom property editor to the
customContentproperty of thelightning__EnablementProgramtarget, configure these attributes.-
Add the LWC of the custom property editor to the
editorattribute. -
The
labelattribute isn’t used but must be included with a placeholder value.1<property name="customContent" type="String" editor="c/screenFlowPropertyEditor" label="Screen Flows"/>
-
See Add the Custom Exercise Type to Program Builder
Add the Custom Exercise Type to Program Builder
To add the custom exercise type with screen flows to the Components palette in Program Builder, create an LWC. You can find the code examples in the lwc folder of the downloaded files.
-
Create an LWC bundle. Let’s name our example bundle
screenFlow.See Trailhead: Build Lightning Web Components or Create Lightning Web Components in the Lightning Web Components Developer Guide.
-
Leave the
screenFlow.htmlfile empty. We don’t render the markup of this HTML file.1<template> </template> -
In the
screenFlow.js-meta.xmlconfiguration file, add and configure thelightning__EnablementProgramtarget, as shown in this example. This LWC target adds the custom exercise type to the Components palette. The target properties are the options available in the Program Builder property sheet when an Enablement admin adds the custom exercise type to a program.Make the
defaultattribute of thesubcategoryproperty point to thedeveloperNameof the EnblProgramTaskSubCategory Metadata type record. Theeditorattribute of thecustomContentproperty calls thescreenFlowPropertyEditorLWC, which you created in the Customize the Property Editor for the Custom Exercise Type section.1<LightningComponentBundle xmlns="http://soap.sforce.com/2006/04/metadata"> 2 <apiVersion>62.0</apiVersion> 3 <isExposed>true</isExposed> 4 <masterLabel>Screen Flows</masterLabel> 5 <description>Screen Flows</description> 6 7 <targets> 8 <target>lightning__EnablementProgram</target> 9 </targets> 10 11 <targetConfigs> 12 <targetConfig targets="lightning__EnablementProgram"> 13 <property name="title" type="String" max="80" required="true" default="" label="Name" /> 14 <property name="description" type="multilinetext" required="true" default="" max="350" label="Description" /> 15 <property name="day" type="Integer" min="1" max="365" default="1" required="true" label="Day" /> 16 <property name="category" type="String" default="Exercise" /> 17 <property name="subCategory" type="String" default="ScreenFlowTaskSubCategory" /> 18 <property name="customContent" type="String" editor="c/screenFlowPropertyEditor" label="Screen Flows" /> 19 </targetConfig> 20 </targetConfigs> 21</LightningComponentBundle> -
In the
screenFlow.jsfile, include the@apivariables for each property configured in the.js-meta.xmlfile.1import { api, LightningElement } from "lwc"; 2 3export default class ScreenFlow extends LightningElement { 4 @api title; 5 @api description; 6 @api day; 7 @api category; 8 @api subCategory; 9 @api customContent; 10} -
In the
screenFlow.svgfile, add the custom exercise icon as an SVG image, as shown here. Program Builder shows this icon in the Custom Items section of the Components palette.To find the SVG definition of an icon, download the icons from the Salesforce Lightning Design System website and navigate to the SVG file for the icon you want to use.
Tip
1<svg width="48" height="48" viewBox="0 0 48 48" fill="none" xmlns="http://www.w3.org/2000/svg">
2    <rect width="48" height="48" rx="4" fill="#107CAD"/>
3    <path d="M38.352 14.7359C37.104 12.2879 33.936 7.72791 28.032 10.4159C24.384 12.0959 22.32 13.0559 22.32 13.0559L17.04 15.3599C15.552 16.0799 12.288 15.0719 10.464 14.3999C9.93599 14.2079 9.45599 14.7839 9.69599 15.3119C10.944 17.7599 14.112 22.3199 20.016 19.6319C23.664 17.9519 31.008 14.7839 31.008 14.7839C32.496 14.0639 35.76 15.0719 37.584 15.7439C38.112 15.8399 38.592 15.3119 38.352 14.7359Z" fill="white"/>
4    <path d="M25.68 22.4639C25.008 22.8479 22.368 24.0479 22.368 24.0479L19.728 25.1999C18.432 25.9199 15.6 24.9599 13.92 24.2879C13.44 24.0479 13.008 24.6719 13.248 25.1519C14.304 27.5519 17.136 31.8719 22.32 29.2319C25.536 27.5999 28.272 26.5439 28.272 26.5439C29.568 25.8239 32.4 26.7839 34.08 27.4559C34.56 27.6479 34.992 27.0719 34.752 26.5439C33.648 24.1439 30.816 19.8239 25.68 22.4639Z" fill="white"/>
5    <path d="M23.76 33.0719C23.232 33.3599 22.32 33.9359 22.32 33.9359C21.312 34.5599 19.2 33.7439 17.952 33.1199C17.616 32.9279 17.28 33.5039 17.472 33.9839C18.24 36.1439 20.352 40.0319 24.24 37.6319C25.68 36.7199 25.68 36.7679 25.68 36.7679C26.736 36.2399 28.8 36.9599 30.048 37.5359C30.384 37.7279 30.72 37.1519 30.528 36.6719C29.76 34.5599 27.792 30.8639 23.76 33.0719Z" fill="white"/>
6</svg>
Configure the Custom Exercise for the Guidance Center
Create a new LWC component for showing the custom exercise type in the Guidance Center. You can find the code examples in the lwc folder of the downloaded files.
-
Create an LWC bundle. Let’s name our example bundle
screenFlowViewer.See Trailhead: Build Lightning Web Components or Create Lightning Web Components in the Lightning Web Components Developer Guide.
-
In the
screenFlowViewer.htmlfile, configure how to display the custom exercise in the Guidance Center.1<template> 2 <lightning-flow 3 lwc:if="{renderFlow}" 4 onstatuschange="{handleStatusChange}" 5 flow-api-name="{flowDeveloperName}" 6 > 7 </lightning-flow> 8 9 <lightning-badge 10 class="slds-m-top_medium slds-text-body_regular" 11 lwc:if="{learningItemStatusCompleted}" 12 label="All good. You have finished the flow." 13 ></lightning-badge> 14 15 <lightning-spinner 16 lwc:if="{loading}" 17 variant="brand" 18 alternative-text="Loading" 19 size="x-small" 20 ></lightning-spinner> 21</template> -
In the
screenFlowViewer.js-meta.xmlconfiguration file, expose this component to other namespaces, and specify the API version.Salesforce’s internal LWC that invokes this LWC is in a different namespace. To make this component visible to other namespaces, expose this component.
1<LightningComponentBundle xmlns="http://soap.sforce.com/2006/04/metadata"> 2 <apiVersion>62.0</apiVersion> 3 <isExposed>true</isExposed> 4</LightningComponentBundle> -
In the
screenFlowViewer.jsfile, add these methods and variables.getFlowDeveloperName(): Fetches the screen flow’s developer name by using this method of the optional customResourceControllerApex class. You can add more Apex classes toResourceControllerfor additional customization. You can find an example in theclasses/ResourceController.clsfile of the download.@api customContent: Contains the ID of the content record that the Enablement admin selected for the custom exercise in Program Builder.@api learningItemId: Contains the learning item record ID, which you can use as input to evaluateLearningItem API to determine the progress of the custom exercise. See Track a User’s Progress in a Custom Exercise and evaluateLearningItem LWC wire adapter reference in the Lightning Web Components Developer Guide.
1import { api, wire, LightningElement } from "lwc";
2import getFlowDeveloperName from "@salesforce/apex/ResourceController.getFlowDeveloperName";
3import isLearningItemStatusCompleted from "@salesforce/apex/ResourceController.isLearningItemStatusCompleted";
4import getScreenNames from "@salesforce/apex/ResourceController.getScreenNames";
5import { evaluateLearningItem } from "lightning/uiLearningPlatformApi";
6import Id from "@salesforce/user/Id";
7
8export default class ScreenFlowViewer extends LightningElement {
9  flowDeveloperName;
10  screenNames;
11  loading = false;
12  userId = Id;
13  learningItemStatusCompleted;
14  progressLoaded = false;
15  isFlowCompleted = false;
16
17  @api customContent;
18  @api learningItemId;
19
20  get renderFlow() {
21    return (
22      this.flowDeveloperName &&
23      this.screenNames &&
24      this.progressLoaded &&
25      !this.learningItemStatusCompleted &&
26      !this.isFlowCompleted
27    );
28  }
29
30  @wire(isLearningItemStatusCompleted, { learningItemId: "$learningItemId", userId: "$userId" })
31  learningItemprogress({ error, data }) {
32    if (error) {
33      // show error
34    } else if (data !== undefined) {
35      this.progressLoaded = true;
36      this.learningItemStatusCompleted = data;
37    }
38  }
39
40  @wire(getFlowDeveloperName, { customScreenFlowId: "$customContent" })
41  flowDevName({ error, data }) {
42    if (error) {
43      // show error
44    } else if (data) {
45      this.flowDeveloperName = data;
46    }
47  }
48
49  @wire(getScreenNames, { flowDeveloperName: "$flowDeveloperName" })
50  flowScreens({ error, data }) {
51    if (error) {
52      // show error
53    } else if (data) {
54      this.screenNames = data.join(",");
55    }
56  }
57
58  async handleStatusChange(event) {
59    if (this.flowStatus === "FINISHED") {
60      return;
61    }
62
63    const learningItemId = this.learningItemId;
64    this.loading = true;
65
66    this.flowStatus = event.detail.status;
67    this.currentScreen = event.detail.locationName;
68
69    const res = await evaluateLearningItem({
70      learningItemId,
71      details: {
72        status: event.detail.status,
73        currentScreen: event.detail.locationName,
74        allScreens: this.screenNames,
75      },
76    });
77
78    if (this.flowStatus === "FINISHED") {
79      this.isFlowCompleted = true;
80    }
81
82    const { error } = res;
83
84    if (error) {
85      // show error
86    } else {
87      this.learningItemStatusCompleted = res.isCompleted;
88    }
89
90    this.loading = false;
91  }
92}
That’s it! Enablement admins can now start adding the screen flow custom exercise type to programs, and users can start taking the exercise when they enroll in programs.
 j
j