Use Live Preview to develop Lightning web components in a real-time browser preview. You can load your component in isolation, or preview it within a Lightning app or an Experience Cloud Lightning Web Runtime (LWR) site. Alternatively, you can run the Live Preview Visual Studio Code (VS Code) extension to test a single Lightning web component or React component inside your integrated development environment (IDE).
When you save changes to your source code, Live Preview automatically updates your component in the browser or IDE. This lets you iterate quickly on your components without deploying code or manually refreshing the preview.
Live Preview was previously called Local Dev. In Spring ‘26, we rebranded this feature to reflect the real-time nature of the preview tools.
Note
Where is Live Preview Supported?
Live Preview is available for Lightning apps, Experience sites, Lightning web components, and React components.
You can use Live Preview in production, sandbox, and scratch orgs. However, we recommend running it only in sandbox and scratch orgs.
Set Up Live Preview
First time using Live Preview? For a step-by-step walkthrough of how to configure and run this feature for a Lightning app, check out the project Set Up Your Lightning Web Components Developer Tools on Trailhead.
Tip
Before you can run Live Preview, follow these setup steps.
1. Install the Salesforce Command Line Interface (CLI)
Follow the instructions outlined in Install the Salesforce CLI. The Salesforce CLI automatically installs the Live Preview plugin for you.
2. Enable Live Preview
When you run a Live Preview command for the first time, the CLI prompts you to enable the feature. In response, press Enter or type y to enable it.
Preview a single Lightning web component or React component in VS Code.
Considerations for CLI Commands
To use the latest version of the CLI commands, run sf update before you start a Live Preview instance.
To successfully run Live Preview CLI commands, you must have an lwc directory in your project that contains your components. This directory is typically nested in the force-app/main/default directory.
Lightning App Live Preview
To preview a Lightning app in a desktop environment or on the Salesforce mobile app (iOS or Android), run sf lightning dev app on the CLI with the following flags as needed.
If you forget to set a required flag, don’t worry: the CLI prompts you to select a value from a list of valid options.
Flag
Required/Optional
Description
-o, --target-org
Required
The username or alias of the target org for the preview. Not required if you already set the target-org configuration variable. Example:--target-org myOrg
-n, --name
Optional
The name of the Lightning Experience app you want to preview. If your app name has spaces in it, wrap the name in quotes. Example: To start Live Preview for an app named SDO – Consumer, run --name "SDO - Consumer"
-t, --device-type
Optional
The type of device to display the app preview. This flag accepts only one of these options: - desktop - ios - androidExample:--device-type desktop
-i, --device-id
Optional
If you set --device-type to ios or android, you can choose the ID of the mobile device to display the preview. The default value is the ID of the first available mobile device. Example:--device-id "iPhone 15 Pro Max"
--flags-dir
Optional
Import flag values from a directory.
Lightning Apps in a Mobile Environment
Live Preview supports previewing only Lightning apps in a mobile environment. Specifically, you can run your preview in an iOS simulator or an Android emulator.
Prerequisites
Before you can use this feature, you have to install and configure Salesforce mobile development tools. You only have to complete this setup process once on your machine.
Mac users can run an iOS simulator for Live Preview using Xcode. If you don’t already have Xcode, install it from the Mac App Store and complete the initial setup process. In Xcode, make sure that you download the iOS mobile device simulators that you want to use with Live Preview.
To run your app in an Android emulator using Live Preview, set --device-type to android in your CLI command: sf lightning dev app --device-type android.
Salesforce Mobile App
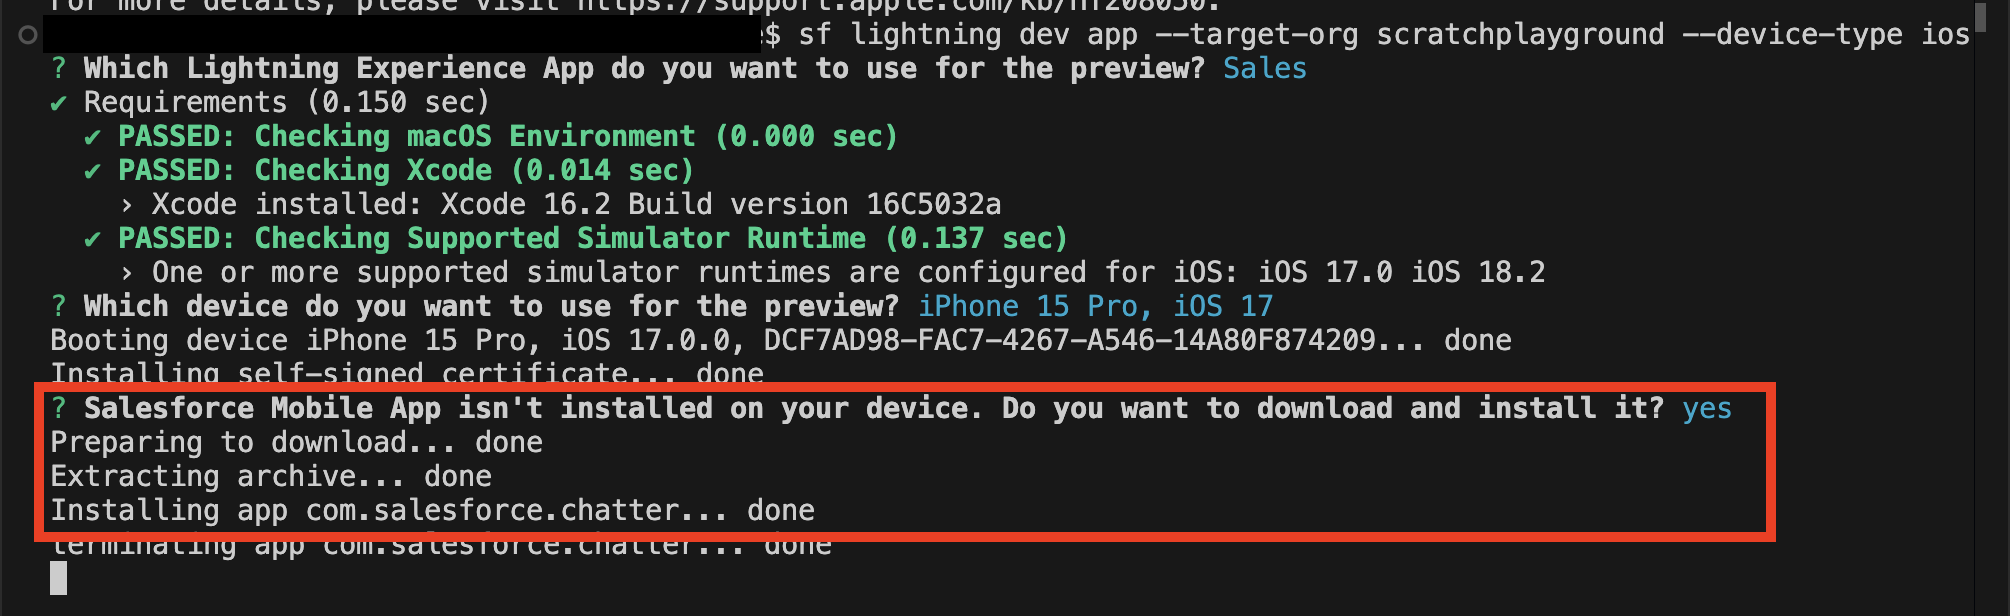
Don’t worry about manually installing the Salesforce mobile app on your simulator or emulator virtual device. When you run the Live Preview CLI command, the CLI prompts you to install the Salesforce mobile app if needed, like this:
Experience Sites Live Preview
When you run sf lightning dev site on the CLI, Live Preview automatically generates and downloads a static bundle based on the current state of your site. You can preview an Experience Cloud LWR site only in a desktop environment with Live Preview.
For now, you have to publish your Experience LWR site before you can run an Experience Sites Live Preview instance.
Important
Flag
Required/Optional
Description
-o, --target-org
Required
The username or alias of the target org for the preview. Not required if you already set the target-org configuration variable. Example:--target-org myOrg
-n, --name
Optional
The name of the Experience Cloud LWR site you want to preview. If your site name has spaces in it, wrap the name in quotes. If you don’t set this flag, Live Preview prompts you in the terminal to select a value for the name from a list of valid options. Example: To run Live Preview for a site named SDO - Consumer, run --name "SDO - Consumer"
--flags-dir
Optional
Import flag values from a directory.
--get-latest
Optional
The sf lightning dev site command caches a version of your Experience LWR site on your machine. This cached version is used whenever you subsequently run the Live Preview site command again. To update the local cache with the latest version of your site from your org, such as to preview recent Experience Builder changes, add the --get-latest flag to your command.
--ssr
Optional
Starting in Spring ‘26, Live Preview doesn’t support this flag. Don’t use it.
Single Component Live Preview
To test a single LWC in your browser with Live Preview, run the sf lightning dev component command on the CLI with the following flags as needed. If you forget to set a required flag, don’t worry: the CLI prompts you to select a value for it from a list of valid options.
In a Single Component Live Preview, components can access platform modules such as public Lightning Data Service wire adapters, @salesforce scoped modules, and Apex controllers.
Flag
Required/Optional
Description
-o, --target-org
Required
The username or alias of the target org for the preview. Starting in Winter ‘26, you have to specify a target org to run a single component preview. This flag is not required if you already set the target-org configuration variable. Example:--target-org myOrg
-n, --name
Optional
The name of the component you want to preview. If your component name has spaces in it, wrap the name in quotes. Example: To run Live Preview for a component named myComponent, run --name "myComponent"
--flags-dir
Optional
Import flag values from a directory.
--json
Optional
Format output as JSON.
Single Component Developer Tools
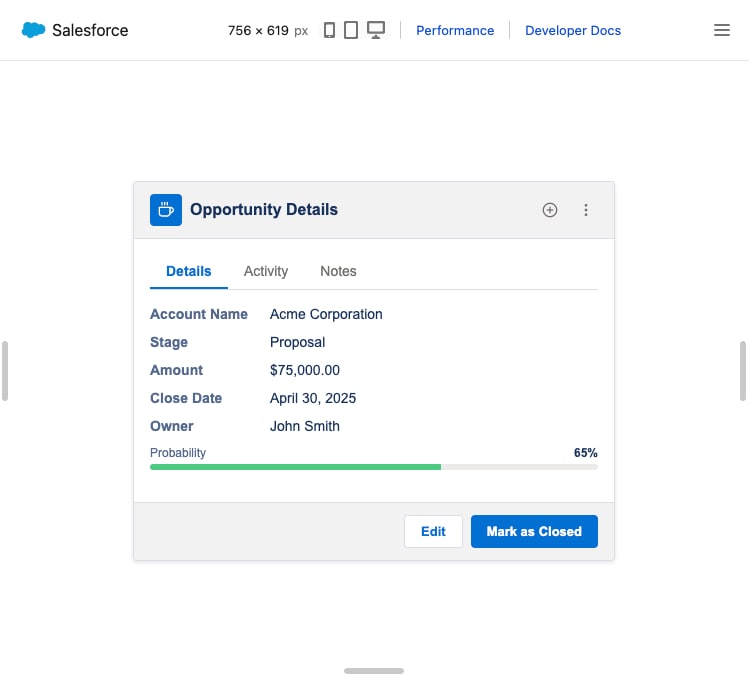
If your command runs successfully, Live Preview automatically opens a new browser tab for the single component preview. Here’s what the single component interface looks like in the browser:
The toolbar at the top of the single component preview page offers the following tools.
Change Component Dimensions: Click a device icon to resize your component to preset dimensions, or drag the resizing bars on three sides of your component to set custom dimensions.
Performance: Toggle Performance Mode to preview your component without page UI elements. To exit Performance Mode, click your browser’s back button.
Project Components: Click the menu icon in the top right to open the Project Components sidebar, which lists components in your project that are available for preview.
Live Preview VS Code Extension
Live Preview lets you run a real-time preview of a Lightning web component or a React component inside a dedicated panel in your VS Code or Code Builder environment. The preview updates automatically when you save local changes, which makes it easy to test component design and behavior without leaving your IDE.
Consider using Live Preview in tandem with Agentforce Vibes, an AI assistant that can help you write, refactor, and test your code. For fast and easy iteration on your components, Agentforce Vibes can directly open components in the Lightning Preview panel when your local changes are complete.
Tip
Preview a Single Lightning Web Component with the VS Code Extension
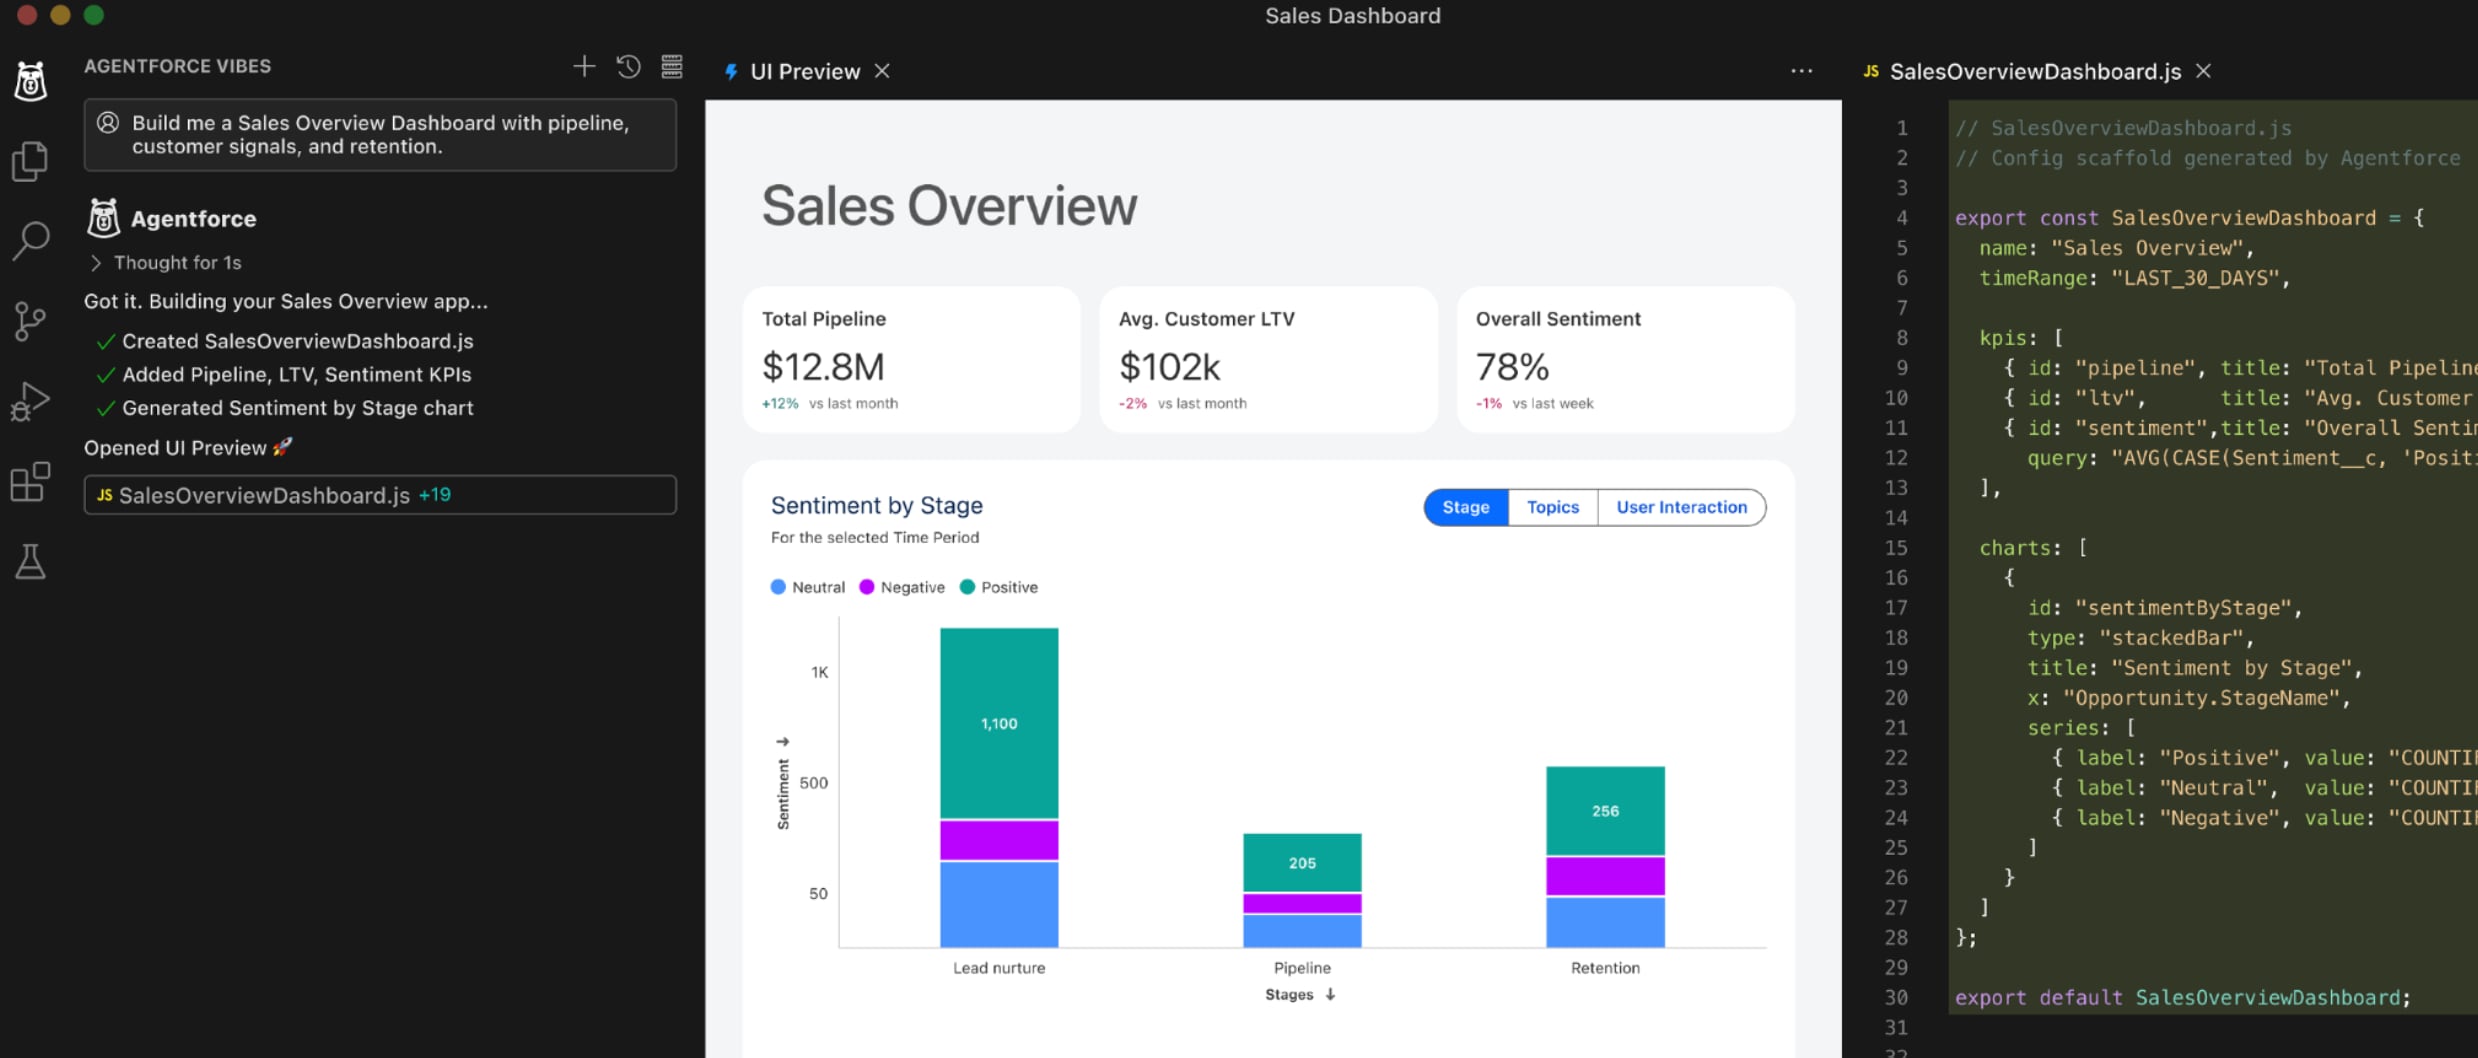
Here’s what the LWC Live Preview extension looks like in action. The UI Preview tab displays a preview of the Sales Overview Dashboard component, which was built using an Agentforce Vibes prompt.
To run a Lightning web component in the Lightning Preview panel, use one of these three methods.
IDE Context Menu
In the VS Code Explorer, right-click a Lightning web component’s directory or any file inside it.
Select SFDX: Open in Lightning Preview.
IDE Command Palette
Open the Command Palette in VS Code, search for SFDX: Open in Lightning Preview, and then select SFDX: Open in Lightning Preview. When prompted, enter or select the name of the component you want to preview.
Agent Integration
If you’re using Agentforce Vibes, you can instruct the agent to preview a component after it’s finished updating your code. The agent automatically opens the component in the Lightning Preview panel.
Preview a Single React Component with the VS Code Extension
Be aware of these guidelines for working with Live Preview.
For Real-Time Preview Updates
When you edit local files with Live Preview enabled, your components automatically reflect only the following changes in your app or site preview:
Automatically Loaded Change
Example
Basic HTML revisions
Changing component attributes, like title="Hello" to title="Goodbye"
New reference to a component
Adding <lightning-button></lightning-button> to your markup
Basic CSS revisions
Changing --slds-c-card-heading-font-weight: 100px; to --slds-c-card-heading-font-weight: 500px;
Importing a new CSS-only component
Adding a cssLibrary component that contains only a CSS file and a configuration file, like in Share CSS Style Rules
JavaScript changes in component methods that don’t affect the component’s public API
Using a new event handler in a template or changing existing event handler logic.
To apply any other local changes to your preview, follow these steps.
For a Lightning app or Experience Cloud LWR site:
Deploy the changes to your org using the project deploy start command.
Restart the Live Preview server to see the updated app or site preview in your browser.
For a component in isolation:
Refresh your browser page.
For example, the following changes do not automatically load in your component preview. To see these changes in your preview, you have to follow the steps for manually loading local changes.
Adding a new @api property or method to a component class
Making changes related to wire adapters, such as configuration updates, importing a new wire adapter, adding @wire to a property, and changing a GraphQL query
Importing new @salesforce scoped modules
Updating your .js-meta.xml file
Revising a service component library
For Adding Component Files
Starting in Spring ‘25, Live Preview detects new or deleted files in your components and automatically updates your preview. For example, if you move shared functions into a component’s Util.js file, your app preview automatically updates to reflect the code you added.
Previously, if you added or deleted a file in an existing component, you had to redeploy the component and restart the Live Preview server to see that change in your preview.
For Modifying Certain File Types
Live Preview automatically updates your preview with most local changes to files ending in .js, .html, and .css. If you edit a component file of any other type — like .js-meta.xml — you have to deploy the component to see those changes in your local preview.
Supported Components
Live Preview only lets you preview Lightning web components. You can’t use it to test Aura components in your app or site preview.
Static Resources
Starting in Spring ‘25, Live Preview no longer saves a copy of your built app or site in your static resources directory. Previously, automatically saved builds counted toward the 250 MB org static resource limit.


 j
j