Manage Content for Site-Wide Regions in Storefront Next with Content Blocks
Manage content consistently across your entire storefront by creating content blocks in site-wide regions, which include headers, the mega menu, and announcement banners. Instead of recreating content that appears across your entire storefront for each individual page, create the content once and apply it everywhere. Maintain brand consistency and save time when updating promotional messages or navigation elements that appear site-wide. Preview your changes directly from Page Designer without switching user interfaces.
Enable Site-Wide Regions for Content Blocks
To enable site-wide regions for content blocks, first turn on a feature switch. If you have a version of Storefront Next template that’s lower than v1.1, update the Storefront Next template to include new fields generate. Finally, deploy the cartridge containing the Page Designer metadata to your B2C Commerce instance.
Use New Fields from the Storefront Next Template
The Site-Wide Regions for Content Blocks feature requires Storefront Next template v1.1 or later, which includes new fields that this feature uses. If you built your storefront with v1.1 or later of the template, your storefront contains the new fields. Otherwise, add the new fields manually.
The new fields are:
embedded: This field indicates whether the header component can contain a content block.
component_id: This field identifies the header and is required for calling the getComponent B2C Commerce API (SCAPI) call to get the embedded content block in a page that’s not in Page Designer—a page that’s not a product detail or listing, about us, or home page. The get Component API endpoint is: GET /experience/shopper-experience/v1/organizations/{organizationId}/components/{componentId}. See Shopper Experience endpoints.
@RegionDefinition([ ]): This decorator enables the addition of a content block inside the header or mega menu.
If you built with a version prior to v1.1 of Storefront Next template, add the new fields manually to the storefront.
In /src/components/header/index.tsx, add the embedded and component_id field to the header and megaMenu components. Also, add the @RegionDefinition decorators below the components, as follows.
1@Component('header', {2 name: 'Header',3 group: 'Layout',4 description: 'Global site header with navigation, search, and cart',5 embedded: true,6 component_id: 'header',7})8@RegionDefinition([{ id: 'announcement', name: 'Announcement' }])910@Component('megaMenu', {11 name: 'Mega Menu',12 group: 'Layout',13 description: 'Site-wide mega menu with per-category dropdown panel content slots',14 embedded: true,15 component_id: 'mega-menu',16 })17 @RegionDefinition([18 // One region per top-level category, keyed by category id via the `region_<id>` convention.19 // Edit this list to match your catalog's top-level category ids. Must stay an array literal —20 // the cartridge generator extracts regions via AST and only handles array-literal arguments.21 { id: 'region_women', name: 'Women' },22 { id: 'region_men', name: 'Men' },23 { id: 'region_kids', name: 'Kids' },24 ])
After you add the new fields, generate the cartridge for the Page Designer metadata. See Generate Cartridges.
Deploy the cartridge to your B2C Commerce instance. See Deploy Cartridges.
Add a Content Block in a Site-Wide Region
Add a content block to site-wide regions in the Content Block Editor. Site-wide regions include the header, the mega menu, and the announcement banner. To create a content block and assign it to a site-wide region:
In Business Manager, click App Launcher and then select Merchant Tools > Your Site > Content > Content Blocks.
Click New to create a content block, and specify a name for the content block.
Select the type of content to include and then click Create.
Set the content block properties, and then click Apply.
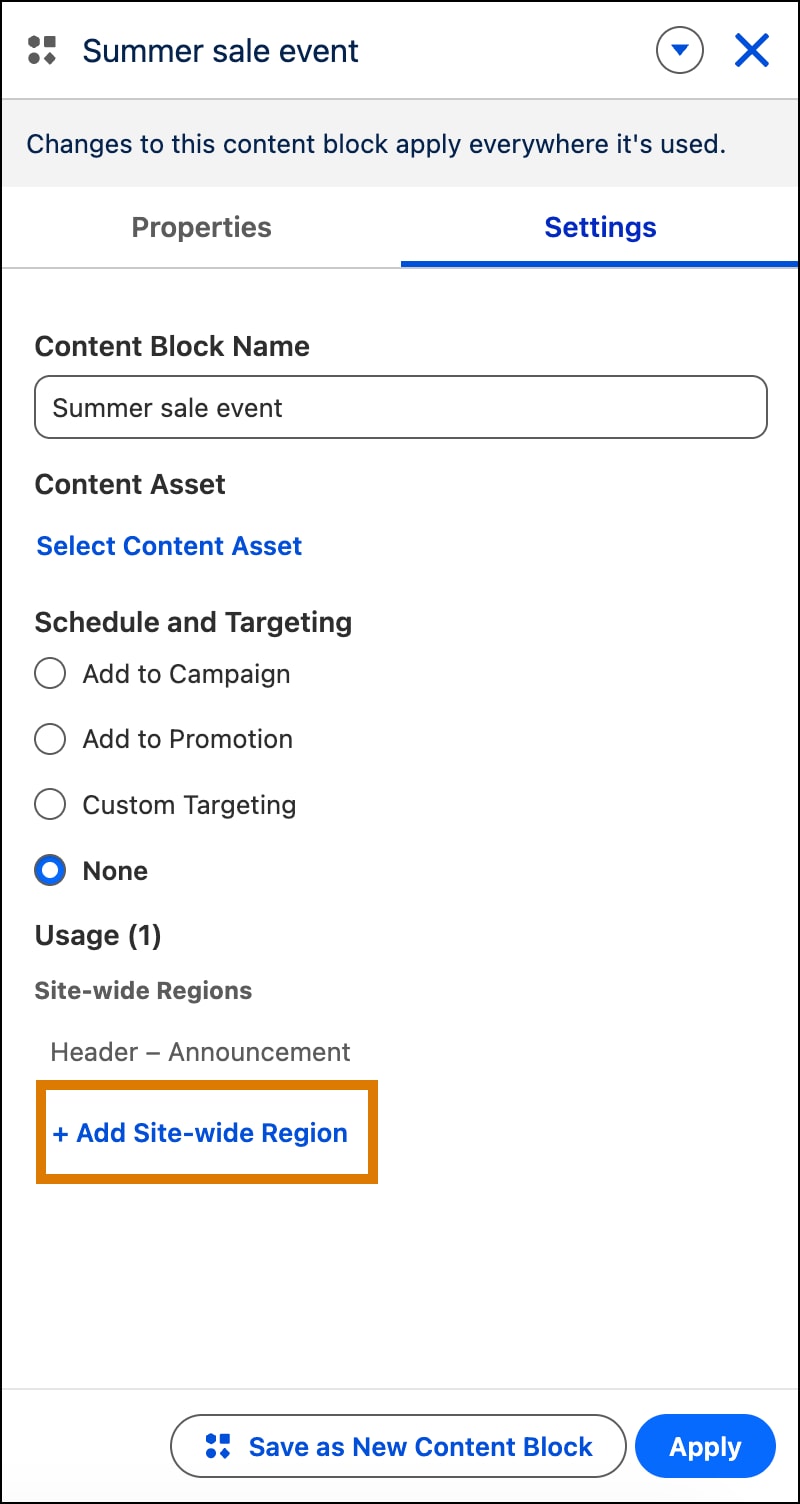
Click Settings, and then click Add Site-Wide Region to assign the content block to a site-wide region, such as a header, a mega menu, or an announcement banner. Based on the component type, you see which site-wide regions are available for assignment.
The content block is now saved and assigned to a site-wide region. If you view the affected page in Page Designer, it shows the content block that you added to the site-wide region embedded in the page’s component.
This example shows a content block for an announcement banner. It contains the Add Site-Wide Region button that provides the site-wide region locations where to place the content block.
The example announcement banner is added to the header. After selecting a site-wide region of “Header – Announcement” for the content block, the announcement banner component is added in the header for all pages.



 j
j