Preserve shopper trust with a tracking consent banner on your Progressive Web App (PWA) Kit site. With the banner, your shoppers can opt in or out of the default activity tracking included in PWA Kit.
This guide explains the default implementation and customization options for the tracking consent banner.
The functionality described in this guide isn’t supported in a hybrid storefront.
Note
Prerequisites
To configure and use the tracking consent banner, build your site with Retail React App version 6.0 or later.
Default Tracking Consent Implementation
Banner UI
The tracking consent banner is available in template-retail-react-app/app/components/_app/index.jsx, so you can display it on any page on your site. The banner is defined in template-retail-react-app/app/hooks/use-dnt-notification.js.
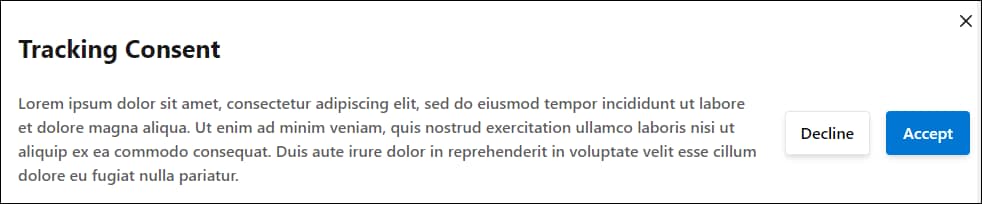
By default, the banner looks similar to this example.
Do Not Track Values
These are the two values that define what the DNT state is set to:
effectiveDnt: Is set to the default DNT state that you configured or is set to false if you didn’t configure a default DNT state. This value is set to false if the shopper consented to tracking or true if the shopper opted out of tracking.
selectedDnt: Is undefined until the shopper interacts with the consent banner. This value is set to false if the shopper consented to tracking or true if the shopper opted out of tracking.
Banner and DNT Workflow
If a shopper closes the banner or doesn’t make a selection in the banner, the default DNT state is set to false (track activity). To change that behavior, see Configure the Default DNT State. The banner reappears the next time the shopper visits your site after they take any of these actions:
Close the browser
Refresh site data
Clear their cookies
The tracking preference is represented by the dw_dnt cookie. The cookie value is 0 if tracking is consented to and 1 if it isn’t. This value is synced with the backend through the DNT claim in the SLAS access token. The use of the SLAS access token is currently the way to pass the DNT preference to SCAPI. For more information about the use of the DNT claim in SLAS and the use of APIs and hooks, see Manage Shopper Tracking Preferences.
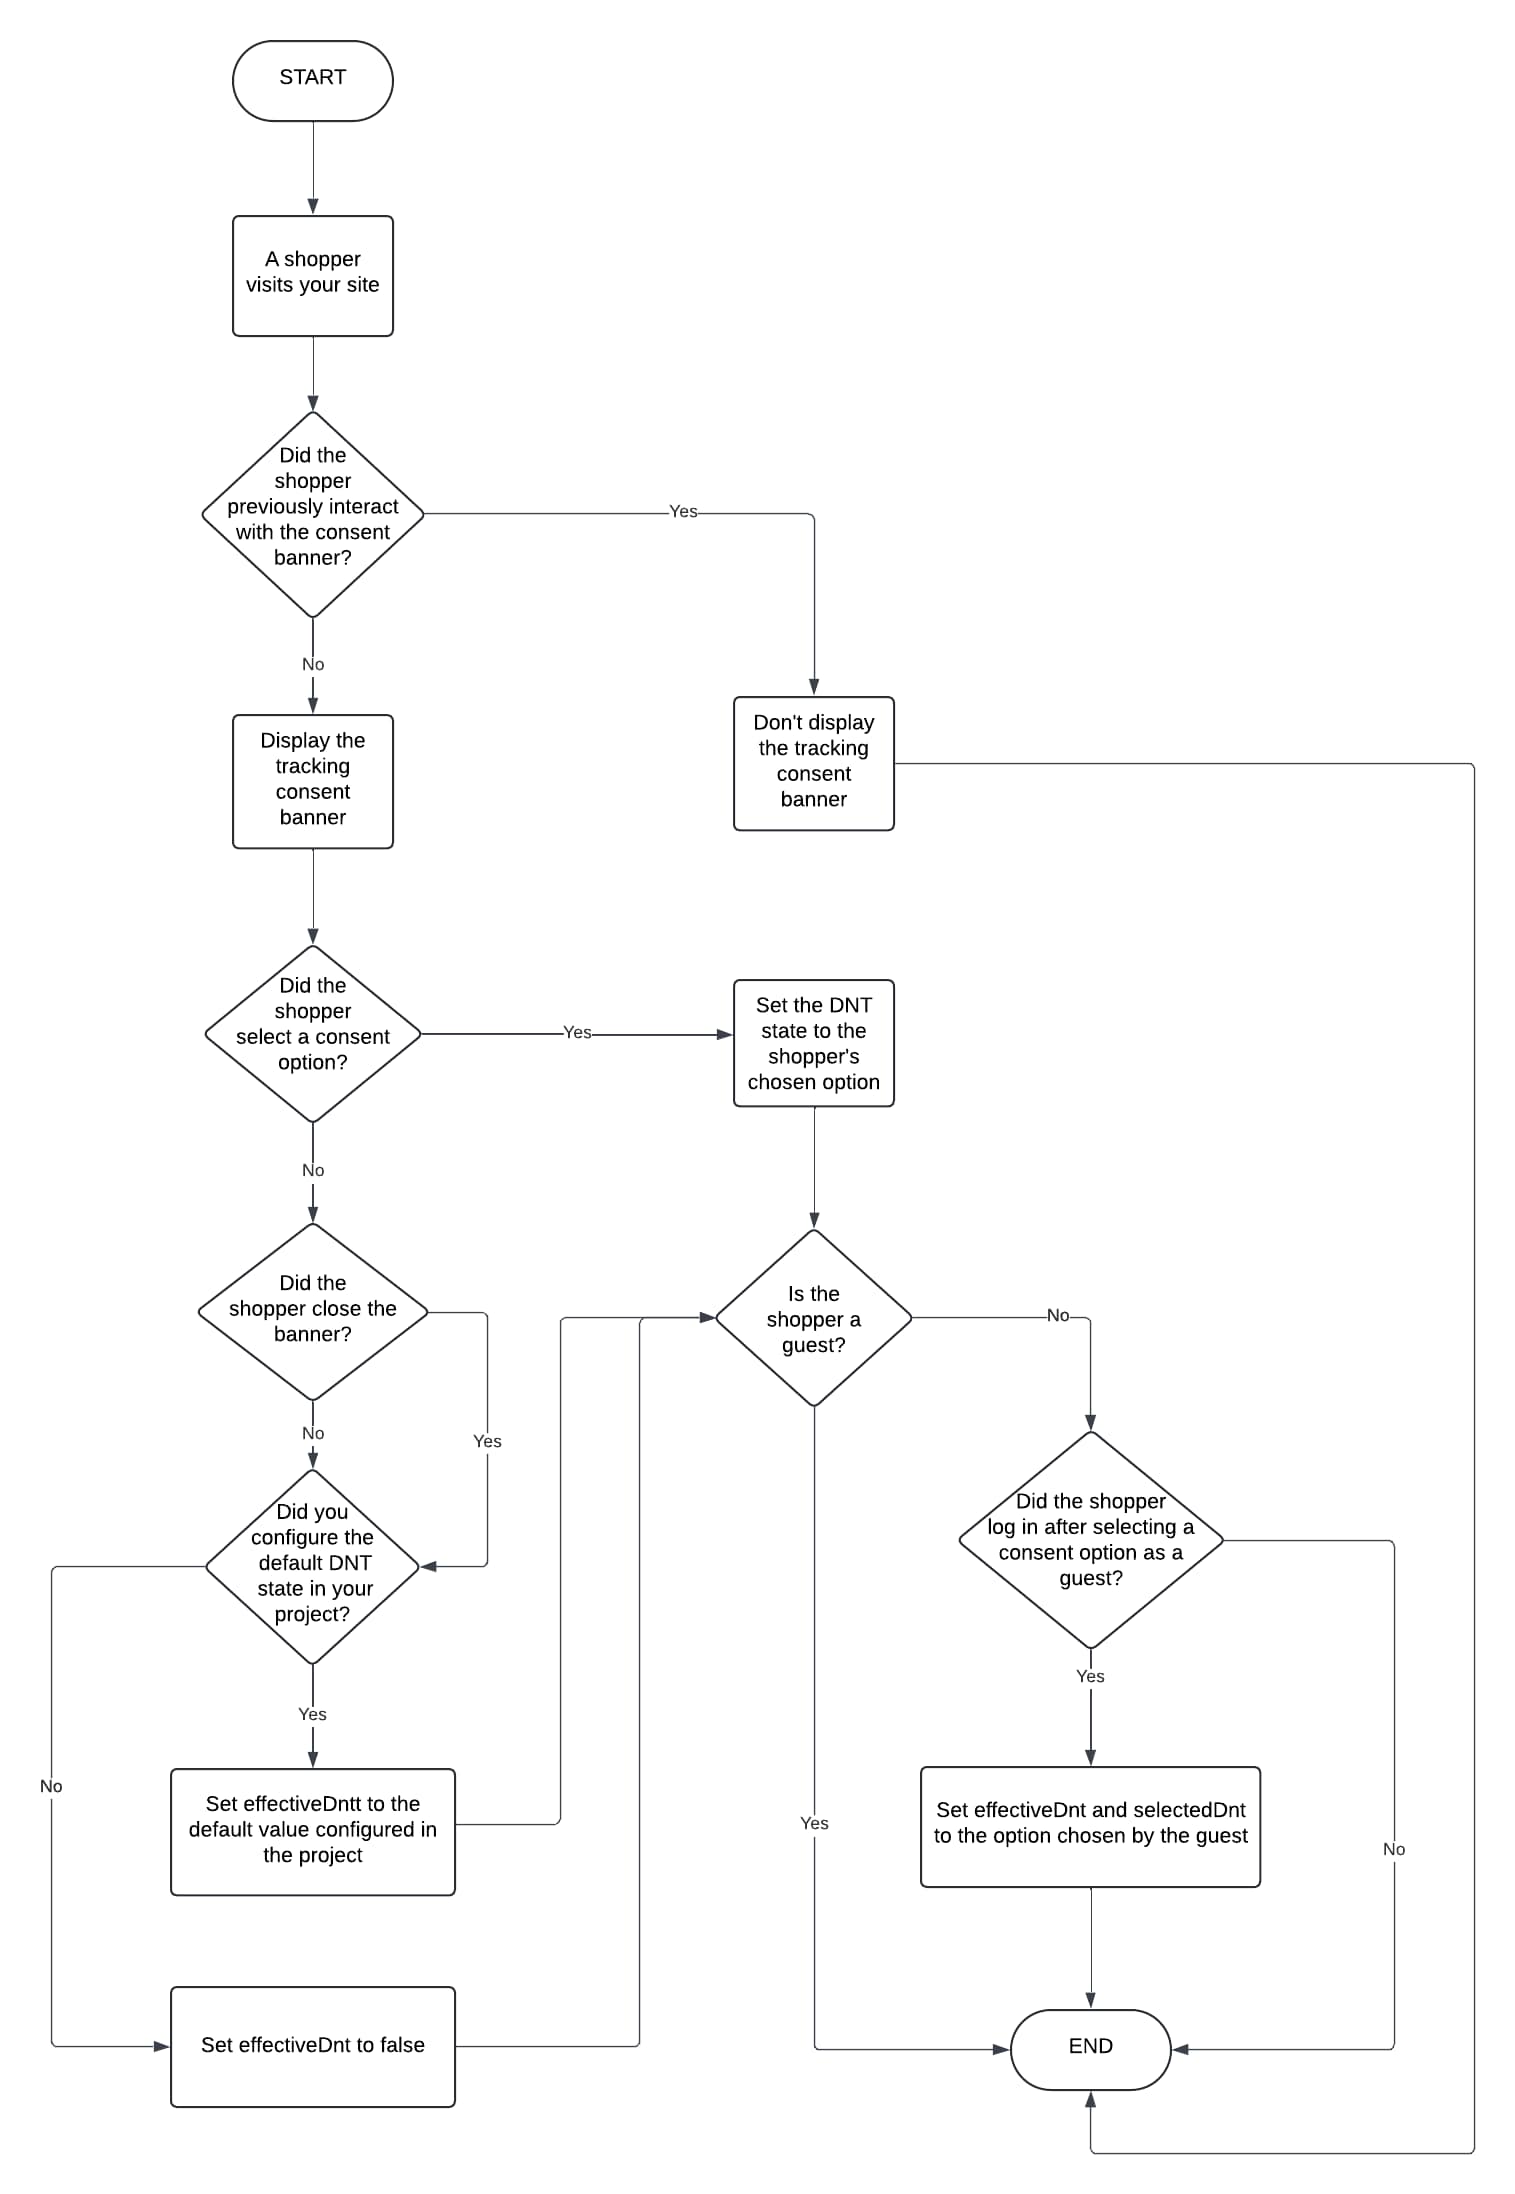
This diagram summarizes the behavior of the tracking consent banner and how shoppers’ DNT state is set when they visit your site. Unless otherwise stated, all of the steps in the diagram apply to both guest shoppers and known shoppers.
Configure the Default DNT State
Optionally, you can specify a default DNT state that applies if a shopper closes the tracking consent banner or doesn’t make a selection in the banner. To do so, set the defaultDNT property in this file in your project: {overridesDir}/app/components/_app-config/index.jsx.
defaultDnt={true}: Indicates that shopper activity isn’t tracked.
defaultDnt={false}: Indicates that shopper activity is tracked.
In this example, defaultDnt is set to false.
1// More code here...23<CommerceApiProvider4 shortCode={commerceApiConfig.parameters.shortCode}5 clientId={commerceApiConfig.parameters.clientId}6 organizationId={commerceApiConfig.parameters.organizationId}7 siteId={locals.site?.id}8 locale={locals.locale?.id}9 currency={locals.locale?.preferredCurrency}10 redirectURI={`${appOrigin}/callback`}11 proxy={`${appOrigin}${commerceApiConfig.proxyPath}`}12 headers={headers}13 // Add your chosen default DNT state.14 defaultDnt={false}15 // Uncomment 'enablePWAKitPrivateClient' to use SLAS private client login flows.16 // Make sure to also enable useSLASPrivateClient in ssr.js when enabling this setting.17 // enablePWAKitPrivateClient={true}18 logger={createLogger({packageName: 'commerce-sdk-react'})}19>20<MultiSiteProvider site={locals.site} locale={locals.locale} buildUrl={locals.buildUrl}>21<ChakraProvider theme={theme}>{children}</ChakraProvider>22</MultiSiteProvider>23<ReactQueryDevtools />24</CommerceApiProvider>2526 // More code here...
Customize the Tracking Consent Banner
Optionally, you can customize the tracking consent banner by changing parts of it such as the appearance or text. Override the banner file in the base template by completing these steps.
If you haven’t done so already, in your PWA Kit project, create a folder called hooks in {overridesDir}/app.
Create a file called use-dnt-notification.js in the hooks folder.
Copy and paste this code into use-dnt-notification.js. In this example, we use selectedDnt to render a customized banner that’s controlled by the DntNotification component. Also, we use the updateDnt function to apply a shopper’s tracking preference as a boolean. See Do Not Track Values.
1import React, {useEffect}from 'react'2import PropTypes from 'prop-types'3import{FormattedMessage, useIntl}from 'react-intl'4import{5 Button,6 Modal,7 ModalContent,8 ModalBody,9 ModalCloseButton,10 useDisclosure,11 Heading,12 Stack,13 Text,14 Flex15}from '@salesforce/retail-react-app/app/components/shared/ui'16import{useDNT}from '@salesforce/commerce-sdk-react'17import{useLocation}from 'react-router-dom'1819export const DntNotification = ({isOpen, onOpen, onClose})=>{20 const{selectedDnt, updateDNT} = useDNT()21 const{formatMessage} = useIntl()22 const location = useLocation()2324 useEffect(()=>{25 if(selectedDnt === undefined){26 onOpen()27}else{28 onClose()29}30}, [location, selectedDnt])3132 const onCloseNotification = ()=>{33 updateDNT(null)34 onClose()35}3637 return(38<Modal39 size="sm"40 data-testid="sf-dnt-notification"41 blockScrollOnMount={false}42 closeOnOverlayClick={false}43 trapFocus={false}44 isOpen={isOpen}45 onOpen={onOpen}46 onClose={onCloseNotification}47>48<ModalContent49 position="fixed"50 bottom="4"51 right="4"52 maxW="400px"53 pointerEvents="all"54 containerProps={{55 pointerEvents: 'none'56}}57 border="2px solid"58>59<ModalCloseButton60 aria-label={formatMessage({61 id: 'dnt_notification.button.assistive_msg.close',62 defaultMessage: 'Close consent tracking form'63})}64 />65<ModalBody pb={8} bg="white" marginTop={4}>66<Heading as="h3" fontSize={25} width="100%" marginBottom={5}>67<FormattedMessage68 defaultMessage="Your Privacy Matters to Us"69 id="dnt_notification.title"70 />71</Heading>72<Flex direction="column">73<Text>74<FormattedMessage75 defaultMessage="We collect data to improve your experience, deliver personalized content or ads, and better understand how our site is used. By selecting 'Accept,' you agree to our use of tracking technologies. "76 id="dnt_notification.description"77 />78</Text>79<Stack direction="column" spacing={4} mt={4} align="flex-end">80<>81<Button82 onClick={()=>{83 updateDNT(true)84 onClose()85}}86 width="100%"87>88<FormattedMessage defaultMessage="Decline" id="dnt_notification.button.decline" />89</Button>90<Button91 onClick={()=>{92 updateDNT(false)93 onClose()94}}95 width="100%"96>97<FormattedMessage defaultMessage="Accept" id="dnt_notification.button.accept" />98</Button>99</>100</Stack>101</Flex>102</ModalBody>103</ModalContent>104</Modal>105)106}107108DntNotification.propTypes = {109 isOpen: PropTypes.bool.isRequired,110 onOpen: PropTypes.func.isRequired,111 onClose: PropTypes.func.isRequired112}113114/**115 *116 * @returns{Object} - Object props to be passed into the DntNotification component117 */118export const useDntNotification = ()=>{119 const{isOpen, onOpen, onClose} = useDisclosure()120121 return{122 isOpen,123 onOpen,124 onClose125}126}
If you overrode the app/components/_app/index.jsx file in your PWA Kit project, utilize the useDntNotification hook to display your customized tracking consent banner.
1import{2 DntNotification,3 useDntNotification4}from '{overridesDir}/app/hooks/use-dnt-notification'56const App = (props)=>{7 ...8 const dntNotification = useDntNotification()9 ...1011 return(12 ...13 // Put the consent tracking banner in your chosen location in your code by adding the dntNotification component.14<DntNotification{...dntNotification} />15 ...16)17}
Suppress Tracking Based on DNT State
Optionally, you can add code in your PWA Kit project to trigger or prevent actions based on a shopper’s tracking preference or your default DNT state.
Use effectiveDnt to trigger or prevent actions such as API calls. For example, API calls to access Google Analytics. See Do Not Track Values.
In this example, we use effectiveDnt to trigger an analytics API call with the goal of gathering data based on a shopper’s interactions with a site. The data can provide insights about factors such as shopper behavior, website traffic, or sales performance.
If a shopper opts out of tracking (the DNT state is set to true) or the DNT state isn’t set:
Einstein events are suppressed. This means that a shopper’s activity on your site isn’t included in Reports & Dashboards.
Active Data metrics are collected if you enabled the feature as described in Active Data. However, all shopper data is anonymized.
PWA Kit overrides any default tracking configuration that you set under privacy preferences in Business Manager. Your PWA Kit site applies either of these configurations:
PWA Kit: The default or custom tracking configuration described in this guide.
Shopper Login and API Access Service(SLAS): If you customized the tracking consent banner using SLAS, your site applies the tracking configuration described in Manage Shopper Tracking Preferences.
Troubleshoot Tracking Consent
This section provides a suggested solution for a common error that you can encounter while using the tracking consent banner.
Banner Doesn’t Appear or Behavior is Unexpected
Cause: CSS or JavaScript issues can hamper functionality or cause the banner to display incorrectly or not at all on certain devices or browsers.
Suggested Solution: Test the banner in multiple browsers and devices to ensure consistent functionality. Pay particular attention to browsers with stricter cookie policies (for example, Safari’s Intelligent Tracking Prevention). Test different screen sizes and resolutions to ensure that the banner is responsive and user-friendly. Confirm that the banner doesn’t interfere with any site functionality or shopper interactions.


 j
j