Add Custom Fonts
You can add custom fonts by uploading the font file as a static resource. Alternatively, you can reference a file that’s hosted externally.
To upload your custom font as a static resource and reference it within the head markup:
-
In Setup, in the Quick Find box, enter
Static Resources, and then select Static Resources. -
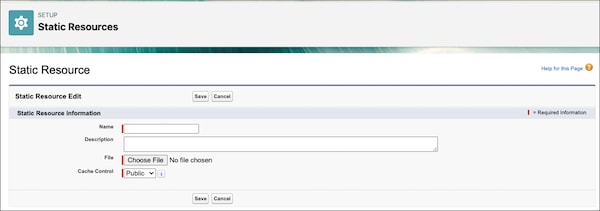
Click New, upload the file, and give the static resource a name. Keep a note of the resource name. If your site has public pages, select Public in the Cache Control setting. If you don’t make the font resource publicly available, the page uses the browser’s default font instead.
-
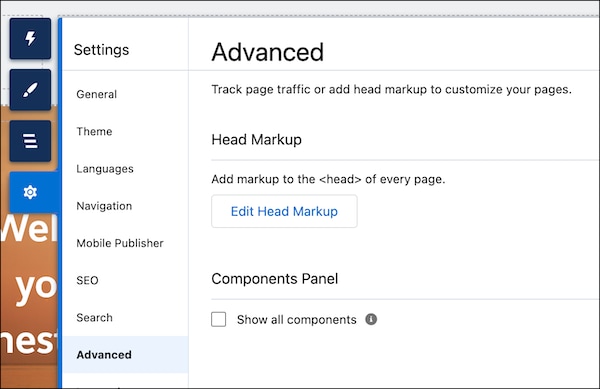
To add a reference to the font in your site’s head markup, return to Experience Builder, and click Settings | Advanced | Edit Head Markup.
-
Insert the
@font-facedeclaration. For example:Salesforce automatically replaces the
`{ basePath }`variable is with your site’s base URL path at run time. For example:If your site URL is
`https://mycompany.force.com/customerportal`, then `{ basePath }`resolves to`/customerportal`.The full font URL becomes:
`https://mycompany.force.com/customerportal/sfsites/c/resource/MyFonts`.Always use
`{ basePath }`(with the curly braces and spaces) exactly as shown in the examples. Don’t replace it with your site path.-
To reference a single font file, use the syntax
{ basePath }/sfsites/c/resource/STATIC_RESOURCE_NAME.For example, if you upload a font file called
myFirstFont.woffand name the resource MyFonts, the URL is{ basePath }/sfsites/c/resource/MyFonts.Where
STATIC_RESOURCE_NAMEis a variable. -
To reference a font file within a .zip file, include the folder structure, but omit the .zip file name. Use the syntax
{ basePath }/sfsites/c/resource/STATIC_RESOURCE_NAME/FONT_FOLDER/FONT_FILE.For example, if you upload a file called
fonts.zip, which containsbold/myFirstFont.woff, and you name the resource MyFonts, the URL is{ basePath }/sfsites/c/resource/MyFonts/bold/myFirstFont.woff.Where
STATIC_RESOURCE_NAME,FONT_FOLDER, andFONT_FILEare variables.
-
-
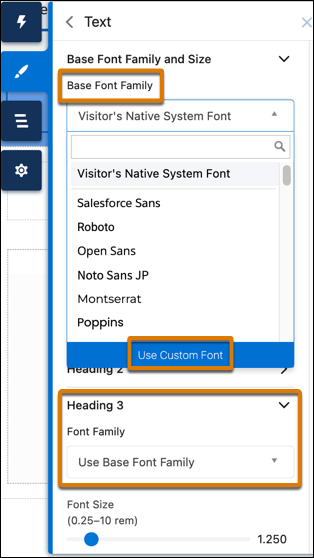
In the Text section of the Theme panel, click the Base Font Family dropdown list or the Font Family dropdown list for a specific text property, and select Use Custom Font.
-
Add the font family name that you entered in the Head Markup editor—for example,
myFirstFont—and save your changes.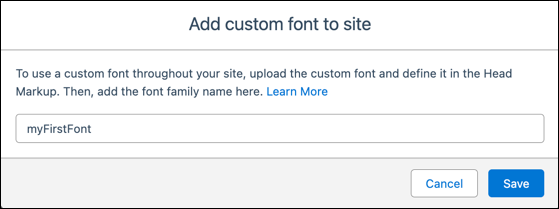
LWR sites support WOFF2 (`.woff2`), WOFF (`.woff`), TrueType (`.ttf`), and OpenType (`.otf`).
Make sure that the font file format, for example, woff, matches your markup. Also make sure that your fallback values, such as Helvetica and sans-serif, are properly defined for your brand. To learn more, see @font-face.
When you upload a font as a Static Resource, declare it in Head Markup, and apply it in the Theme panel, use the following pattern:
<style> @font-face { font-family: 'YourFontName'; src: url('{ basePath }/sfsites/c/resource/YourStaticResourceName') format('woff2'); font-weight: 400; }</style>
If you have multiple font weights from a zip file, use the following pattern:
<style> @font-face { font-family: 'BrandFont'; src: url('{ basePath }/sfsites/c/resource/CustomFonts/Regular.woff2') format('woff2'); font-weight: 400; } @font-face { font-family: 'BrandFont'; src: url('{ basePath }/sfsites/c/resource/CustomFonts/Bold.woff2') format('woff2'); font-weight: 700; }</style>
Then enter: BrandFont, Arial, sans-serif. Don’t forget to set Cache Control to Public for unauthenticated guest user access and always include fallback fonts.
You can use fonts hosted outside Salesforce, such as Google Fonts. To access externally hosted files, update the Content Security Policy (CSP) for your org by adding the hosts to your list of trusted URLs. Otherwise, an error appears indicating that you don’t have access to the resource.
For example, for Google Fonts, add:
https://fonts.googleapis.comto access the Google Fonts style sheethttps://fonts.gstatic.comto access fonts from Google Font
For details on how to add a Trusted URL with the required CSP directives, see Manage Trusted URLs.